7,500+ items available from stock
Best price guarantee
Your partner for astronomy

New Products

Posts Tagged 'omegon telescope-accessories'

Radiant LED finder: Now with an exclusive bonus to help find objects more easily

February 21 2020, Marcus Schenk

It should be easy, but sometimes it really is exasperating. How am I supposed to find a galaxy, a nebula in the sky, when there are hardly any reference points?

Radiant Sucher mit Telrad Kreisen

The solution: the Radiant finder. With three circles in divisions of a half, two and four degrees, you use a two-dimensional search device; this offers an invaluable advantage over a simple LED finder with a projected dot. Indeed, astronomers who started with point-finders have often needed years to develop the necessary system or routine so that they could find something easily.

The idea of easily finding objects differs fundamentally from actual practice, but why is this?

Well, because at the beginning, you still need some practice to transfer that which you see on the star chart to the sky. For example, how do I find the famous Owl Nebula M97? How can I visualise that in the sky?


Astro Lineal für Radiant Sucher

Now there is a helpful solution to this: The Radiant Special Lineal
This makes it easier to find objects in the sky. You just place the transparent tool onto your star atlas and you can then find out how far, and in which directions, you need to move the circles in the sky. For example, place the centre of the circle on the lower-right star, Merak in the Big Dipper. Point roughly towards the 3.6 mag bright star, x UMa, and move Merak to the edge of the outer circle – M97 will already be in the centre. You can then do the same with your telescope in the evening.

It is like painting by numbers in the sky!

BONUS: Exclusively for Radiant purchasers
From now on, when you purchase a Radiant finder, you will also be given the special lineal with Radiant circles. This helpful tool is not available separately, you can only get it as a free bonus when you buy a Radiant finder.

Would you like to be able to find objects more easily? You can find the Radiant Finder with an Astro Lineal here!


Focusers: This is how you optimise your telescope on the accessories side

June 19 2017, Marcus Schenk

A focuser is most likely the component, that is used most frequently and intensively on a telescope. How often do you plug in eyepieces, adapters and cameras? Yes, a focuser has to cope with quite a lot. But is it of sufficient quality? Many telescopes are designed for a very reasonable price – this can then be noticed on the focuser. Optimising the focuser has a tremendous effect at this point.

Having a good look at your current focuser quickly reveals whether you can achieve even better results with your telescope.

An interesting question: What is the purpose of a high-quality, accurately moving focuser? What should it be able to do?

omegon-focuser-blog-astroshop

Five arguments for a good focuser

A focuser should

… be free of play.
You probably know this? You turn the focuser wheel, but the mechanical system rotates without any effect. And all of a sudden, it starts to move. On the one hand this is annoying, on the other hand it gives you the feeling of working with low-quality material.

…be free of any shifting.
You turn the focuser wheel, but Jupiter performs a rain dance and is jumping about in the eyepiece. Even worse in a camera. The object may even jump out of the field of view. Diagnosis: Shifting. This should be remedied as quickly as possible by using a good focuser.

…not bend when a camera is connected.
Unstable focusers sometimes lead to fatal results for your astro photographs. If the focuser tube bends, a photo may be sharp in one corner, but blurred in the other. Now, who wants such a result after an otherwise successful photo session. Further down, you find a list with a load capacity that specifies the maximum camera load, which should help to avoid such problems.

…have an accurate, fine focus adjustment.
Anyone enthusiastic about astro photography knows: Focusing the camera on an object in the sky is a challenge. This is much easier with a smooth running focuser or a 1:10 dual reduction. This allows you to adjust the focus in the range of tenths of a millimetre. This all to find the exact sharpness.

…not slip when using heavy accessories.
A heavy eyepiece may have a weight of up to 1 kg, camera equipment may even be heavier. In this case, it is an advantage to have a focuser that does not slip under a heavy weight.

Our product range includes some Omegon focusers, with which you can easily optimise your telescope and enhance its performance. For even more fun when star gazing. Especially the Omegon products of the series V-Power, Omegon Pro and the Omegon Hybrid Caryford Dual Speed are dedicated for these five wishes and fulfil them with high precision. The mentioned Omegon Hybrid Caryford Dual Speed has even been designed with a very low construction height. On very fast Newton systems, with e.g. f/5, one can reduce the vignetting and enhance the illumination.

You surely want to know whether the focuser matches your telescope. How high is the backfocus? What are the adapter measurements? How high is the load capacity of the focuser? This new list provides all information at a glance. You can immediately see, which focuser would suit you best.

Omegon_Focuser_Table

New: Omegon Oberon eyepieces with 82° field of view

May 23 2017, Marcus Schenk

The new Omegon Oberon eyepieces have an 82° field of view and thus provide you with an outstanding free and open view. Apart from this, they are waterproof and filled with nitrogen. At less than 200 Euros they have a remarkably reasonable price tag and are affordable for almost every hobby astronomer.

Die Omegon Oberon Okulare mit 82° Gesichtsfeld

Waterproof and filled with nitrogen

You surely know the situation when eyepieces lose their shine. When dirt, pollen and the grease from your eyelids cover the eye lenses. This is normally the point at which eyepieces should be cleaned. But this is not as simple as it sounds, because lenses need to be cleaned with great care and using optical cleansing agents.  Omegon eyepieces make it incredibly easy.

Simply flush the eyepiece off under running water. And your eyepieces gleam like on the first day.

The benefits of a large field of view

Wide-angle eyepieces are the dream of any stargazer. In contrast to the standard eyepieces with a 45° or 50° field of view, large-field eyepieces give you the impression of floating through outer space. Above 70° the eye does not perceive the outer edge of the eyepiece, and a starry sky appears almost endless. The Oberon eyepieces with 82° fulfil this task even better, because here the eye can even move within the field of view.

The Oberon eyepiece series consists of six eyepieces with focal lengths of 7 mm, 10 mm, 15 mm, 19 mm, 23 mm and 32 mm. The three small focal lengths are available in 1.25″, the three long focal lengths in 2″. Any star gazer knows that sometimes it is quite difficult to find an object. A 32 mm Oberon eyepiece like this makes things a lot easier: A small magnification coupled with an 82° field of view makes the big Oberon a perfect finder eyepiece.

But also a 7 mm eyepiece with 82° has clear advantages: Viewing the surface of the Moon with a high magnification while still seeing large areas of the lunar landscape – it is just amazing.

The advantages of Oberon eyepieces at a glance:

•    Enduring: waterproof and filled with nitrogen – to protect against moisture and for a long service life
•    82° field of view: giant field of view, almost without limitation
•    Goof grip: serrated rubber armouring
•    Upscale design: anodised aluminium housing

Come this way: You can find further details on the product pages for the new Oberon eyepieces.

Lunar photography with a smartphone: the Omegon Easypic smartphone adapter

April 27 2017, Marcus Schenk

In the past, taking a photo of the Moon required quite some effort. Take the pictures, develop the film and hope for sharp images. And then came the disappointment if the Moon appeared blurred. This became considerably easier with digital and mobile phone cameras.

In the meantime, smartphone cameras have reached an outstanding level of quality. Which is a good tool for Moon photos, provided that we can tightly mount the phone to the telescope.

Let’s have a look to see how everyone can take a photo of the Moon through a telescope.

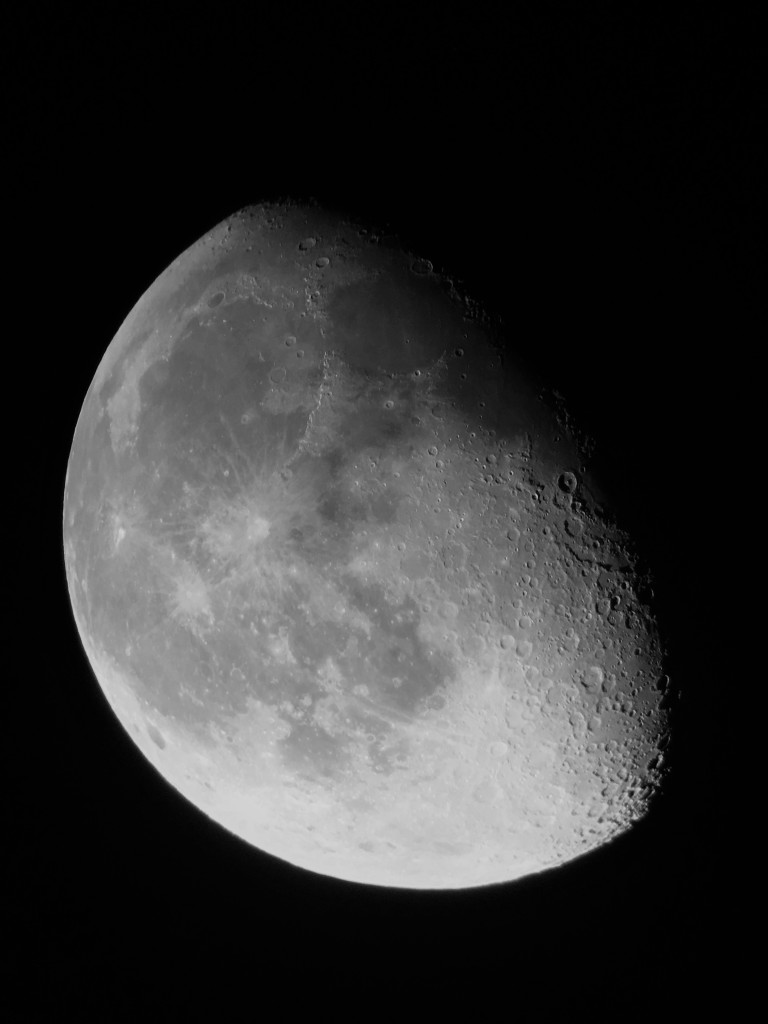
The Moon – shot with an Easypic adapter, an Omegon 8″ Dobson with Redline eyepiece and an iPhone.

Der Mond - aufgenommen mit einem Easypic Adapter, einem Omegon 8" Dobson und einem iPhone.

The difference to other adapters

The Easypic universal smartphone adapter follows a different route to his competitors. Most adapters have a clip that closes around a 1.25 inch eyepiece. The mobile phone is then separately held by a clamp and needs to be correctly positioned above the eyepiece. In itself this is a quite good system but needs quite a lot of experience on the part of the photographer. And in the end, everything must sit tightly in place.

Now the night is not always the right place for patience. And it is pitch black!

Is there no easier way? Yes, sure there is! With self-centring.

Here is how to prepare the adapter

With the Moon in the sky, you direct your telescope to Earth’s satellite. It is already nicely visible through the eyepiece. Now your smartphone and the Easypic adapter are going to play their role.

On the back of the adapter, loosen the small screw for the holding clamps. Pull the holding clamps fully to the outside. Then place your mobile phone with its camera lens directly over the central hole. Slide the holding clamps back against your phone and tighten the screw again. Check that the clamps fit tightly so that your mobile will not come loose.

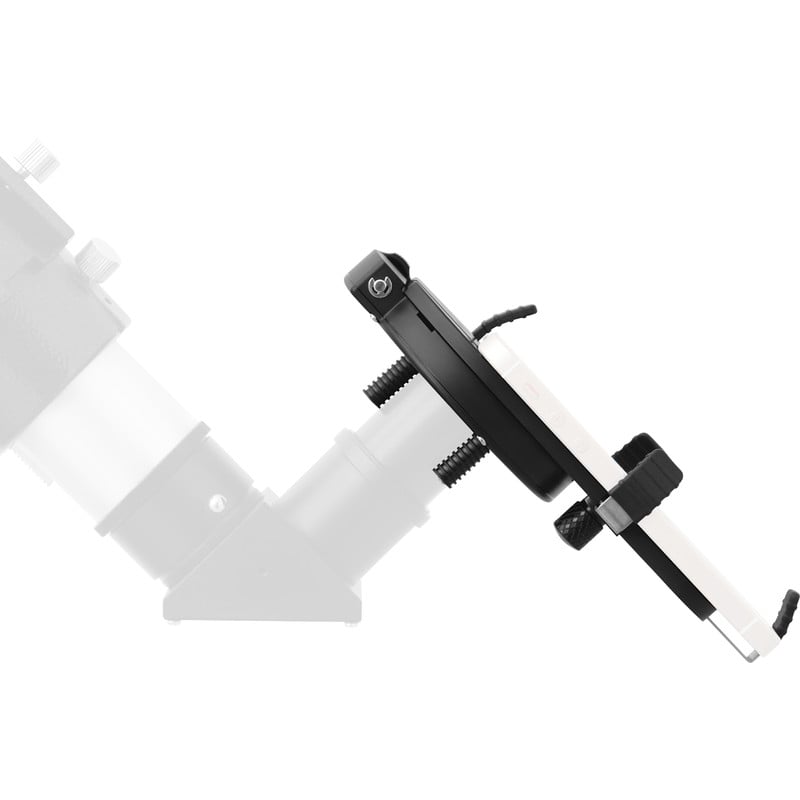
Here is how to connect the adapter to the eyepiece

Now to the easy part! Hold the adapter with the smartphone to the eyepiece, making sure it has direct contact. Then turn the big screw on the side. This allows the movement of three bolts, which accurately clamp around the eyepiece at the same time. This way the adapter centres and fastens automatically around your eyepiece. The camera lens of the smartphone is perfectly aligned with the middle of the eyepiece.

For you this self-centring means: more focus on your object and less worry with technical details.

All done.

So sieht es aus: Das Smartphone am Teleskop und der Mond im Zentrum.

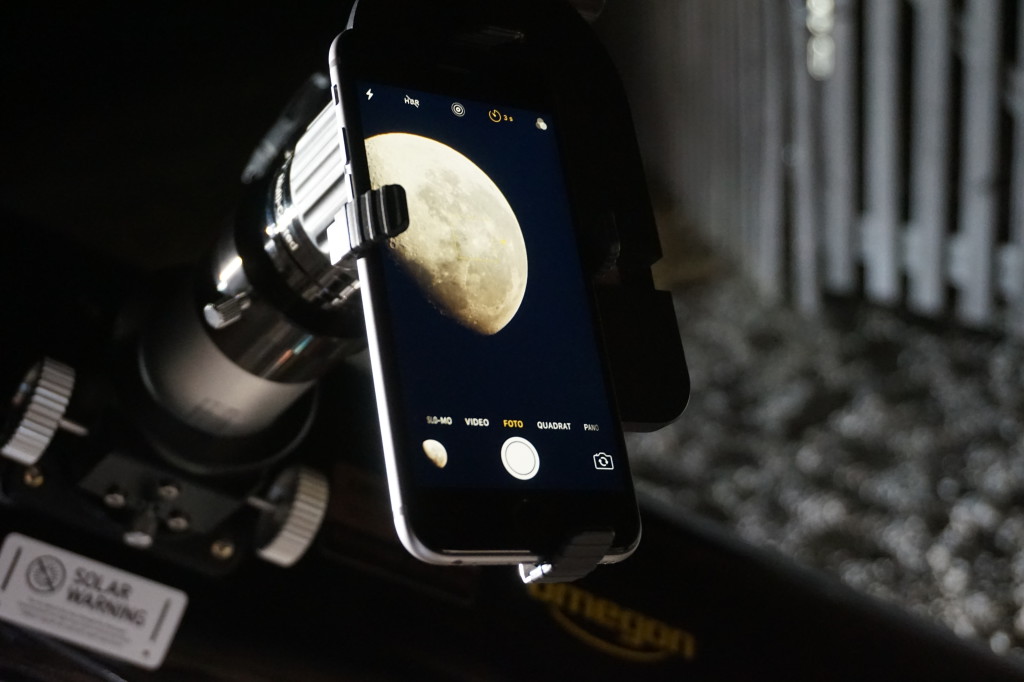
The photoshoot: The Moon in your smartphone

If your camera app has been switched on, you should now see the Moon in your display. Correct the focus once again and everything is ready for taking the photo.

These steps are necessary:
•    Switch off the flash
•    Activate the timer
•    Adapt the exposure time, if necessary and possible

Now press the trigger as usual and take a photo. This image of the Moon was taken with an Easypic universal smartphone adapter and an Omegon 8 inch Dobson telescope.

Using neutral density filters to reduce brightness

In most cases adjusting the correct exposure time is enough for successful Moon images. However, planets like Venus or Jupiter very often appear too bright in an image. They are over-exposed. The planet discs appear burned out. The solution: neutral density filters and variable polarising filters. This is our trick to be able to show the details of the planets.

Conclusion:

A smartphone in combination with an Easypic universal smartphone adapter allows you to take quick photos of the Moon and planets. You don’t have to be an expert: even connecting to the eyepiece is child’s play. All you need to do is position the adapter correctly. The smartphone takes photos of the Moon with outstanding sharpness. A fact that all of us could only dream about a few years ago.

Omegon Mini-Guidescope: Small Guidescopes for better astro photos

January 23 2017, Marcus Schenk

Times are changing: Everything is getting smaller. Also in photography! In the past one solely had to handle large and long Guidescopes in astro photography. The assembly of such equipment often was very inconvenient. With the new Omegon Mini Guidescopes tracking is considerably easier.

Finder and Guidescope: The 60 mm Omegon Microspeed Guidescope mounted on a telescope.

“A Guidescope is a telescope, which is mounted parallel on the main instrument. While the camera is mounted to the main telescope, the Guidescope is responsible for accurate tracking.”

Presentation: Guidescope types 50 and 60 from Omegon.

The Omegon Mini-Guidescopes are available with 50 mm and 60 mm diameter. They are only 200 mm and 260 mm long and with 600 and 900 gram they are almost as light as a 2″ eyepiece. What are the benefits when compared with “conventional” Guidescopes?

  • Lighter: Your telescope will not be overloaded. Even smaller telescopes will be suitable for astro photography.
    Simpler: Simply plug the Guidescope into the finder shoe. It is also simple to remove.
    Better focussing: Sensitive focussing with the helical focuser.

For further details please refer to the product pages for the 50 mm and 60 mm Mini-Guidescopes.

Autoguider and Guidescope: Are they an effective team?

This question can be answered with a clear: “Yes”. The Guidescope works optimally with an Autoguider. Why? Most modern Autoguiders have small pixels. This comes with a clear advantage: A shorter focal length of the Guidescope. Touptek Autoguiders, for instance, have such small pixels. Main feature: Due to the new sensor design these cameras are highly sensitive. This enables you to find,the right guide star for any object.

“With the Guidescope and my camera I always find a guide start in the field of view” says Bodo Fischer, astro photographer and user of the Guidescope.

The Guidescope with a Touptek camera

Which camera is suitable for Microspeed Guidescopes? Our recommendation: Touptek “GCMOS01200KPA” cameras. Highly suitable due to the high image rate of 30 images per second, a ST-4 Autoguider port for your mount and an image processing software.

The best combinations:

  1. Microspeed Guidescope 50 mm + ToupTek GCMOS01200KPA Mono Guider
  2. Microspeed Guidescope 60 mm + ToupTek GCMOS01200KPA Mono Guider

Tip: With the camera use a Omegon UV-IR-filter or the Baader Semi APO filter. For even more brilliant stars and even more success in Autoguiding.

Omegon V-Power: toughened focusers for better astro photos

November 28 2016, Marcus Schenk

Taking astro photos means facing many challenges. One of these are sharp astro photos. It is not easy to focus on weakly glowing stars and nebulae during the night. A perfectly tracked astro photo, but blurred? Inconceivable!

However, the perfect solution for this is now available: the new Omegon V-Power focusers. Making sure that your astro photo does not end up in drama, but as a story with a happy end.

Nur echt mit dem V: Der V-Power High-End-Okularauszug

What makes the V-Power focusers so distinct?

Important parts of the V-Power focuser are made of stainless steel instead of soft aluminium. Robust V2A ball bearings and stainless steel rings ensure high precision focusing. A dual speed 1:10 reduction provides the basis for a sensitively focusedastro photo, and the laser engraving allows you to return to previous settings very quickly. And if you have planned the future use of a motorized control, this is also possible.

With the V-Power finder base you can now also connect your finder scope. Simply attach the base to the focuser – and you are ready to go!

With these sets you can simply connect the focuser to your telescope

The V-Power series is available in different versions: for Newton and Schmidt-Cassegrain telescopes. A plug & play solution is available in a set with matching adapters. Easy focusing in just a few steps.

You want to learn more? Follow this link to the focuser for better astro photos.