

Photographic evidence of exoplanets
Photometric light curves can document the transits of extrasolar planets. Here you can read the instructions on how to make this possible.
 ESO/L. Calçada artists
How to observe transit planets’ light curves.
Planetary photography does not have to stop at the borders of our solar system. Over the last 20 years, the search for worlds circling other suns has led to the discovery of several thousand extrasolar planets. Some of these exoplanets can even be relatively easily detected photographically with the average amateur telescope.
The so-called transit method is a suitable way for amateurs to detect exoplanets: if, before the exoplanet passes in front of a particular star, a camera attached to a telescope is used to continuously record the brightness of the star, then a later analysis of the data will reveal a reduction in the star’s light curve as a result of the exoplanet's transit in front of the star. At the end of the transit, the brightness then increases again.
The right equipment
Often, the equipment used for photographing the planets of our solar system can also be used for the photographic detection of exoplanets. Schmidt-Cassegrain telescopes with 200mm to 400mm apertures are useful for detecting exoplanets, as these telescopes not only offer a large aperture, but also because they are usually operated using a fork mount, this means that the benefits of this type of mount can be taken advantage of. Observing an exoplanet transit is best when the star is at its maximum possible altitude above the horizon, and it usually takes several hours. If you’re using your telescope with an equatorial mount, you will usually need to swap the position of the telescope on the mount at some point, which will also mean you need to realign the telescope, maybe also realign the camera, and restart the guider. This is not only an annoying interruption, but usually also means that you miss a few minutes of data during the transit. With a SC telescope attached to a fork mount on a polar wedge, you have the advantage that the transit can be observed seamlessly without interruption.
The aperture of the telescope you use naturally has an influence on the number of observable exoplanets. Using a classic SC telescope with a 200mm aperture, you should be able to detect the transit of some of the well-known exoplanets associated with stars up to magnitude 12 to 14. The greater the variation in brightness caused by the transiting planet, the easier the detection will be. Transits of fainter stars require larger telescope apertures. Auto-guiding for the mount is essential during a transit to ensure that the star being observed is held on the CCD camera chip during the entire observation period - which can last several hours.
The camera you use should always be a cooled CCD camera. When it comes to the size of the camera chip sensor, it is useful if additional, equally bright, stars can be captured in the field of view together with the transit star, as these are later useful as reference stars when evaluating the image.
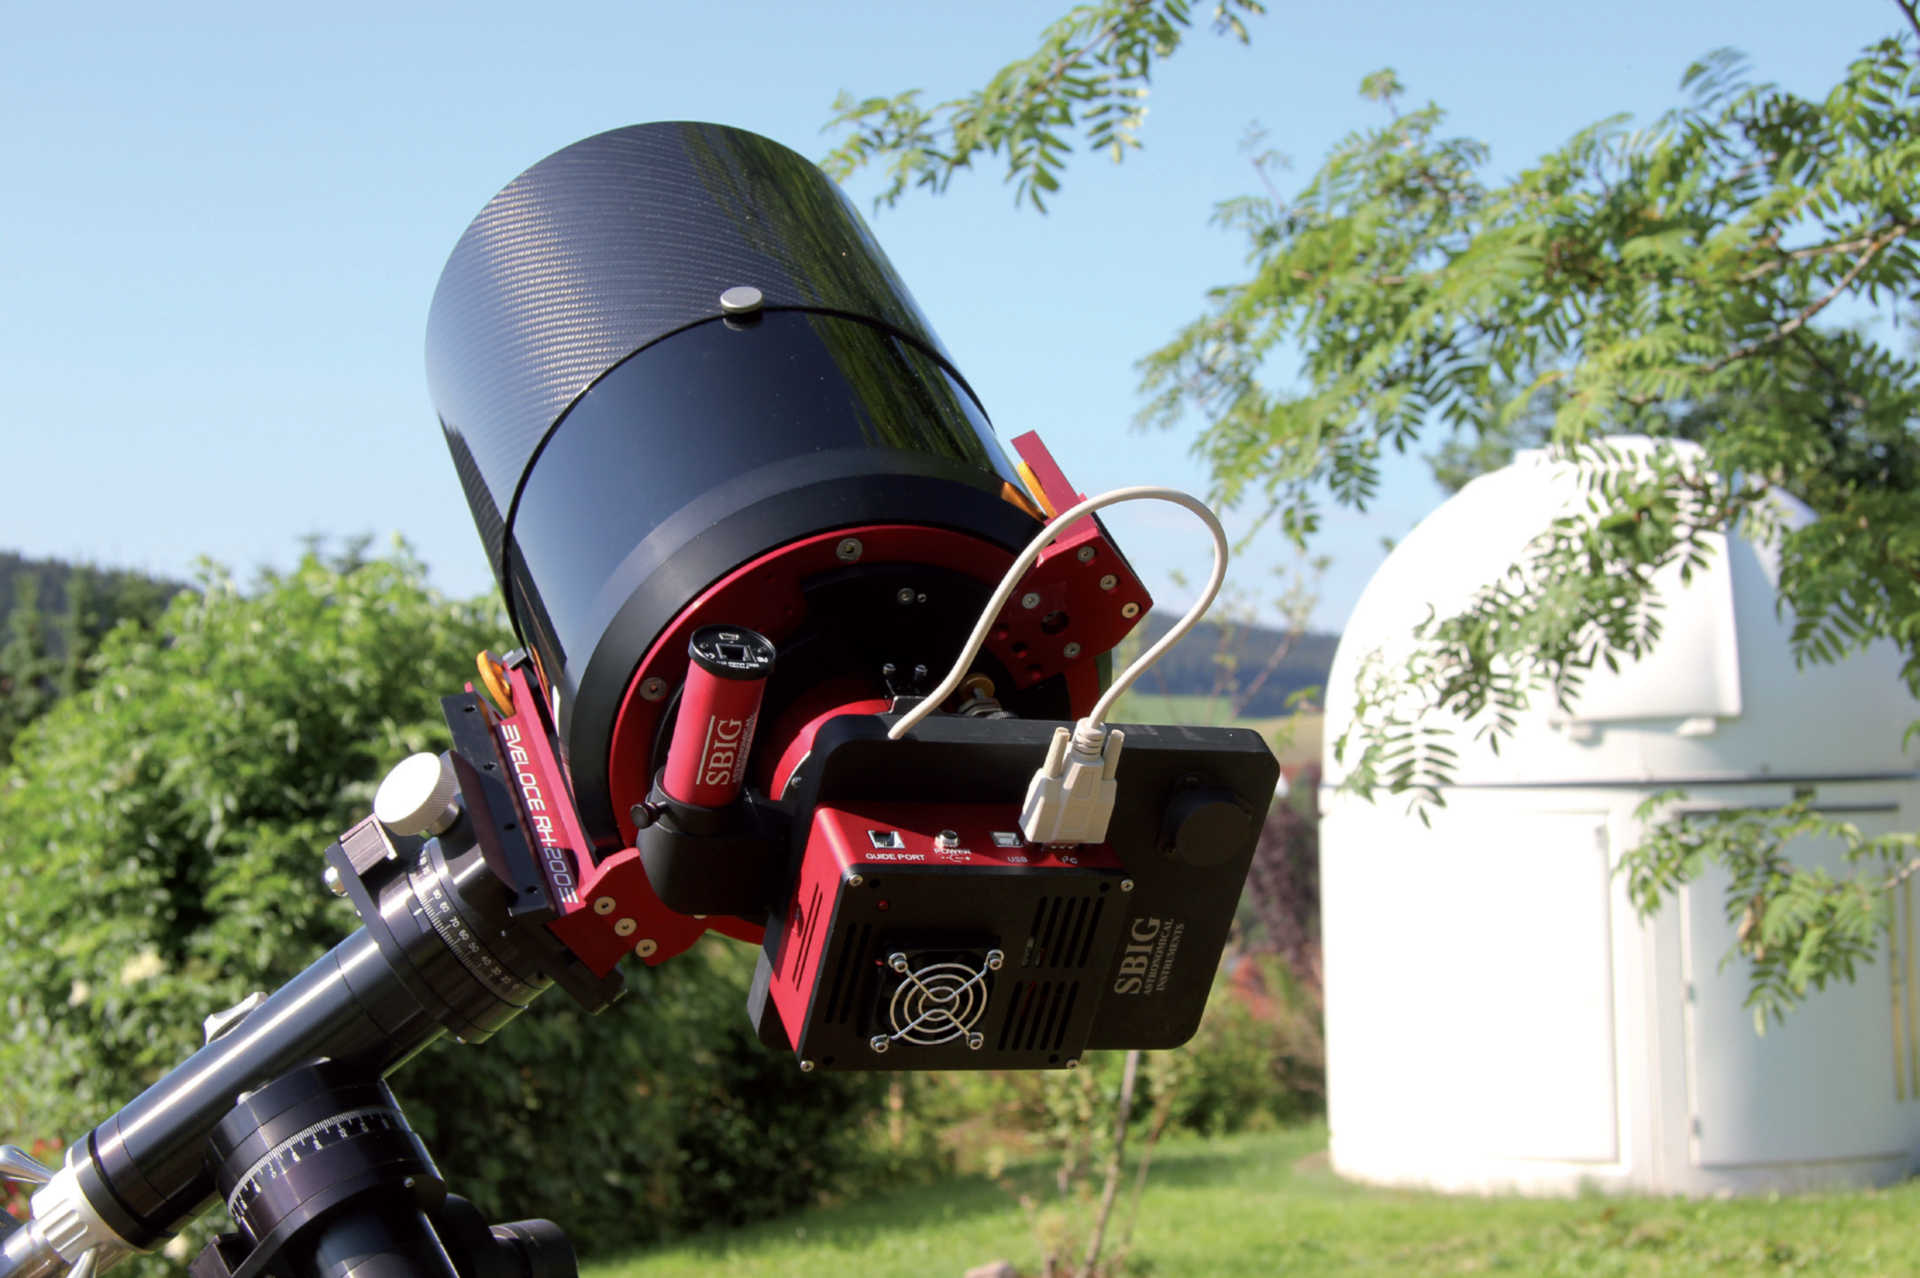 Cooled CCD cameras on Schmidt Cassegrain telescopes with a 200mm aperture are suitable for the photographic detection of an exoplanet, although detection is also possible with other types of telescopes – there have also been successful exoplanet detections carried out with 60mm refractors. U. Dittler
Selecting an exoplanet
Besides the choice of telescope, the choice of exoplanet transit suitable for observation is very dependent on the location of the observer and, very importantly, on the length of the night. Long winter nights are much more suitable for documenting a transit lasting several hours than short summer nights, when the beginning or end of the transit may occur in twilight. The Internet is useful when selecting which transit is to be documented: the Exoplanet Transit Database, which is run by Czech astronomers, gives you lists of the transit of known exoplanets for the coming days if you select the Transit Predictions menu item, and input your observation location.
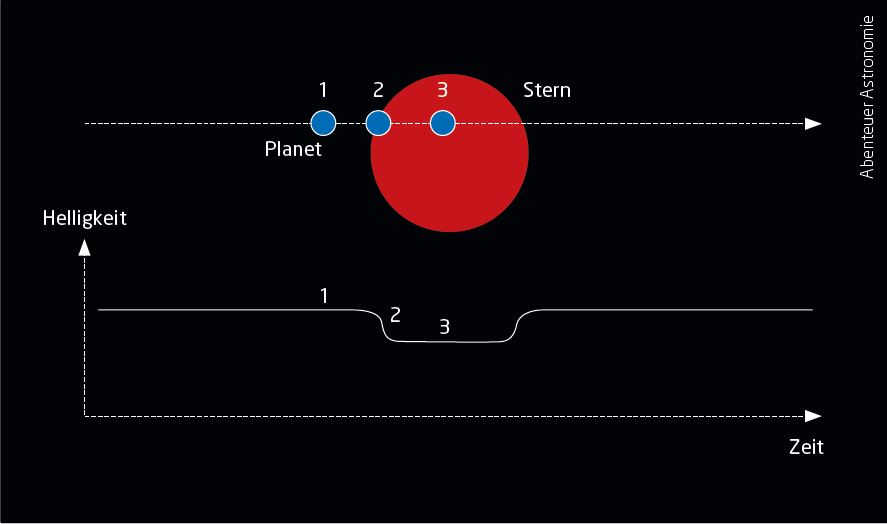 The transit method is definitely the simplest method for amateur astronomers to detect an exoplanet. During its journey in front of the star, the exoplanet blocks some of its light, so if the star’s brightness is continually measured, a corresponding reduction in brightness can be detected. Adventures in astronomy.
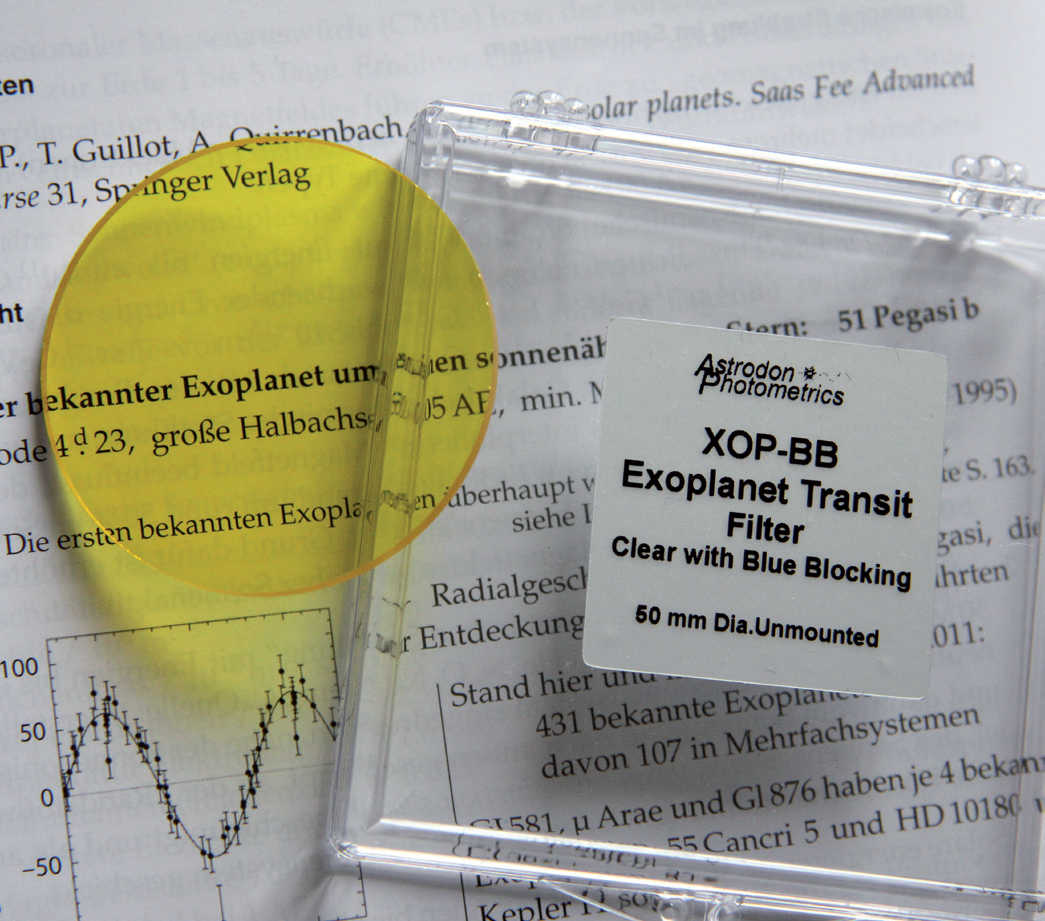 This is because observing a transit can take several hours and the position of the observed star above the horizon may change significantly. It may be helpful to use an exoplanet filter that reduces the effects of haze at the horizon on the final images. U. Dittler
When selecting a transit to be observed, besides the brightness of the star, the expected reduction in brightness must also be taken into account. For beginners, exoplanet transits causing a brightness drop of at least magnitude 0.02 for stars up to magnitude 10 are suitable. Short transit times also simplify observation and lead to fast visible results and a sense of achievement. When selecting a transit, you should also ensure that both the beginning and end of the transit are visible high above the horizon – observing a transit at the zenith is usually easier and more promising than one closer to the horizon.
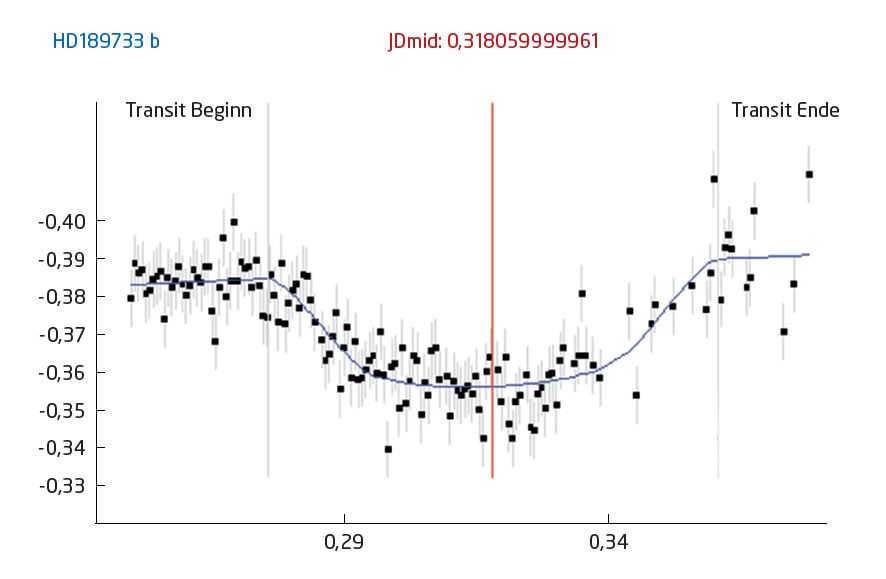 The data analysis of the light curve of the exoplanet HD189733b shows the typical dip caused by the occultation of the star as the exoplanet passes in front of it. The data evaluated here was captured using a Celestron C8 together with a SBIG STL-11000 camera. U. Dittler
 Carrying out the night time imaging
Once you have located the star, positioned it centrally on the imaging chip and started the autoguider, the exoplanet’s star can be photographed continuously. Here, it may be helpful to defocus the star slightly (so that the light from the star is distributed over several pixels), and to ensure that the maximum saturation of the star image is around 70-75% to reduce the influence of noise and to avoid pixel burnout.
Various software solutions are available for the evaluation of the data obtained, many of which were originally developed for the detection of variable stars and are therefore correspondingly comprehensive today. The following describes image processing using the Muniwin program.
First, align the images one on top of another to compensate for any tracking inaccuracy. For photometric processing, you will not only need to identify the exoplanet’s parent star, but also a comparison star – as close in brightness possible – as well as one or more check stars, which are also used by the software to calculate the changes in brightness. The brightness fluctuations found in the images are then displayed in a graphical curve of the brightness gradient.
 The individual images were loaded into Muniwin. In this process step, the exoplanet’s parent star and various reference stars were marked. U. Dittler
The individual image processing steps
After creating a new project to create a light curve, the series of images can be imported into Muniwin, where the additional import of flat field and dark frames then enables the automated correction of all the raw images of the series. Once you have selected the parent star and the comparison or test stars, you can start the photometric evaluation of the images. As output, Muniwin not only calculates the brightness profile of the transit star in relation to the comparison star, but also the difference in brightness between all of the identified stars (transit star, comparison star and check stars). This has the advantage that you can very quickly get an overview of the quality of both the images and the comparison stars selected. This is because the difference in brightness between the check stars should result in a straight line (and not a curve), since the brightness of these stars should have remained unchanged while you were shooting the series.
There is no need to save the final image, and the adjustment of contrast and range of tones normally required for astronomy photos are not required, since Muniwin’s main output after data analysis is, at first glance, a seemingly unimpressive text file of the analysis results.
However, this analysis data of an exoplanet transit can be shared with the Exoplanet Transit Database in order to help calculate the orbit times of the observed objects more accurately. In addition, you are helping to build on a collection of observation documentation, which also records which results are possible with which equipment. After your analysis results have been uploaded and checked by astronomers from the Exoplanet Transit Database, they will create a graphic that clearly visualises the course of the documented exoplanet transit.
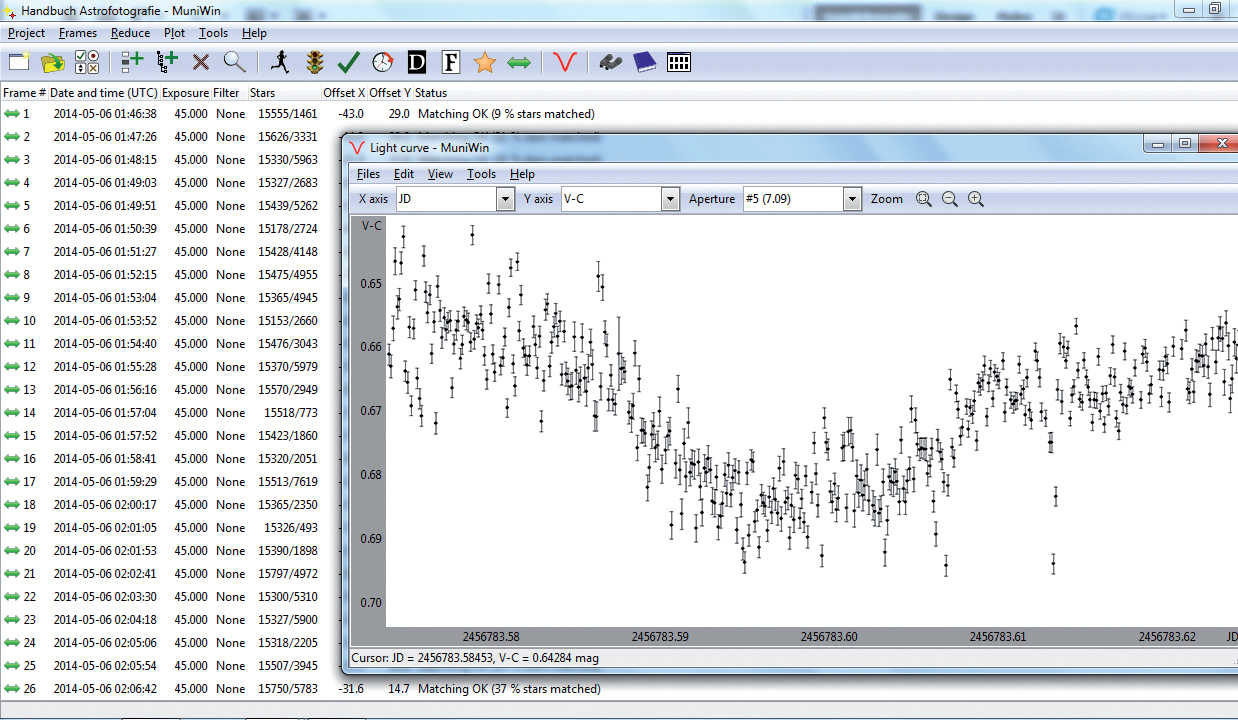 As a result of the analysis, Muniwin generates a graphical representation of the brightness profile of the star occulted by the exoplanet transit (the decrease in brightness can be clearly seen in the middle of the curve). U. Dittler
The bottom line
The detection of extrasolar planets is certainly not a common activity for amateur astronomers – nevertheless, many already possess the equipment necessary for exoplanet detection. The detection of exoplanets is also an area of astronomy in which amateurs can make an important contribution to research – even if the discovery of new exoplanets is becoming increasingly difficult for amateurs, they can still contribute data by measuring those that are already known, in order to better understand the individual exoplanets in the future and to be able to predict their transits.
Author: Ullrich Dittler / Licence: Oculum Verlag GmbH