

Space station passing in front of the Sun. Equipment and preparation.
Pictures of the ISS passing in front of the Sun offer a great alternative to photography requiring long exposure times. How accurate planning will lead to a successful picture.
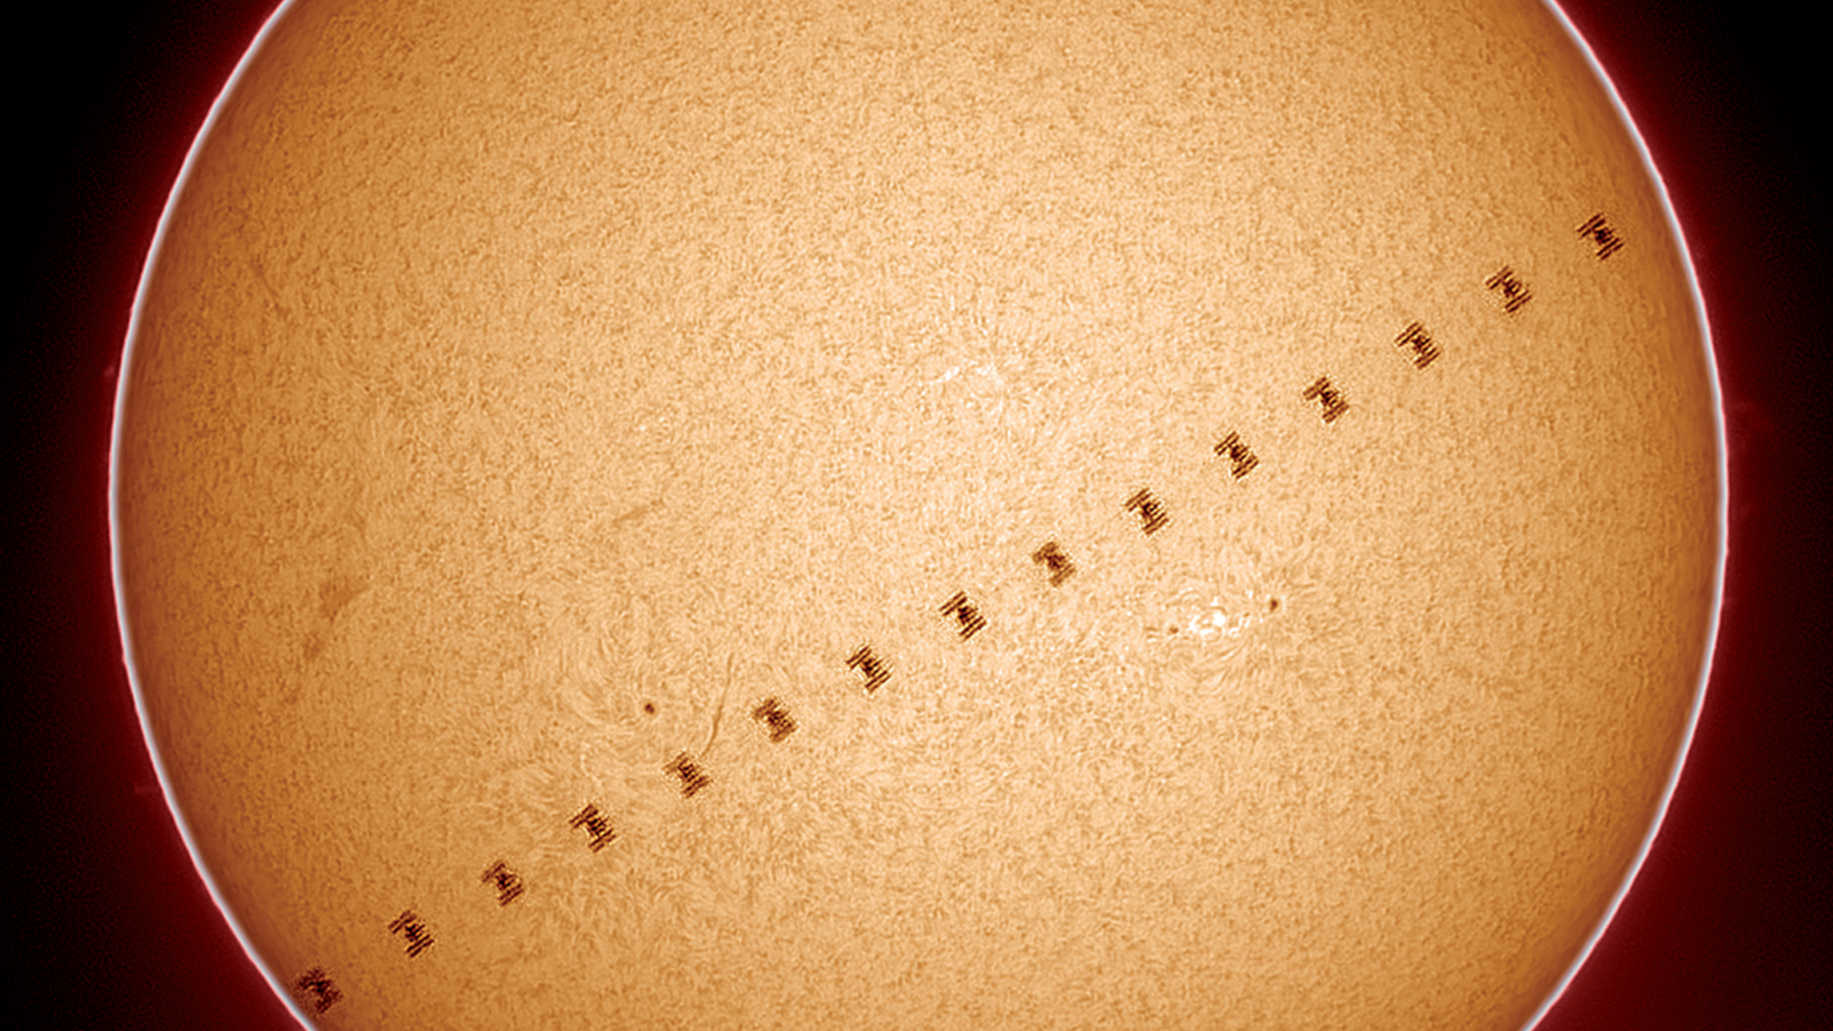 The transit of the International Space Station ISS, captured here in Hα light, took place on 17.6.2017 at 18:57:03, when the sun stood 64.7 degrees above the horizon in the southern sky. The distance between the ISS and the observation site was 451.6 kilometres, so the transit took just 0.6 seconds and the space station appeared to be comparatively large. The picture was taken with a Coronado Solarmax60, other equipment as shown in the third illustration. The picture is a composite of 16 images. U. Dittler
How to capture a transit of the International Space Station crossing in front of the Sun
Astrophotography is usually associated with long exposure times which, in the case of deep sky photography, can last many hours. Capturing the International Space Station (ISS) passing in front of the Sun is a completely different matter. Here, detailed planning is crucial for an event which will last between 0.6 and 3 seconds.
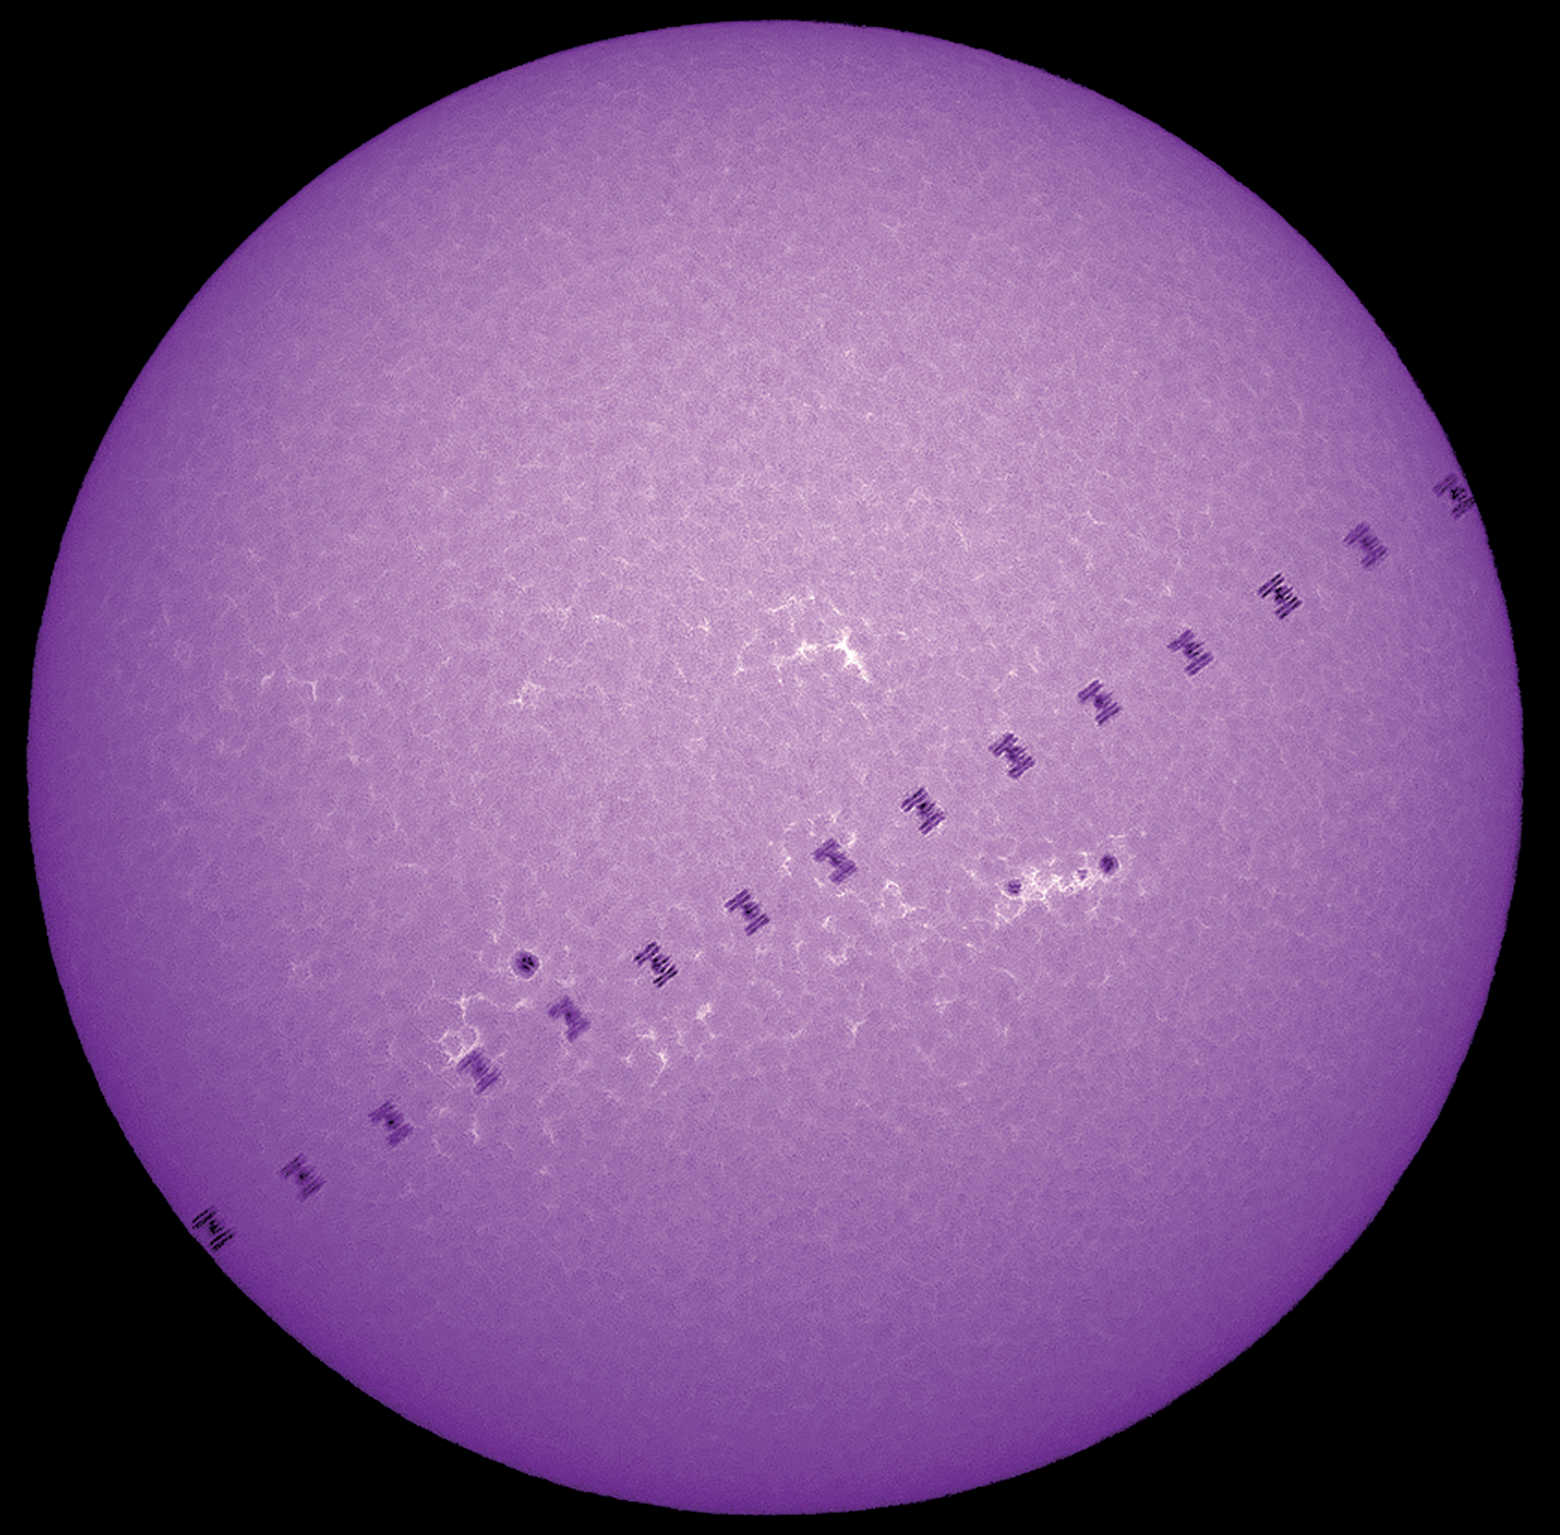
 In the late afternoon on a clear summer day over the Gutachtal in the Black Forest the transit of the ISS could be photographed in front of the setting Sun. The transit took place at 18:31:58, when the Sun was still 24.9 degrees above the SW horizon. The distance between the ISS and the observation site was 870.7km, so the transit lasted 1.7 seconds and the space station appeared medium sized. The view is a montage of 51 images in Photoshop. U. Dittler
The International Space Station (ISS) orbits the Earth at an altitude of around 400km with an orbital inclination of 51.6° to the east, and takes around 92 minutes to complete a round trip. At dusk or dawn, still illuminated by the Sun and moving across a dark sky, the ISS can be easily seen. As a long bright streak, it is easy to spot on wide-angle twilight shots. If you want to capture more than just a bright streak, it is definitely an exciting challenge to photograph the ISS during a transit in front of the Sun or Moon. Then you can really see the form and structure of the ISS, passing in front of the bright Sun or in the reflected moonlight.
Preparations on the computer
Detailed and split-second planning is essential for a successful photograph of an ISS transit. First, you need to confirm when and where the ISS can be observed passing in front of the Sun or Moon. There are several websites that are helpful for this, such as CalSky, which constantly logs the flight data of the ISS and thus always allows an accurate prediction of the flight path. Once you have entered your own location coordinates on the CalSky website, you can select the ISS under "Satellites". You can also specify which events of the upcoming ISS overflights are to be displayed for the selected time period and for which distance from your own location. In order to see the transit of the space station in front of the Sun and Moon, you should deselect "Satellite overflights" and select "Sun and Moon only" instead. Under "Maximum distance to the centre line of the transit" you can specify within which radius observable transits are to be displayed. The linear distance to the centre line is given here, so the distance you need to travel by car will sometimes be considerably longer. A click on "Go" starts the calculation for the selected parameters, and a list of the observable transits for the selected radius is generated.
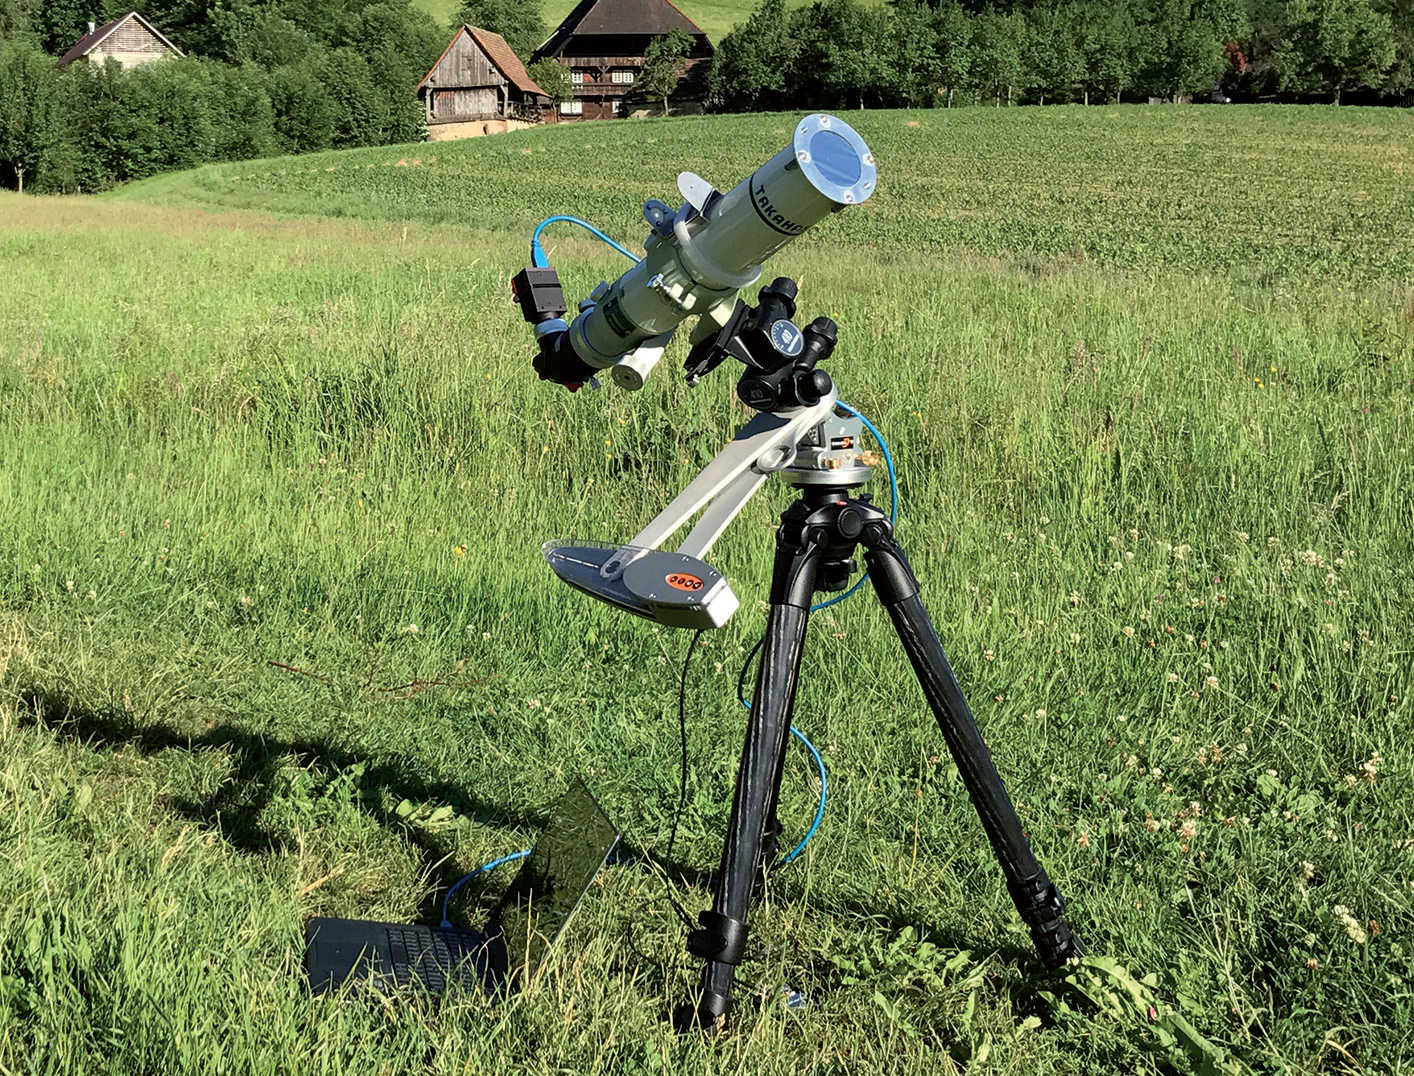 Here you can see the equipment used to create the second image: An Astrotrack travel mount is used on a stable tripod, which carries a Takahashi FS-60Q (focal length 600mm, aperture: 60mm). The camera used was a Point Grey Grasshopper GS3-U3-28S5M, which transferred the captured images directly to the notebook lying on the grass. U. Dittler
It all depends on your location
When selecting which transit from the results list you will observe, it’s not only the weather conditions on the day of the transit and the specified distance to an observation point on the centre line that are decisive, but also the height of the Sun at the time of the transit. If it’s low and close to the horizon, you’ll need to select your observation location carefully. Be sure that the Sun is not above a residential or industrial area which, due to waste heat, would lead to air turbulence disrupting your view. In addition, a transit close to the horizon means that the distance between the ISS and the observer is usually much greater than in the case of a zenith overflight directly above the observer. And the distance between the observer and the ISS naturally affects how large the ISS appears on the images and how long the transit takes. A shorter distance in the range of little more than 400km (which leads to transit times of less than one second) is certainly optimal, whereas transits closer to horizon can increase the distance to over 1,100km (and a transit time of over three seconds).
 Whilst the ISS transit in the first picture above was being photographed in Hα light, it was also photographed simultaneously in calcium light. For this purpose, a Grasshopper GS3-U3-60QS6M CCD camera was combined with a Lunt CaK module (bandwidth of 0.24nm at 393nm) on a Takahashi FC-76DS (focal length 570mm, aperture: 76mm). The composite picture was created by combining 16 individual images in Photoshop. U. Dittler
Equipment required
Since photographing a transit of the ISS in front of the Sun is usually linked to a trip to an observation location on the centre line, the use of short focal length travel telescopes and suitably stable travel mounts with motorised tracking is ideal. The size of the chip and the frame rate are important when selecting the camera to use: in order to be able to photograph all phases of a transit, the camera you use together with your chosen telescope should allow the entire solar surface to be captured in one frame. Cameras with a larger chip are therefore more suitable than those with a smaller one, since a larger telescope focal length – and thus usually the resolution – can then be selected. In addition, the highest possible camera frame rate will also determine how many images of the transit are captured. Cameras that can only take three to four frames per second (as is the case with some low-cost DSLRs, for example) often only produce a handful of images in a close and therefore short transit. On the other hand, CCD cameras generally used for solar and planetary photography operate with frame rates of up to 30 to 60 (or even more) frames per second and can therefore capture significantly more phases of the transit.
An accurate clock with seconds displayed is also vital in order to avoid missing the crucial second(s) of the transit. However, this is a feature of most smartphones and since the displayed time is usually synchronised with GPS satellites, a smartphone is usually much better suited than, for example, a watch.
Author: Ullrich Dittler / Licence: Oculum Verlag GmbH