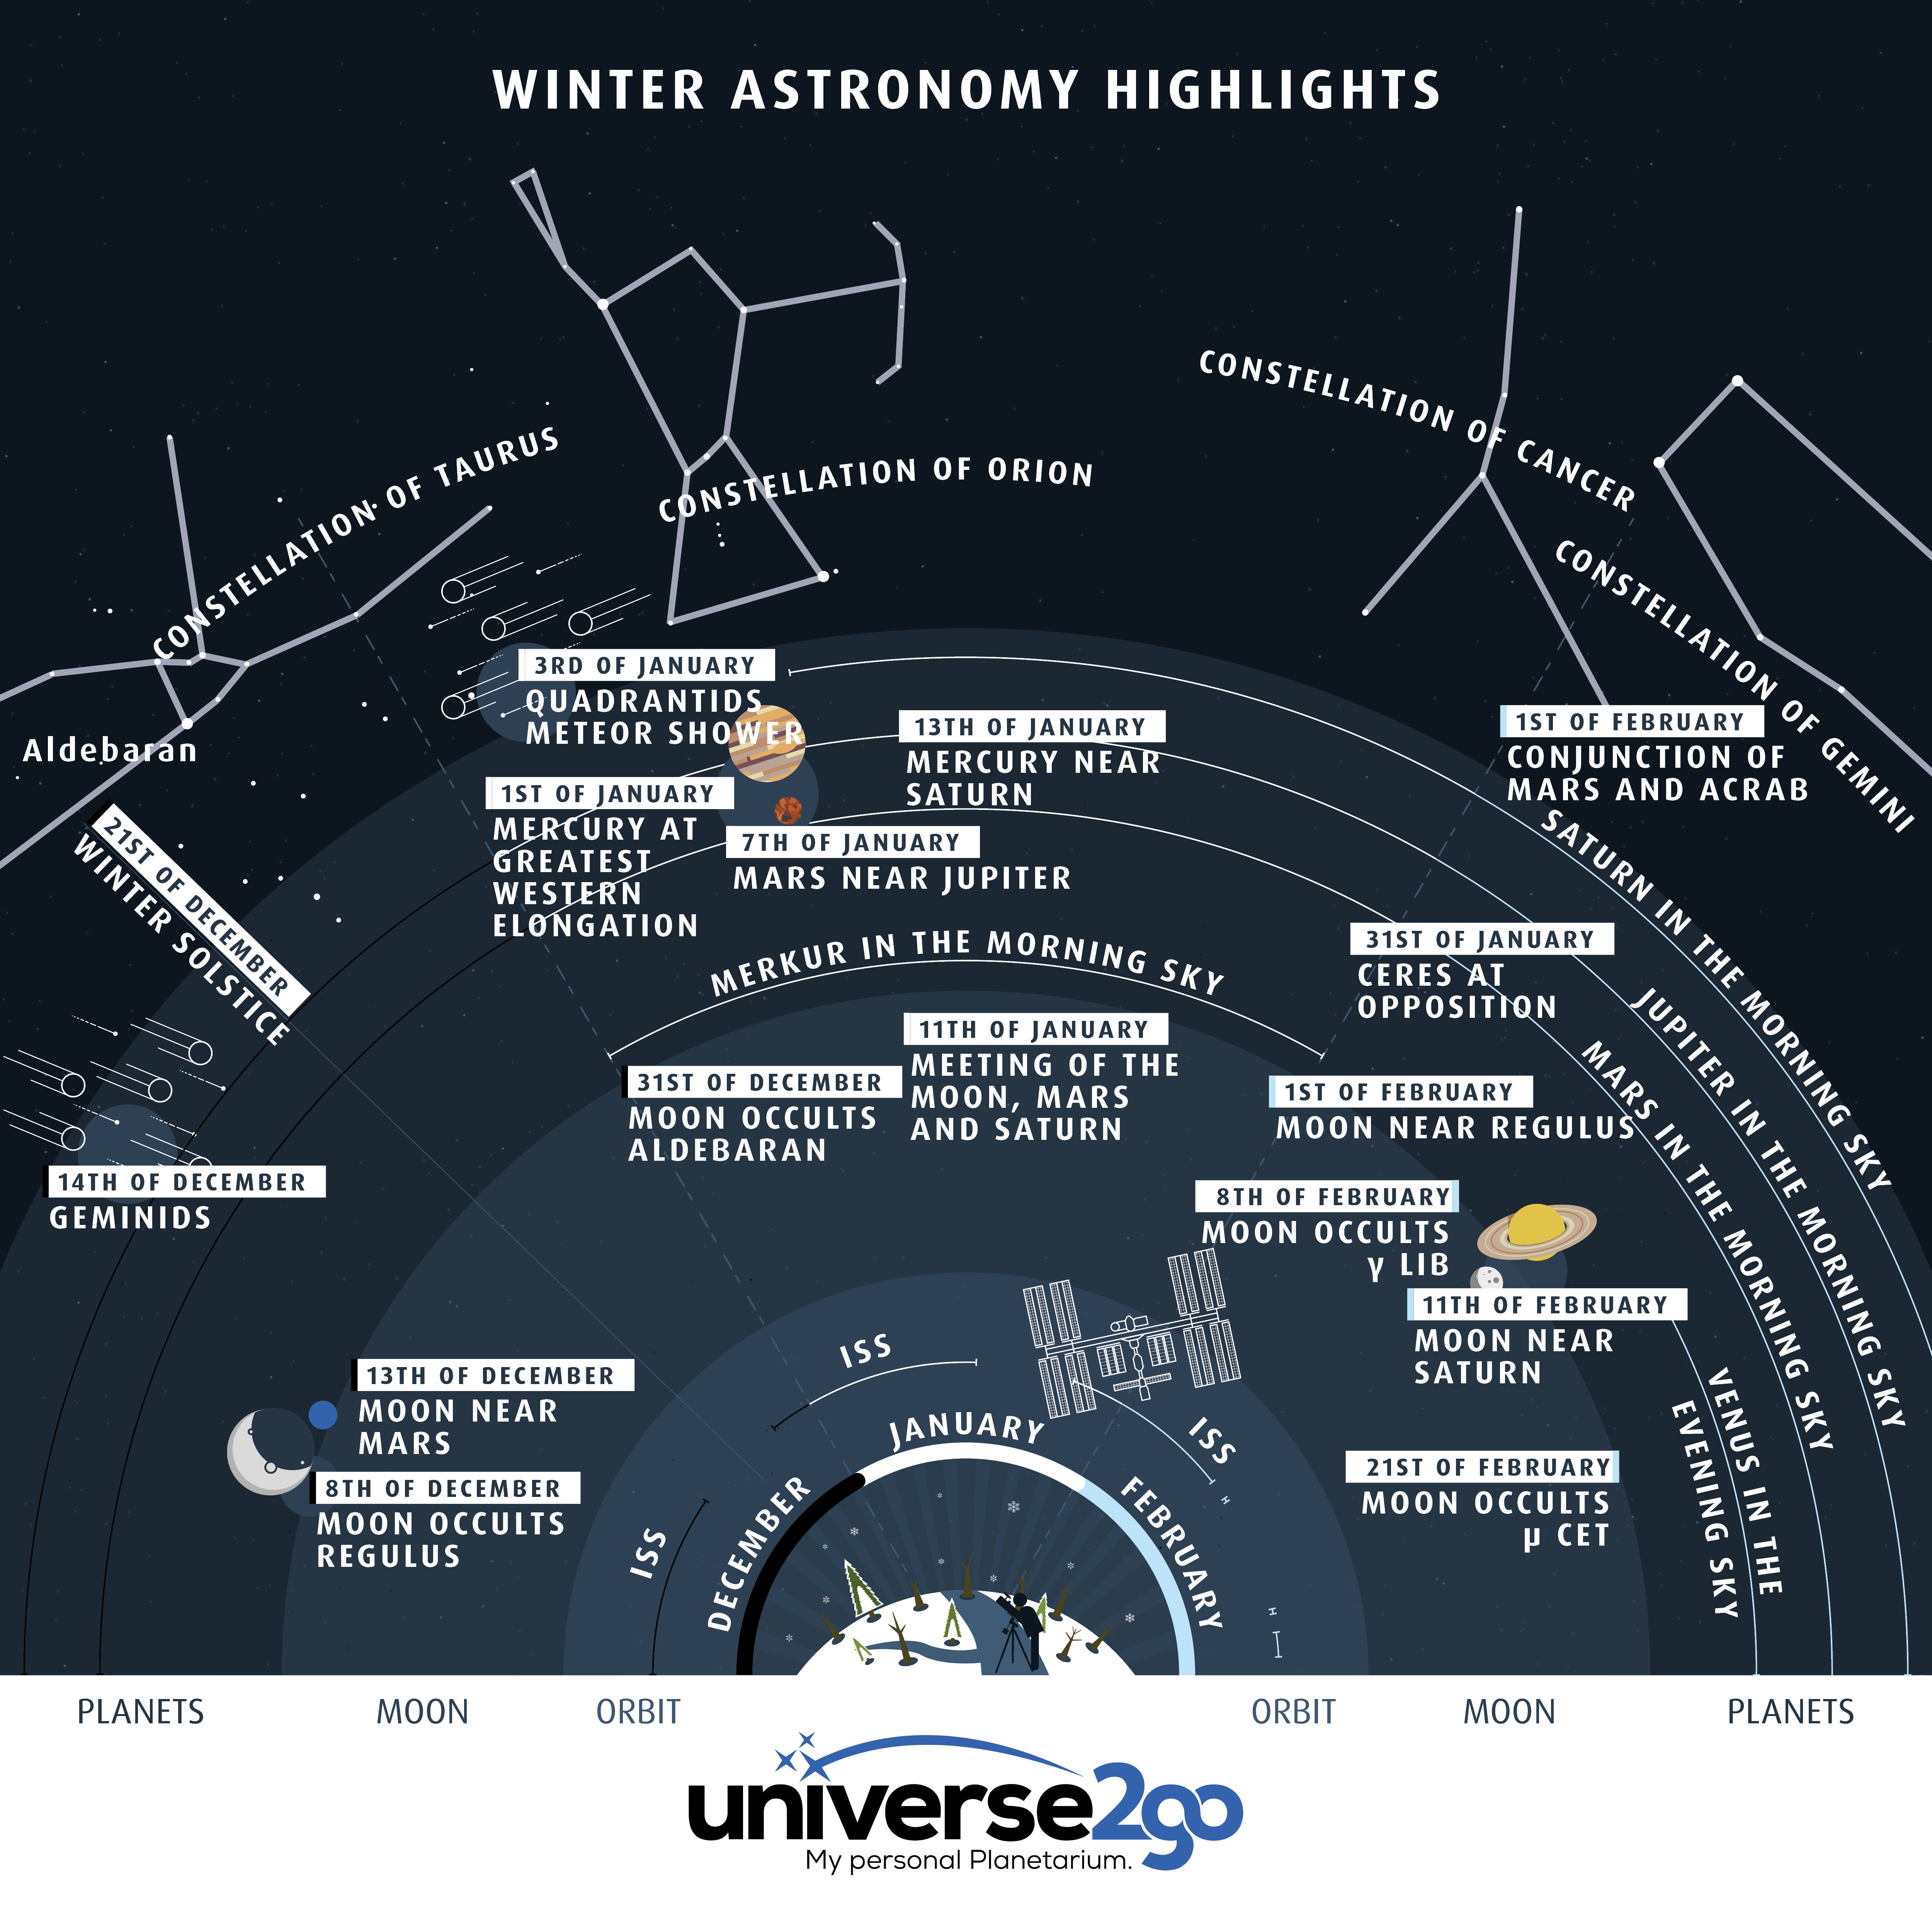
The new cosmic calendar for the next three months at a glance! Our astronomy infographic shows you all you need to keep an eye out for in the coming months. Check out the text below for more details of each event!
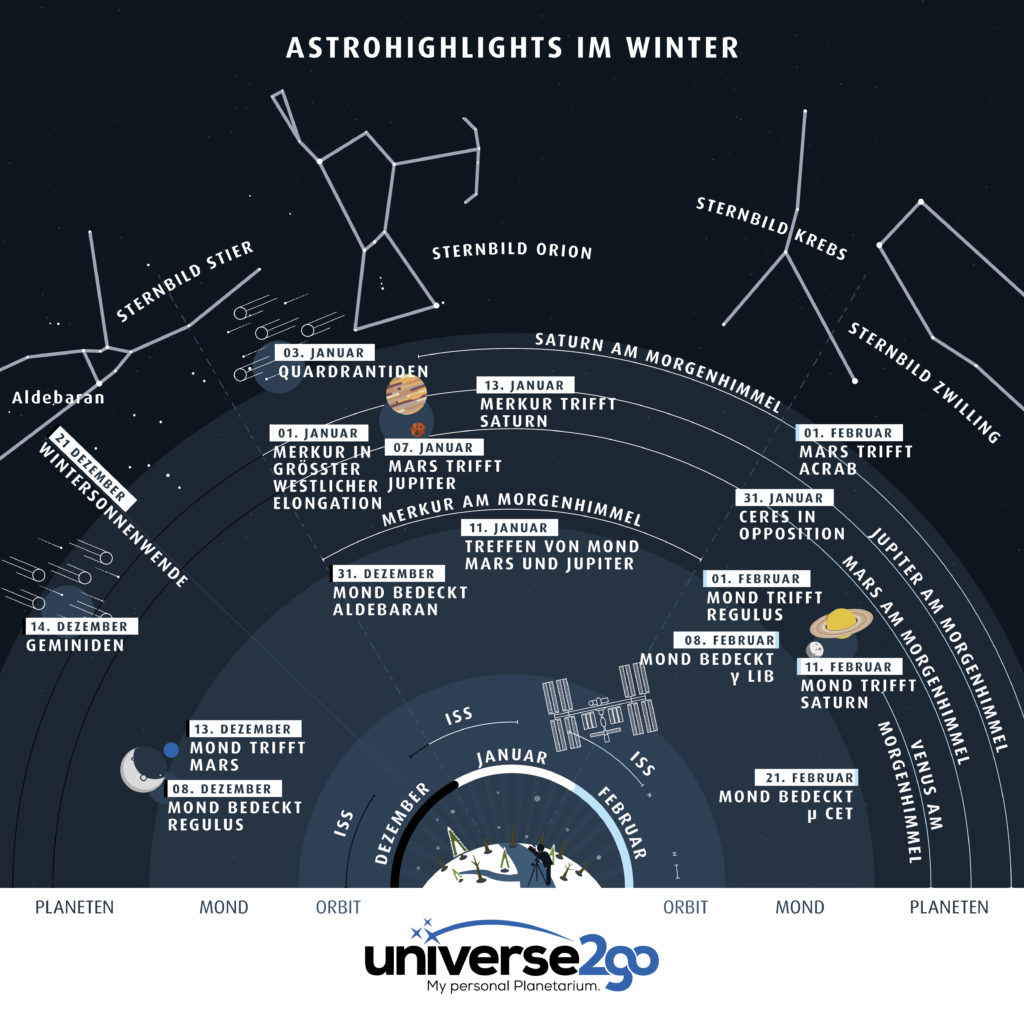
08 Dec – Moon occults Regulus
At the beginning of December the waning Moon will occult the star Regulus in the constellation Leo. It is a special event, since Regulus belongs to the brightest stars in the night sky at 1.3 mag. A pair of binoculars or a small telescope will suffice, to witness it all. However, you will need a good view of the north-eastern horizon. Best case scenario would be finding a nice open area or a hill, from which to observe. It is only important that no houses or forest obstruct your view.
13 Dec – A Lunar Meeting with Mars
The narrow sickle of the waning Moon will show itself shortly before dawn, meeting up with Mars at about 6 degrees. Yet there is more to see: with the star Spica, the two celestial bodies will create a triangle. Closer to the horizon, you will also be able to see Jupiter. It will appear, as if all four form an arrow pointing towards the horizon.
14 Dec – Geminids
If the night sky is clear, look to the south to see the Geminid meteor shower, originating from the constellation Gemini. More precisely, the point of origination will be roughly two degrees above the star Pollux. Between 9 PM and 6 AM is the best time for viewing the Geminids, with roughly 120 meteors per hour . making it one of the most active meteor showers. Unfortunately, the full Moon will create some competition as it rises, but the event should nevertheless not be missed!
21 Dec – Winter Solstice
Every year on the 21st of 22nd of December, we get to experience the shortest day and longest night of the year. This year on the 21st, Winter officially begins and the Sun will set early. The night will last about 12 hours – a dream for every hobby astronomer, who wants to observe for long periods.
31 Dec – The Lunar Occultation of Aldebaran
In the night of the 30th to the 31st, the Moon will occult the star Aldebaran, which is the most prominent star of the Taurus and belongs to the brightest stars in our night sky. Such an occultation of a bright star is quite an experience. Almost completely full, the Moon will approach Aldebaran on its dark and interesting side. The star will disappear sometime around 2 AM and reappear around 30 minutes later on the opposite side.
01 Jan – Mercury at Its Greatest Western Elongation
Mercury orbits so fast and so close to the Sun, that we cannot see it all the time. Yet, today the planet will be at a distance of 22 degrees from the Sun. During dawn, Mercury will appear around 6:30 AM in the south-eastern sky. As the sky brightens, however, you will quickly lose sight of the planet. Luckily, Mercury is quite bright, so you will be able to see it at even 7:30 AM. In case it is overcast or you are sleeping off ringing in the New Year, you will still be able to see Mercury until the 10th of January.
03 Jan – Quadrantids
The next meteor show is already upon us: the Quadrantids. This meteor show will originate from the constellation Boötes and will rain down a maximum of 120 meteors per hour. You will have the best seats for the show if you happen to be out from the 2nd to the 3rd of January.
07 Jan – Mars Meets Jupiter
On the morning of the 7th, Mars and Jupitar will have tea and crumpets. In the middle of the constellation Libra, both planets will be illuminated at a distance of 12 arc-minutes from one another, which is about a third of the Moon’s diameter. You will be able to use your telescope to view both planets in one go!
11 Jan – The Meeting of the Moon, Mars and Jupiter
A few days later in the same region, Mars and Jupiter will create some more space. Yet, on this particular morning, the Moon plays a role. The thin sickle will shine about 3 degrees above the two planets. Even if you have to dress warm to see it, the sight will melt any ice in the vicinity.
13 Jan – Mercury Meets Saturn
Mercury will give us one more chance, before exiting the stage. Yet, this morning, the fastest planet will be visible with the gas giant Saturn. Shortly before sunrise, the two will appear just above the horizon in the south east.
31 Jan – Ceres in Opposition
Ceres is one of the most well known dwarf planets of the solar system with a diameter of 963 kilometers. It orbits, with the asteroid belt between Mars and Jupiter, the Sun every 5 years. On the 31st January, Ceres will come into opposition to the Sun and you can observe it at its greatest brightness. With a bright 6.9 size class, it will move from the head of Leo between the constellations Lynx and Cancer. You can use a telescope or a large set of binoculars to find dwarf planet. More exact details can be found here:
01 Feb – The Moon Meets Regulus and Mars meets Acrab
If you like to observe during the morning hours, then there is something for you on the 1st of February. At about 4 AM, the pinzers of Skorpio will rise in the south east. Yet, there is more: Mars. The red planet will push past the star Acrab at a distance of around 18″.
Moreover, the following evening, the Moon will be about 7 arc-minutes away from Regulus, the most prominent star of the constellation Leo. The time for the meeting is quite good: around 7 PM, European Central Time, the Moon will be closest.
08 Feb – The Moon Occults γ Lib
This occultation may not be observed by so many star gazers, since it will take place in dawn, when most are still laying in a warm bed. That makes the occultation of the star γ Lib by the Moon, within the constellation Libra, quite a seldom seen event. The Moon will be illuminated at around 45% and be edging ever closer to the star with its bright side. Around 4:20 AM, the star will disappear behind the Moon and reappear at around 5:30 AM on the un-illuminated side of the Moon.
11 Feb – A Lunar Meeting with Saturn
The Moon seems to enjoy visiting our planets. On the 11th of February, our satellite will meet with Saturn. Such meetings are always an amazing sight and a great opportunity for a great photo with a standing camera and lens. The Moon will be visible about 3.5 degrees higher in the sky, and as a result easier to spot. Around 5 AM, Saturn will peer over the horizon. It is not really the best time for the ringed planet however, as it will only appear in the second half of the night for next few months. As early Summer sets upon us, the planet will appear at more comfortable times. In June, it will even stand in opposition.
21 Feb – The Moon Occults μ Cet
An occultation at dusk: around 6:20 PM, the Moon will occult the star μ Cet in the constellation Cetus. After a good hour, at around 7:15, the star will reappear on the other side. This time the Moon will approach the star with its un-illuminated side. During observation, you will notice the star disappear so suddenly, as if someone just pinched its flame like that of a candle.
23 Feb – The Moon Occults Aldebaran
A highlight on this day is the lunar occultation of Aldebaran. As in last December, you should not miss this event, because such occultations are quite seldom and this will be the last occultation of Aldebaran for years to come.
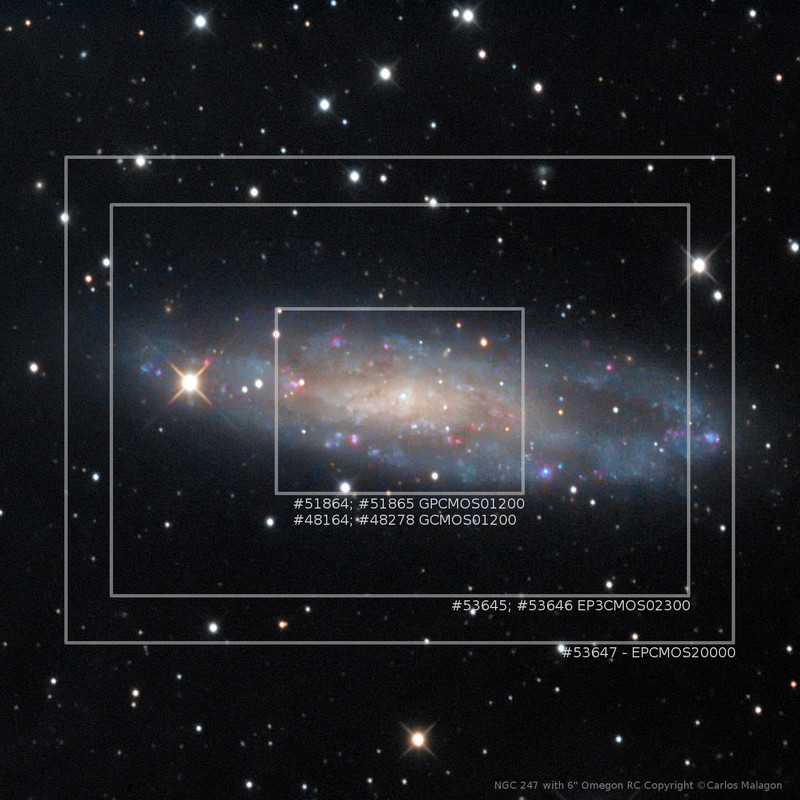
The Moon will inch towards the star with its un-illuminated side. For many, it is quite a surprise when the star suddenly disappears, despite it being expected. At around 5:50 PM, Aldebaran will disappear and at 6:50 PM reappear. For amateurs, it will be interesting to following the occultation to the minute. With a Touptek Camera and software from SharpCap 2.7 will both be helpful in such a scenario.
Enjoy stargazing and clear skies from the team at Astroshop.
PDF here


 What can you see in this graphic?