Your partner for astronomy

Posts Tagged 'telescope-accessories'

Blog Archives

Focusers: This is how you optimise your telescope on the accessories side

June 19 2017, Marcus Schenk

A focuser is most likely the component, that is used most frequently and intensively on a telescope. How often do you plug in eyepieces, adapters and cameras? Yes, a focuser has to cope with quite a lot. But is it of sufficient quality? Many telescopes are designed for a very reasonable price – this can then be noticed on the focuser. Optimising the focuser has a tremendous effect at this point.

Having a good look at your current focuser quickly reveals whether you can achieve even better results with your telescope.

An interesting question: What is the purpose of a high-quality, accurately moving focuser? What should it be able to do?

omegon-focuser-blog-astroshop

Five arguments for a good focuser

A focuser should

… be free of play.
You probably know this? You turn the focuser wheel, but the mechanical system rotates without any effect. And all of a sudden, it starts to move. On the one hand this is annoying, on the other hand it gives you the feeling of working with low-quality material.

…be free of any shifting.
You turn the focuser wheel, but Jupiter performs a rain dance and is jumping about in the eyepiece. Even worse in a camera. The object may even jump out of the field of view. Diagnosis: Shifting. This should be remedied as quickly as possible by using a good focuser.

…not bend when a camera is connected.
Unstable focusers sometimes lead to fatal results for your astro photographs. If the focuser tube bends, a photo may be sharp in one corner, but blurred in the other. Now, who wants such a result after an otherwise successful photo session. Further down, you find a list with a load capacity that specifies the maximum camera load, which should help to avoid such problems.

…have an accurate, fine focus adjustment.
Anyone enthusiastic about astro photography knows: Focusing the camera on an object in the sky is a challenge. This is much easier with a smooth running focuser or a 1:10 dual reduction. This allows you to adjust the focus in the range of tenths of a millimetre. This all to find the exact sharpness.

…not slip when using heavy accessories.
A heavy eyepiece may have a weight of up to 1 kg, camera equipment may even be heavier. In this case, it is an advantage to have a focuser that does not slip under a heavy weight.

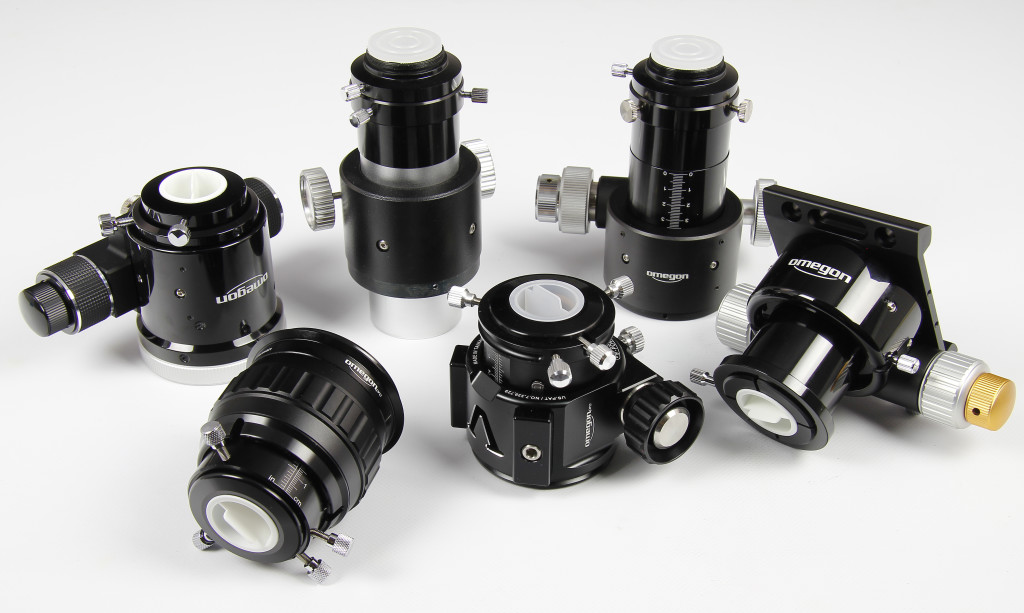
Our product range includes some Omegon focusers, with which you can easily optimise your telescope and enhance its performance. For even more fun when star gazing. Especially the Omegon products of the series V-Power, Omegon Pro and the Omegon Hybrid Caryford Dual Speed are dedicated for these five wishes and fulfil them with high precision. The mentioned Omegon Hybrid Caryford Dual Speed has even been designed with a very low construction height. On very fast Newton systems, with e.g. f/5, one can reduce the vignetting and enhance the illumination.

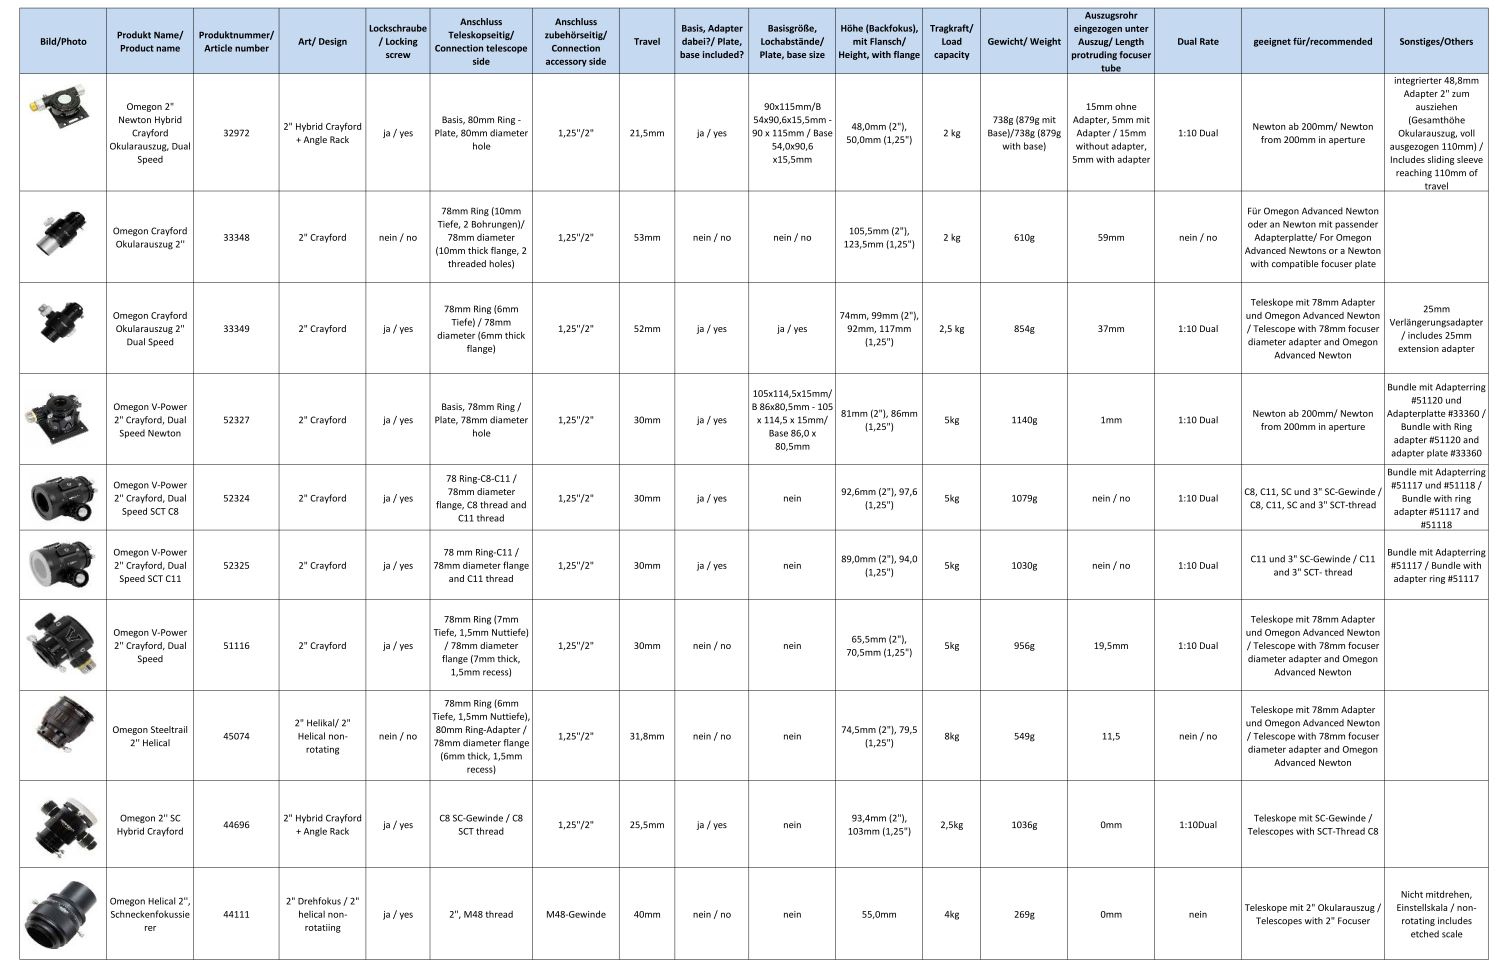
You surely want to know whether the focuser matches your telescope. How high is the backfocus? What are the adapter measurements? How high is the load capacity of the focuser? This new list provides all information at a glance. You can immediately see, which focuser would suit you best.

Omegon_Focuser_Table

CGX-L: The Large Version of the New Celestron Mount

June 12 2017, Stefan Taube

At the beginning of February, we introduced the latest development from Celestron: Celestron CGX. The CGX now has a big sister. The brand-new  CGX-L mount is able to carry 34 kilogrammes and thus almost 10 kilogrammes more than the CGX.

The large 14 inch optics can thus also be used with the new technology of the CGX-mounts:

CGX-L-1400

The generously sized 144 millimetre worm gears are an important factor in increasing the load bearing capacity. They enable smooth running, even when carrying heavy telescopes. Apart from this, the dovetail clamps were extended to 270 millimetres, so that large telescopes are also securely held in place.

The illustration shows the mount head with the large worm gear and the toothed belt drive:

CGX-L-Antrieb

Another positive aspect: Additional AUX ports and the autoguider connection on the DEC-axis ensure a better cable management.

If you intend to use large optics with photo equipment, you need a heavy counter weight. With 31.5 millimetres in diameter, the counterweight shaft has been adequately dimensioned for carrying heavy loads.

Despite the increased load bearing capacity, the CGX-L is still portable. And not only the mount is able to carry higher loads: Celestron delivers the CGX-L with a steel tripod which has been considerably reinforced compared to the CGX. The tripod legs have a diameter of 70 millimetres!

The CGX-L is a universally usable mount, with hardly any limits: You may use it stationary in your garden observatory or transport it to telescope meetings or to your favourite observation location.

We offer the mounts CGX and CGX-L individually. With the dual saddle plate, you can combine these mounts with almost any optics system. But you can also decide on a complete telescope system consisting of mount and Schmidt-Cassegrain optics. You will find these product series under the two links CGX- telescopes and CGX-L telescopes.

No matter whether you decide for the CGX or directly for the larger sister CGX-L, you will receive a modern mount, which will set the standard for the next few years.

New: Omegon Oberon eyepieces with 82° field of view

May 23 2017, Marcus Schenk

The new Omegon Oberon eyepieces have an 82° field of view and thus provide you with an outstanding free and open view. Apart from this, they are waterproof and filled with nitrogen. At less than 200 Euros they have a remarkably reasonable price tag and are affordable for almost every hobby astronomer.

Die Omegon Oberon Okulare mit 82° Gesichtsfeld

Waterproof and filled with nitrogen

You surely know the situation when eyepieces lose their shine. When dirt, pollen and the grease from your eyelids cover the eye lenses. This is normally the point at which eyepieces should be cleaned. But this is not as simple as it sounds, because lenses need to be cleaned with great care and using optical cleansing agents.  Omegon eyepieces make it incredibly easy.

Simply flush the eyepiece off under running water. And your eyepieces gleam like on the first day.

The benefits of a large field of view

Wide-angle eyepieces are the dream of any stargazer. In contrast to the standard eyepieces with a 45° or 50° field of view, large-field eyepieces give you the impression of floating through outer space. Above 70° the eye does not perceive the outer edge of the eyepiece, and a starry sky appears almost endless. The Oberon eyepieces with 82° fulfil this task even better, because here the eye can even move within the field of view.

The Oberon eyepiece series consists of six eyepieces with focal lengths of 7 mm, 10 mm, 15 mm, 19 mm, 23 mm and 32 mm. The three small focal lengths are available in 1.25″, the three long focal lengths in 2″. Any star gazer knows that sometimes it is quite difficult to find an object. A 32 mm Oberon eyepiece like this makes things a lot easier: A small magnification coupled with an 82° field of view makes the big Oberon a perfect finder eyepiece.

But also a 7 mm eyepiece with 82° has clear advantages: Viewing the surface of the Moon with a high magnification while still seeing large areas of the lunar landscape – it is just amazing.

The advantages of Oberon eyepieces at a glance:

•    Enduring: waterproof and filled with nitrogen – to protect against moisture and for a long service life
•    82° field of view: giant field of view, almost without limitation
•    Goof grip: serrated rubber armouring
•    Upscale design: anodised aluminium housing

Come this way: You can find further details on the product pages for the new Oberon eyepieces.

Observing the Sun with the DayStar QUARK Calcium-H

May 11 2017, Stefan Taube

The American sun filter manufacturer DayStar revolutionised sun observations with its QUARK series. For a comparatively low price you can now use a refracting telescope with a small aperture for watching the Sun in a defined spectral line – this is no more complicated than plugging an eyepiece into a diagonal mirror.

DayStar have now extended their QUARK series by a model to watch the Sun in a spectral line of the chemical element calcium. With the DayStar QUARK Calcium-H-line sun filter you can watch the sun at a wave length of 397 nanometres – or perhaps not: Not everyone is able to notice such short-wave light.

However, with a planet camera this short-wave radiation can be recorded without any problems. Corresponding tests were undertaken by our colleague Bernd Gährken:

Sonne-Calcium-H

For this photo 4 images were combined. In addition to the QUARK Calcium-H-line, an Omegon photoscope with 1.6x Barlow and a planet camera were used. The scope of delivery includes adapters for 1.25″ and 2″ focusers. The Calcium filter works without telecentrics and requires an optical path of 6.2 centimetres. With many optics the focus cannot be reached directly. We therefore recommend also ordering the reasonably priced path corrector. It can be screwed directly into the QUARK filter. In terms of cameras, we specifically recommend the Mono Guider from Touptek or the planet cameras from ZWOptical. When photographing a tight spectral range, the complete resolution of the sensor can only be utilised when using a black-and-white camera (“mono”).

Unfortunately there were no sunspots on the sun when this photo was taken. This exemplary image provided by the manufacturer shows what sunspots in the light of the Calcium-H-line look like.

Sonne-Calcium-H-Daystar

Photographic data for this image can be found on the product page, QUARK Calcium-H-line.

Observing the sun is a fascinating alternative or an additional challenge for stargazers.

Lunar photography with a smartphone: the Omegon Easypic smartphone adapter

April 27 2017, Marcus Schenk

In the past, taking a photo of the Moon required quite some effort. Take the pictures, develop the film and hope for sharp images. And then came the disappointment if the Moon appeared blurred. This became considerably easier with digital and mobile phone cameras.

In the meantime, smartphone cameras have reached an outstanding level of quality. Which is a good tool for Moon photos, provided that we can tightly mount the phone to the telescope.

Let’s have a look to see how everyone can take a photo of the Moon through a telescope.

The Moon – shot with an Easypic adapter, an Omegon 8″ Dobson with Redline eyepiece and an iPhone.

Der Mond - aufgenommen mit einem Easypic Adapter, einem Omegon 8" Dobson und einem iPhone.

The difference to other adapters

The Easypic universal smartphone adapter follows a different route to his competitors. Most adapters have a clip that closes around a 1.25 inch eyepiece. The mobile phone is then separately held by a clamp and needs to be correctly positioned above the eyepiece. In itself this is a quite good system but needs quite a lot of experience on the part of the photographer. And in the end, everything must sit tightly in place.

Now the night is not always the right place for patience. And it is pitch black!

Is there no easier way? Yes, sure there is! With self-centring.

Here is how to prepare the adapter

With the Moon in the sky, you direct your telescope to Earth’s satellite. It is already nicely visible through the eyepiece. Now your smartphone and the Easypic adapter are going to play their role.

On the back of the adapter, loosen the small screw for the holding clamps. Pull the holding clamps fully to the outside. Then place your mobile phone with its camera lens directly over the central hole. Slide the holding clamps back against your phone and tighten the screw again. Check that the clamps fit tightly so that your mobile will not come loose.

Here is how to connect the adapter to the eyepiece

Now to the easy part! Hold the adapter with the smartphone to the eyepiece, making sure it has direct contact. Then turn the big screw on the side. This allows the movement of three bolts, which accurately clamp around the eyepiece at the same time. This way the adapter centres and fastens automatically around your eyepiece. The camera lens of the smartphone is perfectly aligned with the middle of the eyepiece.

For you this self-centring means: more focus on your object and less worry with technical details.

All done.

So sieht es aus: Das Smartphone am Teleskop und der Mond im Zentrum.

The photoshoot: The Moon in your smartphone

If your camera app has been switched on, you should now see the Moon in your display. Correct the focus once again and everything is ready for taking the photo.

These steps are necessary:
•    Switch off the flash
•    Activate the timer
•    Adapt the exposure time, if necessary and possible

Now press the trigger as usual and take a photo. This image of the Moon was taken with an Easypic universal smartphone adapter and an Omegon 8 inch Dobson telescope.

Using neutral density filters to reduce brightness

In most cases adjusting the correct exposure time is enough for successful Moon images. However, planets like Venus or Jupiter very often appear too bright in an image. They are over-exposed. The planet discs appear burned out. The solution: neutral density filters and variable polarising filters. This is our trick to be able to show the details of the planets.

Conclusion:

A smartphone in combination with an Easypic universal smartphone adapter allows you to take quick photos of the Moon and planets. You don’t have to be an expert: even connecting to the eyepiece is child’s play. All you need to do is position the adapter correctly. The smartphone takes photos of the Moon with outstanding sharpness. A fact that all of us could only dream about a few years ago.

Explore Scientific Twilight AZ – the uncomplicated mount!

March 27 2017, Stefan Taube

The equatorial mount with GoTo functionality is not necessarily a must-have.  Sometimes you just want to have a quick look at the moon or the planets, search for a comet or observe large areas of the sky with a suitable refractor. In this case, an uncomplicated and quickly available azimuthal mount is fits the bill.

The new Twilight I AZ from Explore Scientific is just such a mount. It accommodates telescopes with a weight of up to eight kilograms – which is quite strong for a mount of this class.

ES-Twilight-AZ

Moving to the desired objects is a simple task: With just one lever each you can loosen the clamps of the elevation and the azimuth axis and quickly move the telescope. Once you have retightened the clamps, you use the two flexible shafts and the precision worm gear for fine tuning and tracking.

The mounting saddle accommodates telescopes with a prism rail, compatible with the very popular Vixen standard. With the enclosed Allen key, the mount arm can be adjusted to optimize the viewing height of your optical system and to make sure that the telescope will not hit the tripod leg. Speaking of tripods: the Twilight I AZ comes with a steel tripod with extendible legs and an eyepiece tray.

The mount Twilight I AZ is currently available for a price of 279 Euro – an excellent price for a mount of this quality!

DeepSky-Set: Cooled camera ASI 1600 with filter and filter wheel from ZWO

March 13 2017, Stefan Taube

ASI 1600 MM series cameras from ZWOptical have really found their place in astrophotography. With its small pixels, the highly sensitive CMOS sensor offers high resolution, and this even in connection with a relatively big sensor diameter.

We now offer the cooled black and white camera of the ASI 1600 series in a set with a motorized filter wheel and suitable filters: ASI 1600 MMC DeepSky-Imaging-Set for a price of 2,019 Euro. You save 29 Euro when compared with individual prices!

ASI-1600-MMC-Mono-DeepSky-Imaging-Set

A camera with active cooling is optimal for taking photos of nebulae and galaxies, because the cooling reduces sensor noise and thus enables long exposure times. This enables you to even take photos of very faint objects in the sky.

Even though the cooled ASI 1600 is available as colour or black and white camera, only the black and white camera offers the full resolution of the sensor. Ambitious photographers therefore favour this variant. In order to show the colour of the celestial object you just simply take photos through three colour and one luminance filters – the latter to increase brightness. The computer then uses these four images to produce a colour image (L-RGB method).

The filters are placed into a filter wheel, so that the camera does not have to be removed and realigned again for each filter change. The filter change simply takes place by turning the wheel. The filter wheel in the Set with the ASI 1600 is electrically powered and controlled via the camera, meaning you do not need an additional cable connecting to your computer. You simply use the camera control to change from one filter to the next, and this, above all, without having to touch anything.

The four filters in the DeepSky-Imaging-Set were specially developed for the ASI 1600. The colour weighting has been optimized for its sensor, which in this case is a high-quality interferential filter. Since the filters are parfocal to one another, the focus position does not change when changing the filter. Besides the three filters for the red, green and blue channel, the set also contains an UV/IR band-rejection filter for luminance.

Just as the graph concerning the filter transparency (transmission) of the set indicates, the filters block out the disturbing light of many street lamps, but are highly sensitive in the red range of the H-Alpha and SII-line. The transmission rate is greater than 92%.

Transmission

With the ASI 1600 MMC DeepSky-Imaging-Set you receive a high-quality, yet reasonable, camera system with almost unlimited possibilities!


Now available: the EQ6-R mount from Skywatcher!

February 20 2017, Stefan Taube

The new EQ6-R Pro SynScan GoTo mount from Skywatcher is now available for ordering. With its price of EUR 1,599 it is just slightly more expensive than its predecessor. We offer you the EQ6-R even cheaper than the price recommended by the manufacturer: You save EUR 100!

The EQ6-R mount is the further development of one of the most popular astronomical mounts. The classic EQ-6is an equatorial mount with computer control (GoTo). It has a high load capacity, but is still portable. And this all for a fair price. No wonder that the EQ6 has really found its way into the heart of the stargazer community.

“Only those who change remain true to themselves.” (Wolf Biermann)

The new EQ6-R does not do everything differently, but many things better:EQ6-R-Pro-SynScan-GoTo

  • Ergonomic design with bigger twist handles for polar elevation setting and a better polar elevation display, convenient handle for transport, mounting saddle for Vixen or Losmandy standard prism rails.
  • Latest version of the SynScan hand controller, permanent PEC correction and camera shutter control.
  • And best of it all: a toothed belt drive! With this new drive system there is no effect known as backlash, i.e. no gear play when changing direction. The mount runs much quieter, with higher torque. All this has a positive effect on autoguiding.

With this new version Skywatcher gives its classic mount a facelift. This way the new EQ6-R will be a standard in hobby astronomy for years to come: the EQ6 just keeps on running…

Now available: Omegon Autoguiding-Set with 15% price advantage

February 6 2017, Marcus Schenk

Simply useful for astrophotography: a guidescope and an autoguider, with which you can control your long exposure photographs and ensure perfect and dot-shaped tracked shots.
Omegon now offers a mini guidescope with a 50 mm or 60 mm diameter. With the Touptek Autoguider GCMOS01200KMB Mono the whole system becomes an astrophoto control base.


Even more economical in a set

You can also buy the mini guidescope in a set with the Touptek guider.
Your advantage: buying the set you save up 15% compared with the individual products:
1. Omegon camera Easy Autoguiding-Set50
2. Omegon camera Easy Autoguiding-Set60


Why these guidescopes are so convenient

Until recently, photographers used long refractors mounted parallel to the main telescope, which require their own tube clamps, are impractical and, all in all, very heavy. Used on a stationary telescope, there is no problem. But what if you want your telescope to be portable? With the new mini guidescopes, it is as simple never before. Simply mount the guidescope to your existing finderbase, connect the camera – and you are ready to go. Plus, it is not much heavier than a common finderscope. We think this is really convenient! This way you can even use smaller telescopes for taking photos of DeepSky objects.

What are your astronomical plans for 2017? To take your best astrophoto? With our new technology this dream can easily become a reality.

Omegon Mini-Guidescope: Small Guidescopes for better astro photos

January 23 2017, Marcus Schenk

Times are changing: Everything is getting smaller. Also in photography! In the past one solely had to handle large and long Guidescopes in astro photography. The assembly of such equipment often was very inconvenient. With the new Omegon Mini Guidescopes tracking is considerably easier.

Finder and Guidescope: The 60 mm Omegon Microspeed Guidescope mounted on a telescope.

“A Guidescope is a telescope, which is mounted parallel on the main instrument. While the camera is mounted to the main telescope, the Guidescope is responsible for accurate tracking.”

Presentation: Guidescope types 50 and 60 from Omegon.

The Omegon Mini-Guidescopes are available with 50 mm and 60 mm diameter. They are only 200 mm and 260 mm long and with 600 and 900 gram they are almost as light as a 2″ eyepiece. What are the benefits when compared with “conventional” Guidescopes?

  • Lighter: Your telescope will not be overloaded. Even smaller telescopes will be suitable for astro photography.
    Simpler: Simply plug the Guidescope into the finder shoe. It is also simple to remove.
    Better focussing: Sensitive focussing with the helical focuser.

For further details please refer to the product pages for the 50 mm and 60 mm Mini-Guidescopes.

Autoguider and Guidescope: Are they an effective team?

This question can be answered with a clear: “Yes”. The Guidescope works optimally with an Autoguider. Why? Most modern Autoguiders have small pixels. This comes with a clear advantage: A shorter focal length of the Guidescope. Touptek Autoguiders, for instance, have such small pixels. Main feature: Due to the new sensor design these cameras are highly sensitive. This enables you to find,the right guide star for any object.

“With the Guidescope and my camera I always find a guide start in the field of view” says Bodo Fischer, astro photographer and user of the Guidescope.

The Guidescope with a Touptek camera

Which camera is suitable for Microspeed Guidescopes? Our recommendation: Touptek “GCMOS01200KPA” cameras. Highly suitable due to the high image rate of 30 images per second, a ST-4 Autoguider port for your mount and an image processing software.

The best combinations:

  1. Microspeed Guidescope 50 mm + ToupTek GCMOS01200KPA Mono Guider
  2. Microspeed Guidescope 60 mm + ToupTek GCMOS01200KPA Mono Guider

Tip: With the camera use a Omegon UV-IR-filter or the Baader Semi APO filter. For even more brilliant stars and even more success in Autoguiding.