Your partner for astronomy

Archive for 2017

Blog Archives

Experts on Tour – Leica has invited us to deepen our expert knowledge!

August 1 2017, Stefan Rieger

In order to refresh our expert knowledge, we occasionally get up early in the morning: The plane to Hamburg took off at 6 o’clock already, from there we travelled to Schleswig-Holstein. Leica had invited us to comprehensively check and compare their range of binoculars and spotting scopes over a period of two days. For this purpose, we travelled to the Kaltinger Watt. During a walk through the tidal flat and intensive watching out of the sheds of the NABU station, we were able to put the Leica binoculars and spotting scopes extensively to the test.

Hinflug mit Nikiair MUC-HH

During a delicious supper in a sociable group of people with dealer colleagues and Leica employees we explained which product developments the market is looking for. Let’s see, whether the one or the other idea will find its way into the product development.

On the second day, a theoretical part first explained, what a Leica product is characterised by. Leica describes this as the “Leica-DNA”: A specification profile that any product in the Leica portfolio must attain in order to make it from development to production.

The Leica DNA includes:

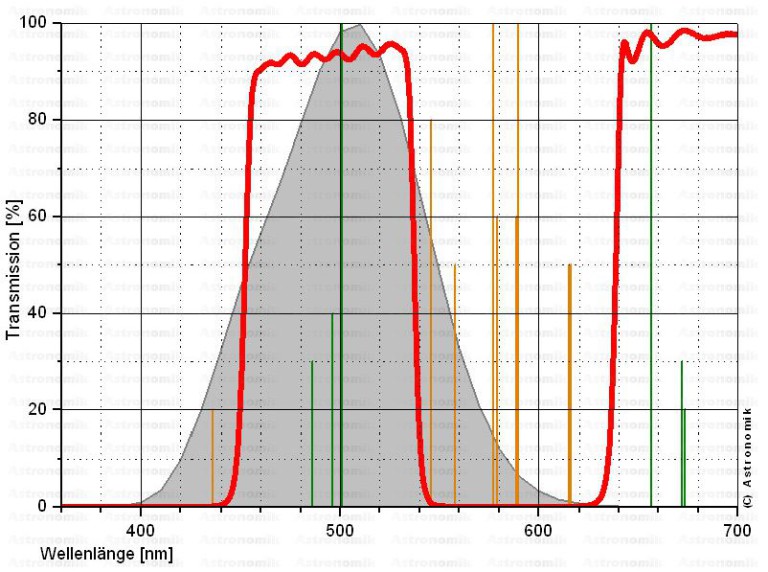
  • Compared with other premium products in their class, Leica products should have the best balanced transmission curve in the visible wave range of the light. This ensures excellent contrast and outstanding colour neutrality.
  • Besides the optics Leica also places high demands on the mechanics and the robustness of the housing. All models must pass some tests, both during the development phase and, at random, during ongoing production. As an example, Leica binoculars must withstand temperatures from 40 to 85 degrees over hours, i.e. they must work correctly immediately after. They must also withstand sudden shocks.
  • Leica products should always be the most compact binoculars of their class, but still highly ergonomic. For this purpose, Leica tries to balance the weight perfectly in comparison to their competitors, so that tipping the binoculars does not always need to be prevented by hand.
  • All Leica binoculars and spotting scopes are made for everyday use!

The following series of binoculars are currently in the Leica product range:

Leica Noctivid - das Non-Plus-Ultra für den Naturbeobachter

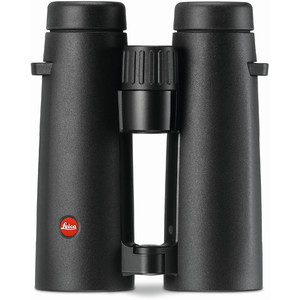
Leica Noctivid: This is currently the non-plus-ultra in binoculars for nature and bird watchers. Due to the extremely short close range of approx. 1.5 metres, it is most suitable for watching insects and crayfish as well as plants. Among the premium binoculars from European production, it currently offers the biggest field of view of its class and has – as preferred by many nature observers – an open bridge. Moreover, this instrument is characterised by a very plastic representation, which gives the impression of a very high focal depth.

Leica Ultravid HD-Plus, hier in der Sonderserie

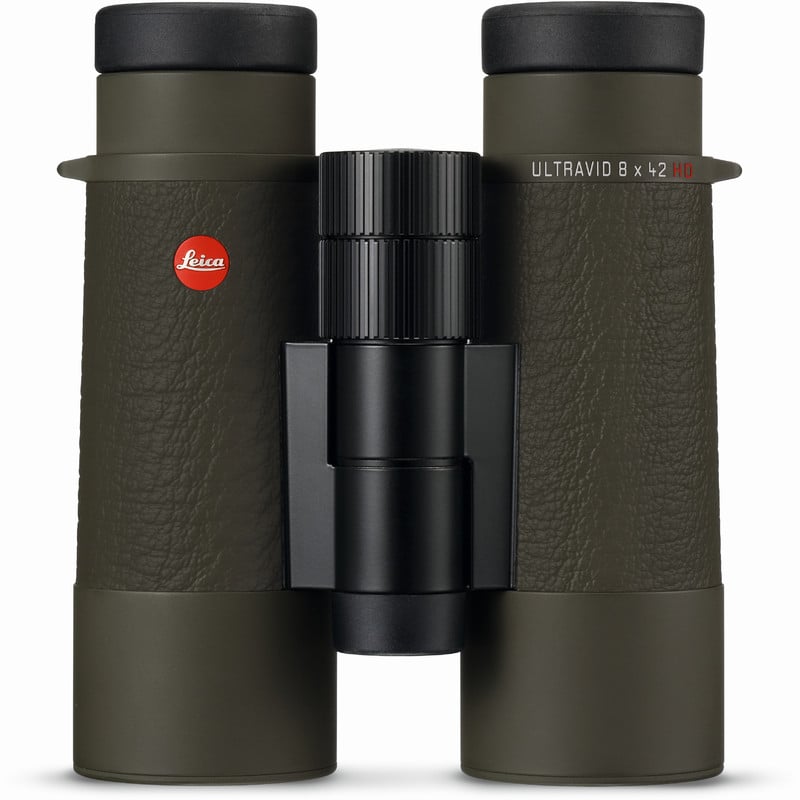
Leica Ultravid HD-Plus: The Ultravid HD-Plus is the successor of the legendary Ultravid HD and the Ultravid models. At present, it is still one of the most compact binoculars for discerning customers. This model has not been changed from outside, but the newly developed coatings have been adapted to the SCHOTT-HT-Glass that is now used. This allowed for a further improvement of colour purity, contrast and transmission.

Leica Trinovid HD 8x32

Leica Trinovid HD: Leica binoculars have been available under the name Trinovid already since 1963. This model designation is therefore very popular and known by many nature observers. Even today one can see models from the 60s and 70s hanging around the neck of some nature observers. In the meantime, so-called HD glass is also used for the most current version of the Trinovid HD series. This increases the contrast range and reduces colour fringes, leaving you with a much clearer and sharper image. As a measure to slightly reduce the production costs, this binoculars model is produced in their own factory in Portugal. The quality and manufacturing standards are obviously the same as in their factory in Wetzlar. The Trinovid HD series addresses users, who would rather keep an eye on their money, when it comes to judging between costs and the last percent of what is optically possible.

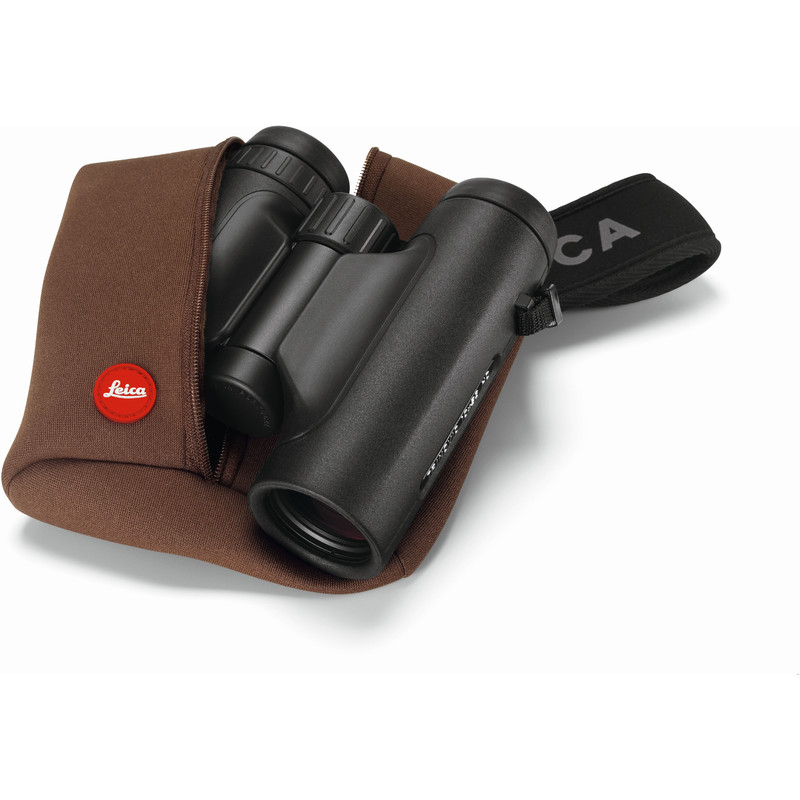
Leica pocket binoculars: Even with the pocket binoculars there is a differentiation between Ultravid and Trinovid. The Ultravid has a shorter close range, a slightly better image performance and, apart from that, is nitrogen filled and thus watertight and protected against steaming up from inside. The Trinovid is a classic, which, in its present form, has been available since the 90s. But still excellent and, above all, compact binoculars.

Leica Geovid 8x56 HD-B

More interesting for hunters is the Geovid series with integrated rangefinder. Moreover, for customers looking for something special, there are various models or edition models.

Leica APO Televid 82 W

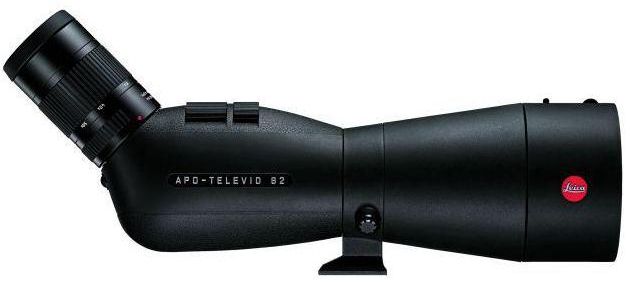
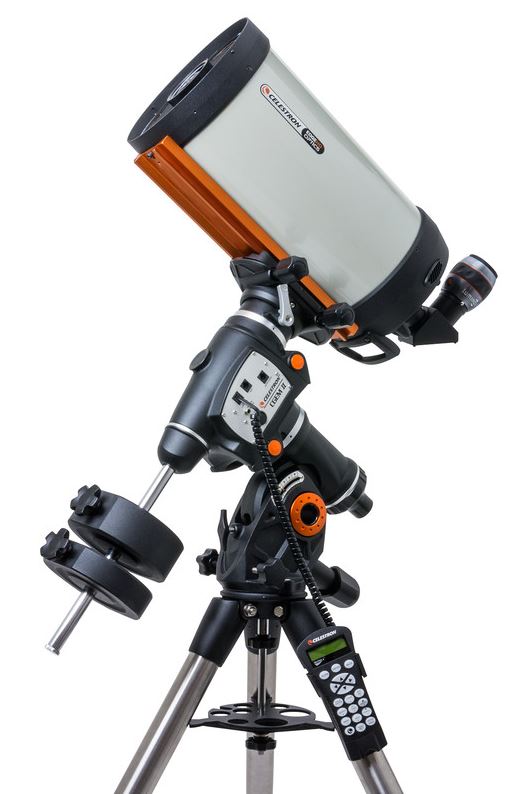
In case of spotting scopes the selection is more limited. Here there is only one series “APO Televid” which is available with various aperture diameters and always with straight or inclined view. The Vario Eyepiece is a so-called wide-angle eyepiece and provides a magnification range of 25-50x for all models.

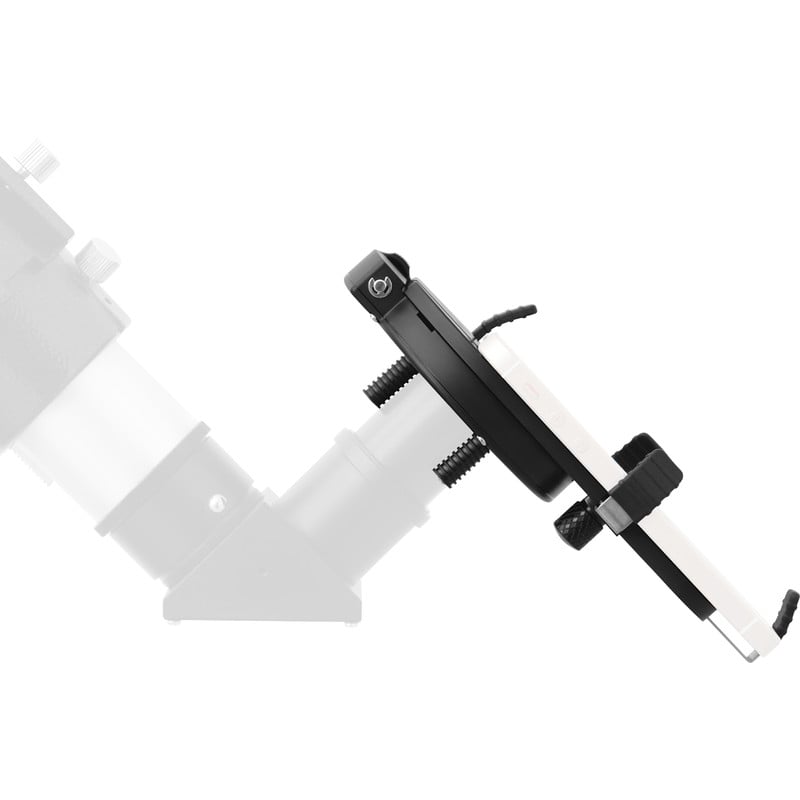
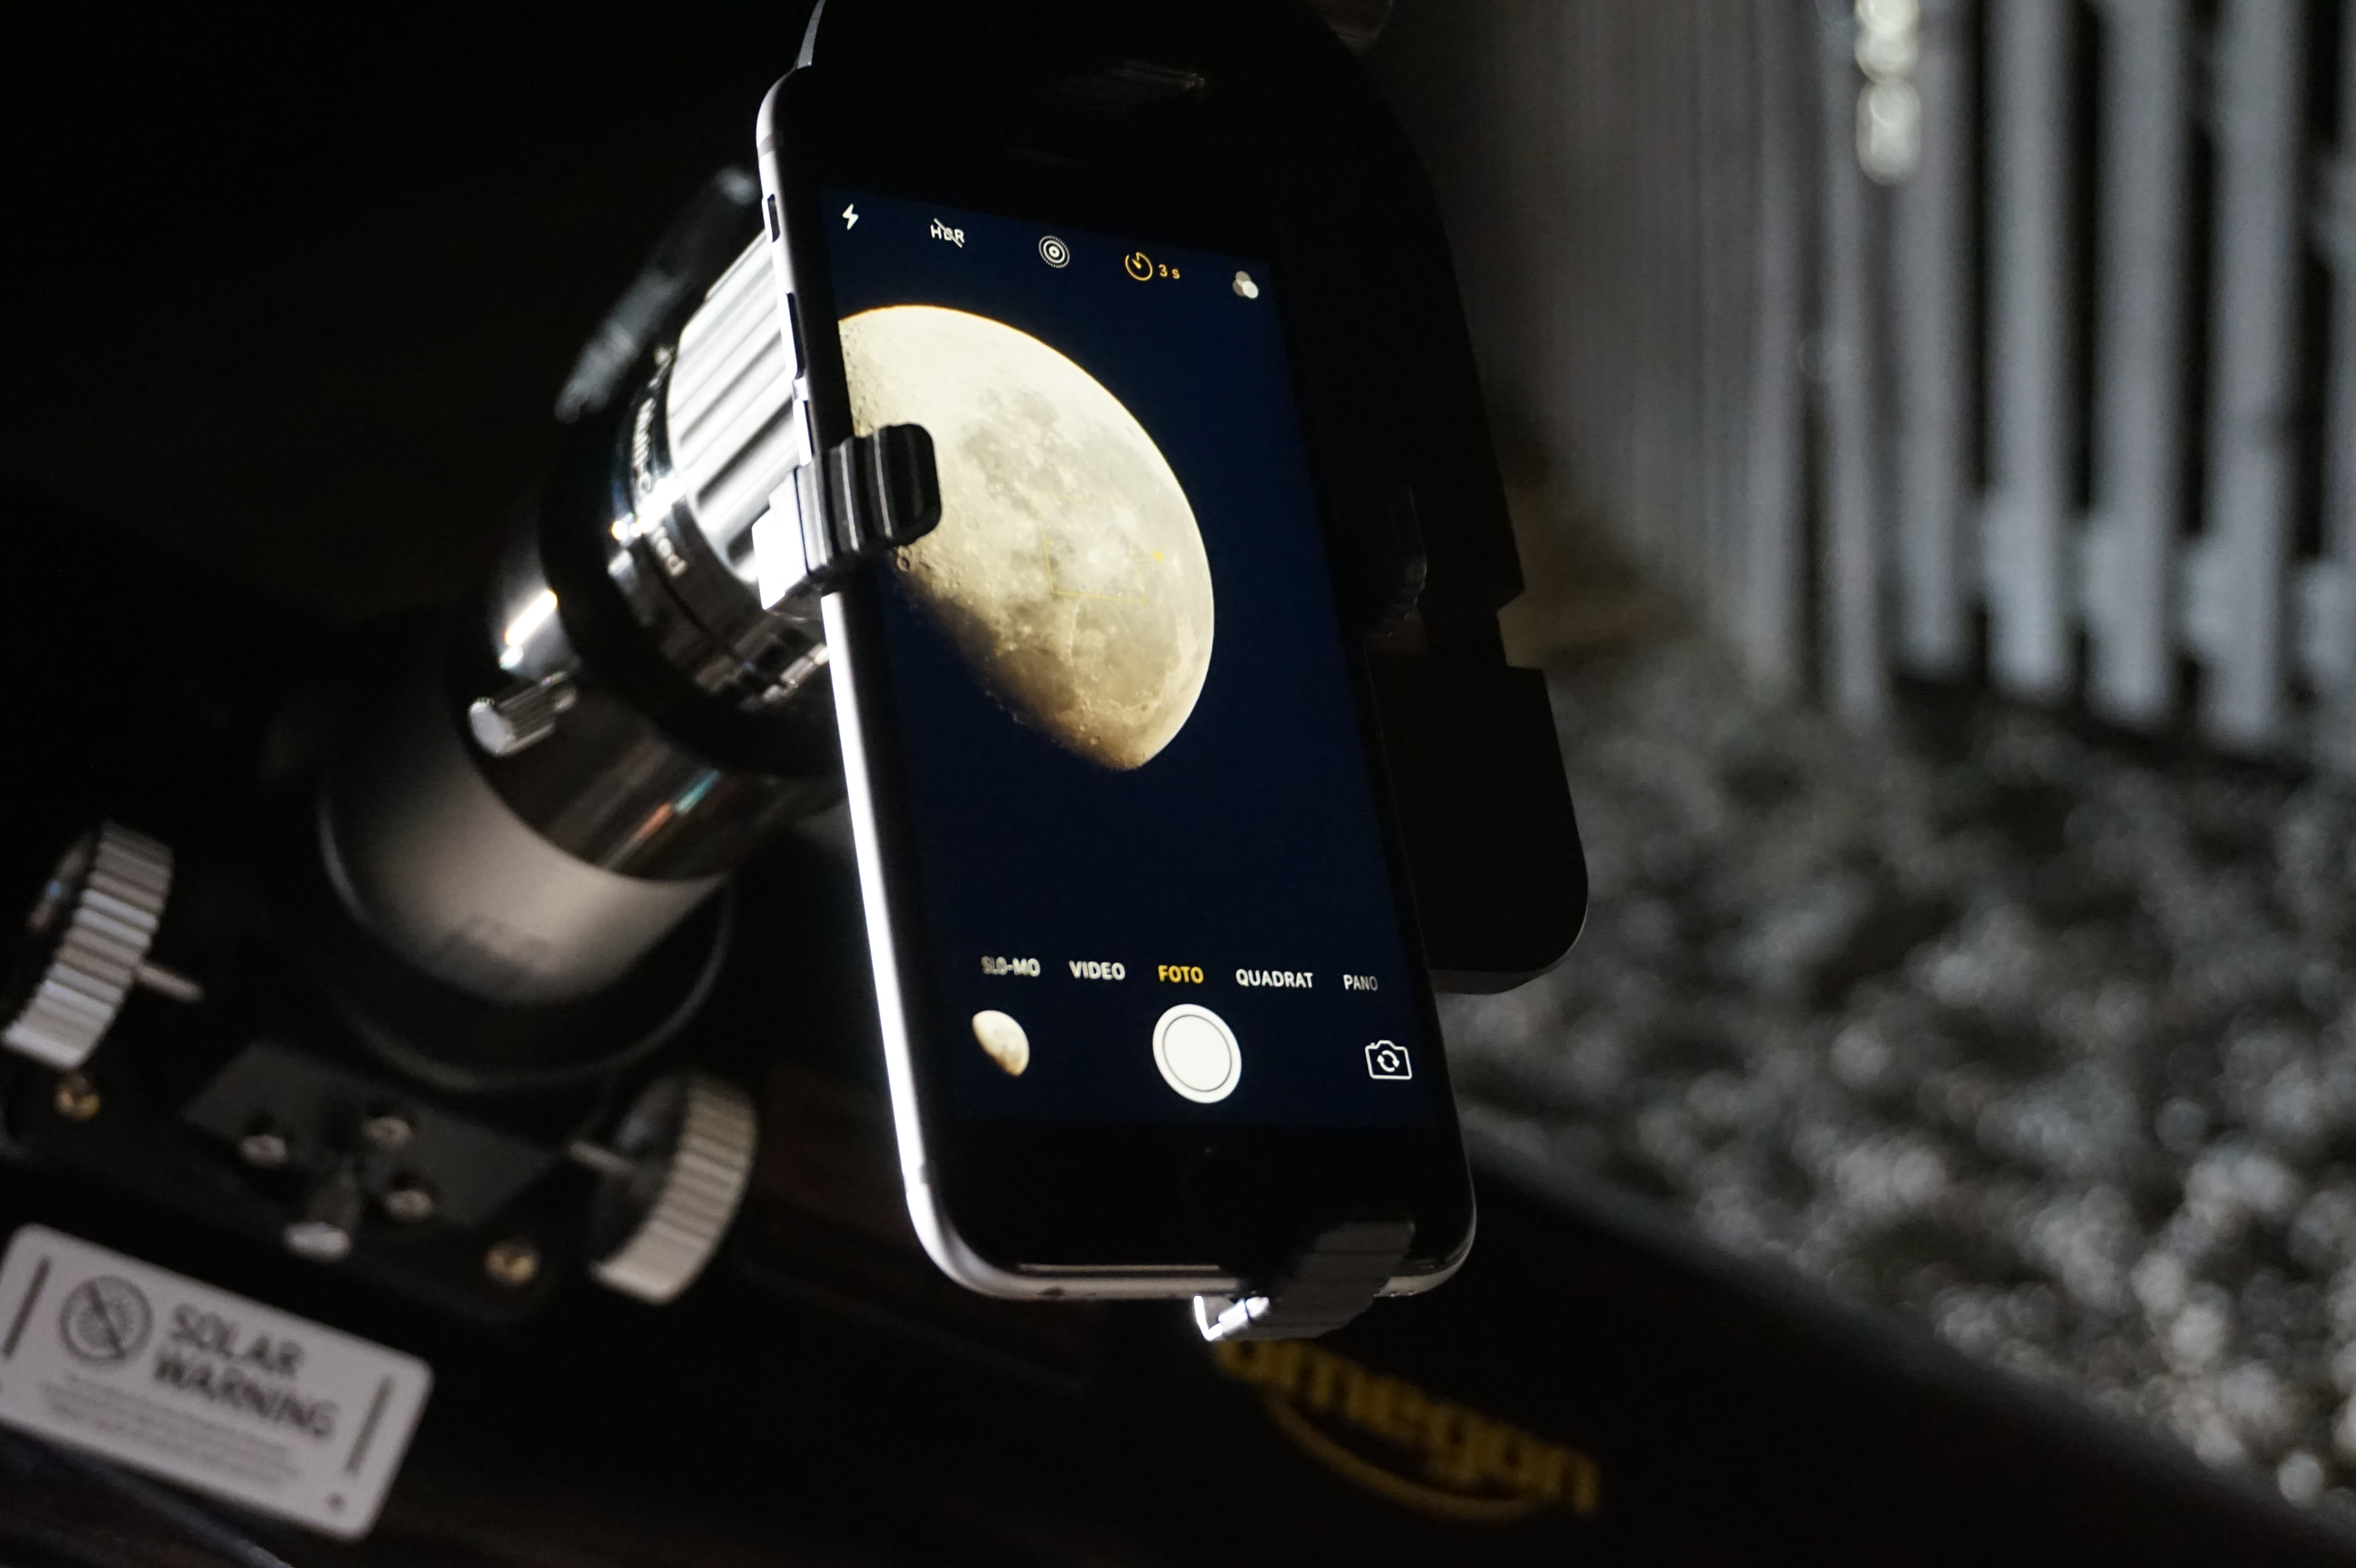
In the field of digiscoping, Leica supplies adapters for their own cameras, but also for system cameras and it is currently the only adapter with diopter compensation in the market. This is simply made to fit via an optional T2-ring for the DSLR or system camera.

Leica Beobachtungshütte am Katinger Watt

All in all, a very successful journey. With less sleep, but excellent impressions concerning Leica products, the Leica market consciousness and the bird life at the North Sea. Over the next few days my colleague will write a bit more about our observations.

Astronomik: new clip filters for Canon DSLR cameras

July 31 2017, Stefan Taube

Northern German company Astronomik is a specialist for astronomical filters for astrophotographers or purely visual star gazers. Clip filters are a special innovation of Astronomik. These filters have a special mounting shape, which allows them to be placed directly into a DSLR or system camera – without using any tools!

Astronomik currently offer clip filters for:

The camera mentioned last is designed with extremely high sensitivity. We offer this camera as a specially astro-modified camera. For more information please follow this link: Sony Alpha 7s Astro.

For APS-C Format EOS cameras from Canon, Astronomik have now developed a new series. A special feature of these new XT filters is the very thin carrier with a thickness of only 0.3 mm, to which the filter layer is applied. When using filters with thicker glass carriers, image faults may become visible in the corners of the photos. Stars appear slightly dash shaped. This can be particularly noticed when using short focal lengths. So if you would like to use a Canon EOS with the camera lens on a camera mount to take wide angle shots of the night sky, an XT filter might be the right investment.

XT filters are available in the usual versions, from CLS to H-alpha all the way to SII filters. For novices we especially recommend the CLS filter, which suppresses artificial light pollution.

The red transmission curve reveals: The CLS filter blocks the light from the yellow street lamps.

The red transmission curve reveals: The CLS filter blocks the light from the yellow street lamps.


By the way: Removing a clip filter from the camera housing is just as easy as putting it in.

SkyGuider Pro: the large camera mount from iOptron

July 17 2017, Stefan Taube

The SkyTracker Pro from iOptron is one of the most popular camera mounts. This handy unit tracks photographic equipment of up to three kilograms in weight to follow the rotation of the sky. This allows you to take panorama shots of the night sky with long exposure times.

The new SkyGuider Pro from iOptron can even carry up to five kilograms of photographic equipment. This is easily sufficient for a small telescope, such as the Photography Scope with camera. The scope of delivery already includes a mounting plate for small telescopes.

The scope of delivery also includes a counterweight for balancing the photographic equipment. This provides stability and takes pressure off the rotation axis.

However, you can also install a second camera with up to three kilograms in weight instead of the counterweight. This way you can take photos of the same sky area, but with two different focal lengths.
Alternatively, you can use the second camera as an autoguider.

On the product page for the iOptron Mount SkyGuider Pro you will find an illustration showing the vast variety of applications for this camera mount.

In addition to the counterweight, the scope of delivery of the SkyGuider Pro includes almost everything you need. The only thing missing is a tripod and a ball head might also make sense. Both these articles can be found under the tab “Recommended Accessories” on the product page.

The SkyGuider Pro comes with a power pack which can simply be recharged via USB. There is hardly any mount for sky photography available for use with photographic equipment of up to five kilograms in weight, that is more light-weight or more compact. As with other mounts from iOptron, the SkyGuider Pro also offers a satisfying, solid mechanical design. We are convinced that this new camera mount will meet your approval!

Good things always return: The ETX-125 telescope from Meade

June 29 2017, Stefan Taube

It is available again, the ETX-125 from Meade. Easy to transport, versatile in use and computer controlled – this made the ETX-125 a classic in the past!

ETX125

The advantages of the Meade ETX-125:

  • Compact Maksutov optics: Longer focal length despite the short tube. Ideal for watching the moon and planets, but also for observing nature in the daytime. The robust Maksutov is stable in adjustment and, due to the closed tube, has a well protected mirror.
  • With its opening of 127 millimetres, it is the biggest optics of the ETX series and also suitable for watching objects beyond our solar system: The Orion nebula, the big star cluster M13 in the Hercules constellation, and many other objects.
  • The optical tube is fixed in a bracket mount. It reliably carries the optical system, its motors in both axes align it with the desired observation object and track the telescope in line with any rotation of the sky. The integrated battery compartment provides the required electric current for the motors during outdoor use. However, the ETX-125 can also be powered via an optionally available power supply unit.
  • The tube is actually fixed in the fork, but the fork can be removed from the tripod for easier transportation. The steel pipe tripod carries the telescope without any negative wobbling. Another special feature: The tripod comes with an integrated equatorial wedge. This makes the azimuthal bracket mounting an equatorial GoTo mount, as is needed for astro photography.

And all this for a fair price!

The Meade ETX-125 is a GoTo telescope. This means that it is equipped with computer control, which makes it possible for beginners to find and identify objects in the sky.

The telescope is controlled via the new AudioStar-Handbox:

AudioStar

With AudioStar, you can choose from 30,000 celestial objects. However, the control also suggests objects for watching. A special feature of AudioStar is the audio output. It provides interesting information about the chosen object – however, only in English.

The compact, robust and computer controlled Meade ETX-125 also convinces in its new design!


Focusers: This is how you optimise your telescope on the accessories side

June 19 2017, Marcus Schenk

A focuser is most likely the component, that is used most frequently and intensively on a telescope. How often do you plug in eyepieces, adapters and cameras? Yes, a focuser has to cope with quite a lot. But is it of sufficient quality? Many telescopes are designed for a very reasonable price – this can then be noticed on the focuser. Optimising the focuser has a tremendous effect at this point.

Having a good look at your current focuser quickly reveals whether you can achieve even better results with your telescope.

An interesting question: What is the purpose of a high-quality, accurately moving focuser? What should it be able to do?

omegon-focuser-blog-astroshop

Five arguments for a good focuser

A focuser should

… be free of play.
You probably know this? You turn the focuser wheel, but the mechanical system rotates without any effect. And all of a sudden, it starts to move. On the one hand this is annoying, on the other hand it gives you the feeling of working with low-quality material.

…be free of any shifting.
You turn the focuser wheel, but Jupiter performs a rain dance and is jumping about in the eyepiece. Even worse in a camera. The object may even jump out of the field of view. Diagnosis: Shifting. This should be remedied as quickly as possible by using a good focuser.

…not bend when a camera is connected.
Unstable focusers sometimes lead to fatal results for your astro photographs. If the focuser tube bends, a photo may be sharp in one corner, but blurred in the other. Now, who wants such a result after an otherwise successful photo session. Further down, you find a list with a load capacity that specifies the maximum camera load, which should help to avoid such problems.

…have an accurate, fine focus adjustment.
Anyone enthusiastic about astro photography knows: Focusing the camera on an object in the sky is a challenge. This is much easier with a smooth running focuser or a 1:10 dual reduction. This allows you to adjust the focus in the range of tenths of a millimetre. This all to find the exact sharpness.

…not slip when using heavy accessories.
A heavy eyepiece may have a weight of up to 1 kg, camera equipment may even be heavier. In this case, it is an advantage to have a focuser that does not slip under a heavy weight.

Our product range includes some Omegon focusers, with which you can easily optimise your telescope and enhance its performance. For even more fun when star gazing. Especially the Omegon products of the series V-Power, Omegon Pro and the Omegon Hybrid Caryford Dual Speed are dedicated for these five wishes and fulfil them with high precision. The mentioned Omegon Hybrid Caryford Dual Speed has even been designed with a very low construction height. On very fast Newton systems, with e.g. f/5, one can reduce the vignetting and enhance the illumination.

You surely want to know whether the focuser matches your telescope. How high is the backfocus? What are the adapter measurements? How high is the load capacity of the focuser? This new list provides all information at a glance. You can immediately see, which focuser would suit you best.

Omegon_Focuser_Table

CGX-L: The Large Version of the New Celestron Mount

June 12 2017, Stefan Taube

At the beginning of February, we introduced the latest development from Celestron: Celestron CGX. The CGX now has a big sister. The brand-new  CGX-L mount is able to carry 34 kilogrammes and thus almost 10 kilogrammes more than the CGX.

The large 14 inch optics can thus also be used with the new technology of the CGX-mounts:

CGX-L-1400

The generously sized 144 millimetre worm gears are an important factor in increasing the load bearing capacity. They enable smooth running, even when carrying heavy telescopes. Apart from this, the dovetail clamps were extended to 270 millimetres, so that large telescopes are also securely held in place.

The illustration shows the mount head with the large worm gear and the toothed belt drive:

CGX-L-Antrieb

Another positive aspect: Additional AUX ports and the autoguider connection on the DEC-axis ensure a better cable management.

If you intend to use large optics with photo equipment, you need a heavy counter weight. With 31.5 millimetres in diameter, the counterweight shaft has been adequately dimensioned for carrying heavy loads.

Despite the increased load bearing capacity, the CGX-L is still portable. And not only the mount is able to carry higher loads: Celestron delivers the CGX-L with a steel tripod which has been considerably reinforced compared to the CGX. The tripod legs have a diameter of 70 millimetres!

The CGX-L is a universally usable mount, with hardly any limits: You may use it stationary in your garden observatory or transport it to telescope meetings or to your favourite observation location.

We offer the mounts CGX and CGX-L individually. With the dual saddle plate, you can combine these mounts with almost any optics system. But you can also decide on a complete telescope system consisting of mount and Schmidt-Cassegrain optics. You will find these product series under the two links CGX- telescopes and CGX-L telescopes.

No matter whether you decide for the CGX or directly for the larger sister CGX-L, you will receive a modern mount, which will set the standard for the next few years.

New: Omegon Oberon eyepieces with 82° field of view

May 23 2017, Marcus Schenk

The new Omegon Oberon eyepieces have an 82° field of view and thus provide you with an outstanding free and open view. Apart from this, they are waterproof and filled with nitrogen. At less than 200 Euros they have a remarkably reasonable price tag and are affordable for almost every hobby astronomer.

Die Omegon Oberon Okulare mit 82° Gesichtsfeld

Waterproof and filled with nitrogen

You surely know the situation when eyepieces lose their shine. When dirt, pollen and the grease from your eyelids cover the eye lenses. This is normally the point at which eyepieces should be cleaned. But this is not as simple as it sounds, because lenses need to be cleaned with great care and using optical cleansing agents.  Omegon eyepieces make it incredibly easy.

Simply flush the eyepiece off under running water. And your eyepieces gleam like on the first day.

The benefits of a large field of view

Wide-angle eyepieces are the dream of any stargazer. In contrast to the standard eyepieces with a 45° or 50° field of view, large-field eyepieces give you the impression of floating through outer space. Above 70° the eye does not perceive the outer edge of the eyepiece, and a starry sky appears almost endless. The Oberon eyepieces with 82° fulfil this task even better, because here the eye can even move within the field of view.

The Oberon eyepiece series consists of six eyepieces with focal lengths of 7 mm, 10 mm, 15 mm, 19 mm, 23 mm and 32 mm. The three small focal lengths are available in 1.25″, the three long focal lengths in 2″. Any star gazer knows that sometimes it is quite difficult to find an object. A 32 mm Oberon eyepiece like this makes things a lot easier: A small magnification coupled with an 82° field of view makes the big Oberon a perfect finder eyepiece.

But also a 7 mm eyepiece with 82° has clear advantages: Viewing the surface of the Moon with a high magnification while still seeing large areas of the lunar landscape – it is just amazing.

The advantages of Oberon eyepieces at a glance:

•    Enduring: waterproof and filled with nitrogen – to protect against moisture and for a long service life
•    82° field of view: giant field of view, almost without limitation
•    Goof grip: serrated rubber armouring
•    Upscale design: anodised aluminium housing

Come this way: You can find further details on the product pages for the new Oberon eyepieces.

Now available: the new CGEM II mount from Celestron

May 17 2017, Stefan Taube

The American telescope manufacturer Celestron has revised their work horse for astrophotographers. The CGEM II is very popular, and rightly so, because when it comes to load bearing capacity it has a lot of reserves as compared to the smaller Advanced VX mount; but it is cheaper than the big CGX. In the field of equatorial GoTo mounts for mobile astrophotography the CGEM II takes a middle position.

CGEM II

The new CGEM II not only looks very trendy, but it also features a few real innovations when compared with its predecessor.

  • New powerful motor electronics with the latest firmware.
  • USB 2.0 port on the hand controller. This way you can simply connect the hand controller to a PC for software updates.
  • PPEC (Permanent Periodic Error Control) ensures precise tracking.
  • Autoguider port. Indispensable for sophisticated astrophotography!
  • Tracking beyond the meridian.
  • The mounting saddle accepts prism rails acc. to Vixen and Losmandy standard. No adapter required.
  • Improved tripod with height marks: This makes it even easier to place the tripod horizontally.

With this mount, the telescope, camera and guider may have a weight of up to 18 kg. This leaves a really big tolerance range.

We offer the CGEM II, but also as a set together with the Schmidt-Cassegrain optics with apertures ranging from 8 to 11 inch (~200 to 280 millimetres): CGEM-II telescopes.

Combined with the classic SC-telescopes this provides you with excellent astronomical equipment which will give you joy for the rest of your life! If you have extra spending money, you should consider the CGEM II with EdgeHD. This variant of the Schmidt-Cassegrain telescope already has the correction optics for the unavoidable coma error integrated, allowing you to take sharp photos right to the edge.

Whatever you will decide, with the CGEM II you can’t go wrong!

Observing the Sun with the DayStar QUARK Calcium-H

May 11 2017, Stefan Taube

The American sun filter manufacturer DayStar revolutionised sun observations with its QUARK series. For a comparatively low price you can now use a refracting telescope with a small aperture for watching the Sun in a defined spectral line – this is no more complicated than plugging an eyepiece into a diagonal mirror.

DayStar have now extended their QUARK series by a model to watch the Sun in a spectral line of the chemical element calcium. With the DayStar QUARK Calcium-H-line sun filter you can watch the sun at a wave length of 397 nanometres – or perhaps not: Not everyone is able to notice such short-wave light.

However, with a planet camera this short-wave radiation can be recorded without any problems. Corresponding tests were undertaken by our colleague Bernd Gährken:

Sonne-Calcium-H

For this photo 4 images were combined. In addition to the QUARK Calcium-H-line, an Omegon photoscope with 1.6x Barlow and a planet camera were used. The scope of delivery includes adapters for 1.25″ and 2″ focusers. The Calcium filter works without telecentrics and requires an optical path of 6.2 centimetres. With many optics the focus cannot be reached directly. We therefore recommend also ordering the reasonably priced path corrector. It can be screwed directly into the QUARK filter. In terms of cameras, we specifically recommend the Mono Guider from Touptek or the planet cameras from ZWOptical. When photographing a tight spectral range, the complete resolution of the sensor can only be utilised when using a black-and-white camera (“mono”).

Unfortunately there were no sunspots on the sun when this photo was taken. This exemplary image provided by the manufacturer shows what sunspots in the light of the Calcium-H-line look like.

Sonne-Calcium-H-Daystar

Photographic data for this image can be found on the product page, QUARK Calcium-H-line.

Observing the sun is a fascinating alternative or an additional challenge for stargazers.

Lunar photography with a smartphone: the Omegon Easypic smartphone adapter

April 27 2017, Marcus Schenk

In the past, taking a photo of the Moon required quite some effort. Take the pictures, develop the film and hope for sharp images. And then came the disappointment if the Moon appeared blurred. This became considerably easier with digital and mobile phone cameras.

In the meantime, smartphone cameras have reached an outstanding level of quality. Which is a good tool for Moon photos, provided that we can tightly mount the phone to the telescope.

Let’s have a look to see how everyone can take a photo of the Moon through a telescope.

The Moon – shot with an Easypic adapter, an Omegon 8″ Dobson with Redline eyepiece and an iPhone.

Der Mond - aufgenommen mit einem Easypic Adapter, einem Omegon 8" Dobson und einem iPhone.

The difference to other adapters

The Easypic universal smartphone adapter follows a different route to his competitors. Most adapters have a clip that closes around a 1.25 inch eyepiece. The mobile phone is then separately held by a clamp and needs to be correctly positioned above the eyepiece. In itself this is a quite good system but needs quite a lot of experience on the part of the photographer. And in the end, everything must sit tightly in place.

Now the night is not always the right place for patience. And it is pitch black!

Is there no easier way? Yes, sure there is! With self-centring.

Here is how to prepare the adapter

With the Moon in the sky, you direct your telescope to Earth’s satellite. It is already nicely visible through the eyepiece. Now your smartphone and the Easypic adapter are going to play their role.

On the back of the adapter, loosen the small screw for the holding clamps. Pull the holding clamps fully to the outside. Then place your mobile phone with its camera lens directly over the central hole. Slide the holding clamps back against your phone and tighten the screw again. Check that the clamps fit tightly so that your mobile will not come loose.

Here is how to connect the adapter to the eyepiece

Now to the easy part! Hold the adapter with the smartphone to the eyepiece, making sure it has direct contact. Then turn the big screw on the side. This allows the movement of three bolts, which accurately clamp around the eyepiece at the same time. This way the adapter centres and fastens automatically around your eyepiece. The camera lens of the smartphone is perfectly aligned with the middle of the eyepiece.

For you this self-centring means: more focus on your object and less worry with technical details.

All done.

So sieht es aus: Das Smartphone am Teleskop und der Mond im Zentrum.

The photoshoot: The Moon in your smartphone

If your camera app has been switched on, you should now see the Moon in your display. Correct the focus once again and everything is ready for taking the photo.

These steps are necessary:
•    Switch off the flash
•    Activate the timer
•    Adapt the exposure time, if necessary and possible

Now press the trigger as usual and take a photo. This image of the Moon was taken with an Easypic universal smartphone adapter and an Omegon 8 inch Dobson telescope.

Using neutral density filters to reduce brightness

In most cases adjusting the correct exposure time is enough for successful Moon images. However, planets like Venus or Jupiter very often appear too bright in an image. They are over-exposed. The planet discs appear burned out. The solution: neutral density filters and variable polarising filters. This is our trick to be able to show the details of the planets.

Conclusion:

A smartphone in combination with an Easypic universal smartphone adapter allows you to take quick photos of the Moon and planets. You don’t have to be an expert: even connecting to the eyepiece is child’s play. All you need to do is position the adapter correctly. The smartphone takes photos of the Moon with outstanding sharpness. A fact that all of us could only dream about a few years ago.