7,500+ items available from stock
Best price guarantee
Your partner for astronomy

New Products

Posts Tagged 'astrophotography telescope-accessories'

New: StarAid Revolution standalone autoguider

January 21 2021, Stefan Taube

Autoguiding is understood to refer to the automatic monitoring of the tracking of astronomical mounts. This monitoring is required for astrophotography in order to keep the targeted object steady on the camera’s sensor.

There are a multitude of cameras available for autoguiding, however they require a laptop or PC and suitable software. Now, standalone solutions are coming out which do not require these supports. The latest innovation in this field is the StarAid Revolution autoguiding camera. Tracking monitoring is extremely simple using this!

StarAid-Kamera-Standalone-Autoguider-Revolution-Revision-B

StarAid Revolution standalone autoguider revision B

Plug & Guide: Connect the camera to your guide scope, connect it to your mount via the guide port, and voila! The camera kicks into action after around 30 seconds and sends corrective impulses to your mount’s motors.

But the StarAid Revolution can do even more: For example, polar alignment, the precise alignment of your mount with the Earth’s rotational axis. It is even possible to control the astronomical camera. An app is available for these additional options and also to monitor the tracking. In order to allow you to connect your smartphone to your autoguider, the StarAid Revolution creates its own WiFi network.

Revolution is a big word. Here, it really does apply!

The SkyGuider Pro camera mount from iOptron is now available with an electronic polar finder

January 8 2020, Stefan Taube

The SkyGuider Pro is a very light mount on which you can set up a camera with interchangeable lenses or a small telescope. This approach allows longer exposure times and so you can create fascinating wide-angle shots of the night sky.

iOptron Montierung SkyGuider Pro iPolar Set

iOptron Mount SkyGuider Pro iPolar Set

The SkyGuider Pro is now also available as a set together with the iPolar electronic polar finder, which has been built into the mount. With this accessory, you can easily and very precisely polar-align your mount.

The electronic finder has a built-in camera. This shows the position of the northern celestial pole and the location that the polar axis of the mount is pointing at, on your laptop. Simply bring the two points together by turning the adjustment screws for the azimuth and altitude axes of the mount – and you’re done!

SkyGuider Pro mit iPolar

SkyGuider Pro with iPolar

The location of the celestial north pole differs somewhat from the location of the Pole Star. The electronics calculate the exact position using the date and time. Thanks to the sensitivity of the camera and the large field of view, this so-called polar alignment is successful even when the mount has been only roughly positioned. This also works in the southern hemisphere and even takes into account atmospheric refraction at low latitudes!

If want to do without iPolar, you can of course still purchase the SkyGuider Pro mount without the electronic polar finder here.

ASIAIR – astrophotography has never been so easy!

December 17 2018, Elias Erdnüß

The brand ZWO is, especially thanks to its powerful and user-friendly CMOS astrocameras, a frequently heard name in amateur astronomy.

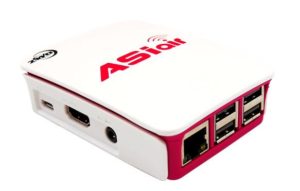
With the ASIAIR control unit, ZWO now promises to fundamentally change the astrophotography scene! It’s a compact computer (Raspberry Pi), that is secured to the telescope of the mount. The device can do everything you expect a computerised telescope system of the 21st century to do!

Mount, camera, filter wheel, and autoguider are connected with the ASIAIR. Via an app for Android or iOS, everything can be controlled centrally and wirelessly via WLAN from the smartphone or tablet. You’ll no longer need to take your laptop with you to autoguide and to use cooled astrocameras. There are also advanced functions such as plate solving at the press of a button.


ASIASI communicates with the telescope mounts via the instrument neutral distributed interface (INDI) and so is compatible with most available GoTo mounts. The only snag: The device only supports ZWO cameras, autoguiders and filter wheels.

Other manufacturers like PrimaLuceLab with the EAGLE 2 are following similar approaches to computerisation. This one may feature higher performance and a wider range of functions, but there’s also the user-friendly ASIAIR for just a fraction of the price.

New, high-performance astrophotography computer, the EAGLE series

April 10 2018, Elias Erdnüß

With the brand-new models, EAGLE 2 and EAGLE 2 Pro, as well as with the upgraded EAGLE CORE, the innovative Italian company, PrimaLuceLab, is taking astrophotography into the 21st century.


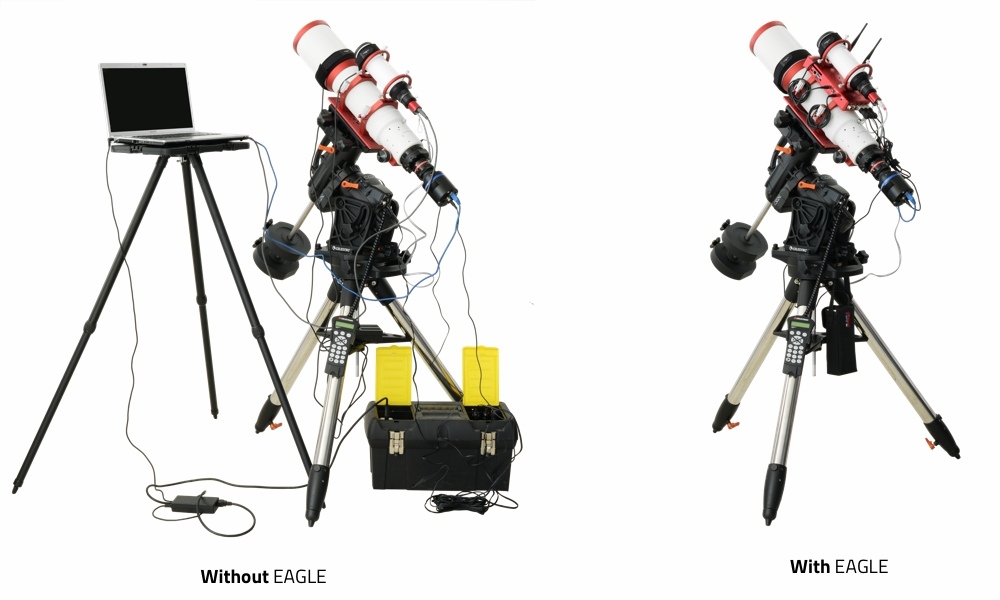
Many astrophotographers use a laptop: to control the wide range of camera equipment, autoguiders and filter wheels and to save the shots you take, a portable computer is essential. All devices must be connected separately to the battery and be connected to each other properly. It takes times and you end up with cables all over the place. When using heater bands, you need ever more controls, and this creates even more cable chaos. This hardly bothers those who have their own small observatory: All the equipment can remain permanently and perfectly set up with ideal cable routes and cable ties, and everything is controlled via a PC that is installed in the observatory.

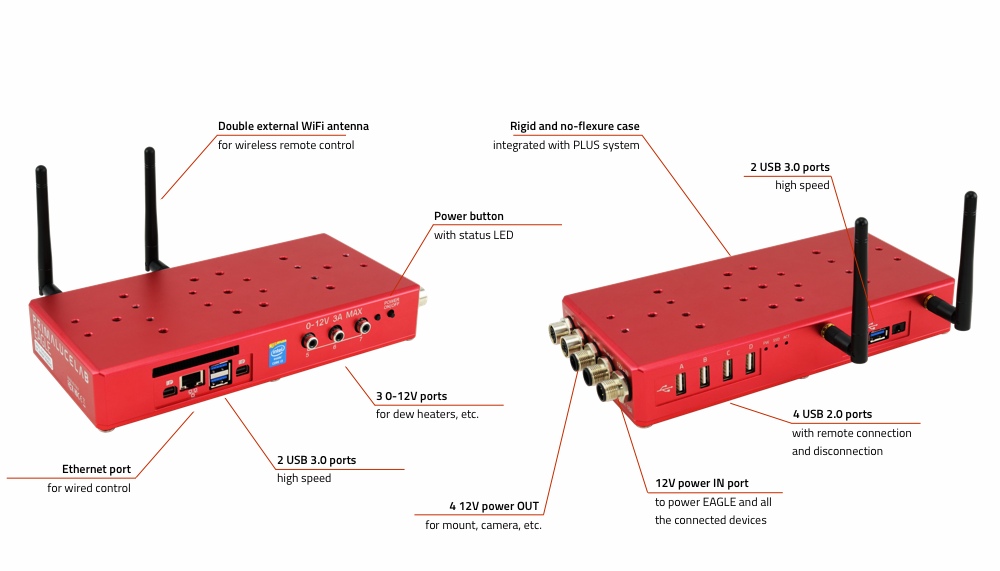
EAGLE 2 makes this comfort also available to astrophotographers without an observatory! The EAGLE 2 computers are full, high-performance Windows 10 computers on which you can install any software, just like a PC. Using USB connectors, cameras, mounts and autoguiders can be connected to the EAGLE 2, and it also features 12V outputs to supply the power for mounts, camera cooling systems and heating bands. The power supply of all the equipment operates like that via EAGLE 2 and can be set and controlled. A compact battery with just one single 12V direct current output is now all that’s needed! The EAGLE 2 is not just another device that takes up extra time every night to set up and for all the cables to be connected. It has many mechanical connection possibilities so it can be permanently connected to your equipment. The idea is to set up the optimum mechanical connection and perfect cabling once, and then carry it as a whole without stumbling or getting tangled up.

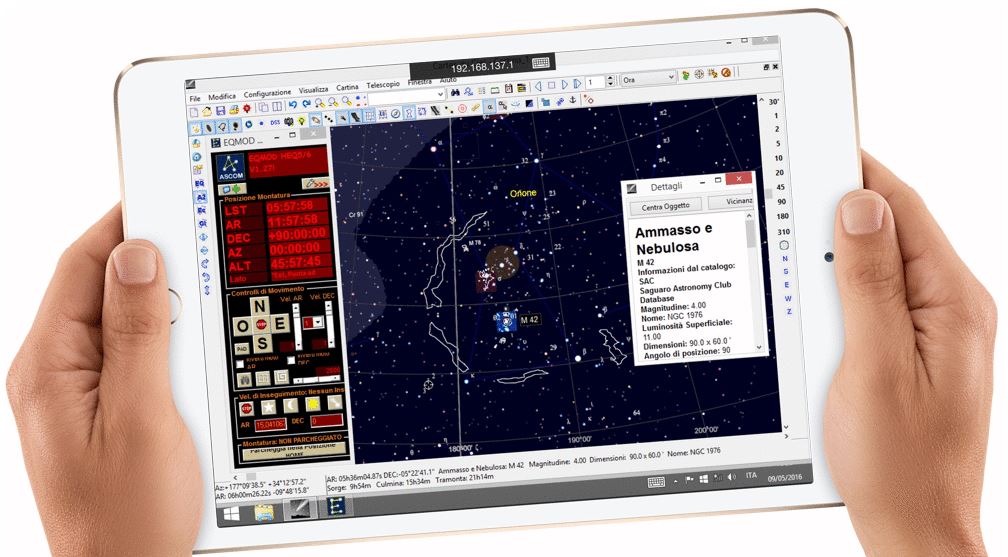
The greatest highlight of the entire system is, however, the Wifi capability of the EAGLE 2. From any terminal you want, whether it be your smartphone, tablet and even a Mac, you can control the EAGLE 2 remotely and wirelessly. On the terminal, you’ll see the familiar Windows 10 interface of the EAGLE 2 and can use it like any normal PC.

The pro version of the EAGLE 2 computer is fitted with more working memory, a more powerful processor and a larger hard drive. It is perfectly suited to more CPU-intensive image processing or other advanced application that go beyond simple telescope and camera control. The inexpensive small brother is the EAGLE CORE. There’s no Windows 10 running on this; instead, it has special software for controlling DSLR cameras and autoguiding equipment. So, the EAGLE CORE is the right choice for DSLR astrophotographers who want to use an autoguider without having to take an extra laptop with them.

If you’ve been thinking about buying a new laptop for astrophotography for a while, you really ought to consider the EAGLE 2 computer as an alternative. A permanently installed solution, no messy cables, no problems with power supply and comfortable wireless remote control all speak for themselves!

Lunar photography with a smartphone: the Omegon Easypic smartphone adapter

April 27 2017, Marcus Schenk

In the past, taking a photo of the Moon required quite some effort. Take the pictures, develop the film and hope for sharp images. And then came the disappointment if the Moon appeared blurred. This became considerably easier with digital and mobile phone cameras.

In the meantime, smartphone cameras have reached an outstanding level of quality. Which is a good tool for Moon photos, provided that we can tightly mount the phone to the telescope.

Let’s have a look to see how everyone can take a photo of the Moon through a telescope.

The Moon – shot with an Easypic adapter, an Omegon 8″ Dobson with Redline eyepiece and an iPhone.
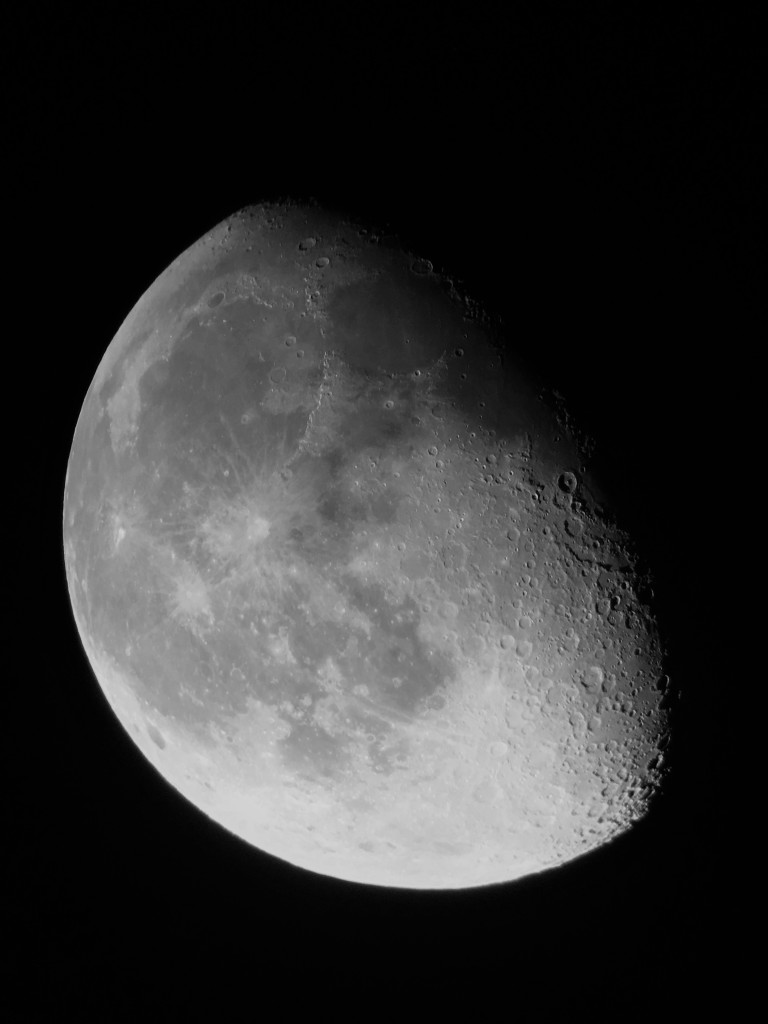
Der Mond - aufgenommen mit einem Easypic Adapter, einem Omegon 8" Dobson und einem iPhone.

The difference to other adapters

The Easypic universal smartphone adapter follows a different route to his competitors. Most adapters have a clip that closes around a 1.25 inch eyepiece. The mobile phone is then separately held by a clamp and needs to be correctly positioned above the eyepiece. In itself this is a quite good system but needs quite a lot of experience on the part of the photographer. And in the end, everything must sit tightly in place.

Now the night is not always the right place for patience. And it is pitch black!

Is there no easier way? Yes, sure there is! With self-centring.

Here is how to prepare the adapter

With the Moon in the sky, you direct your telescope to Earth’s satellite. It is already nicely visible through the eyepiece. Now your smartphone and the Easypic adapter are going to play their role.
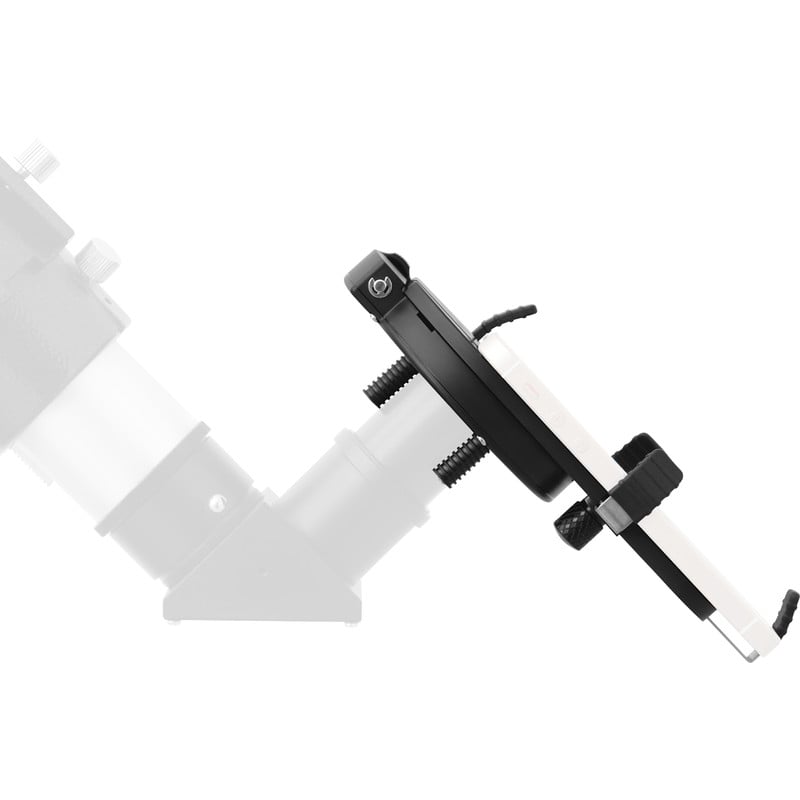
On the back of the adapter, loosen the small screw for the holding clamps. Pull the holding clamps fully to the outside. Then place your mobile phone with its camera lens directly over the central hole. Slide the holding clamps back against your phone and tighten the screw again. Check that the clamps fit tightly so that your mobile will not come loose.

Here is how to connect the adapter to the eyepiece

Now to the easy part! Hold the adapter with the smartphone to the eyepiece, making sure it has direct contact. Then turn the big screw on the side. This allows the movement of three bolts, which accurately clamp around the eyepiece at the same time. This way the adapter centres and fastens automatically around your eyepiece. The camera lens of the smartphone is perfectly aligned with the middle of the eyepiece.

For you this self-centring means: more focus on your object and less worry with technical details.

All done.
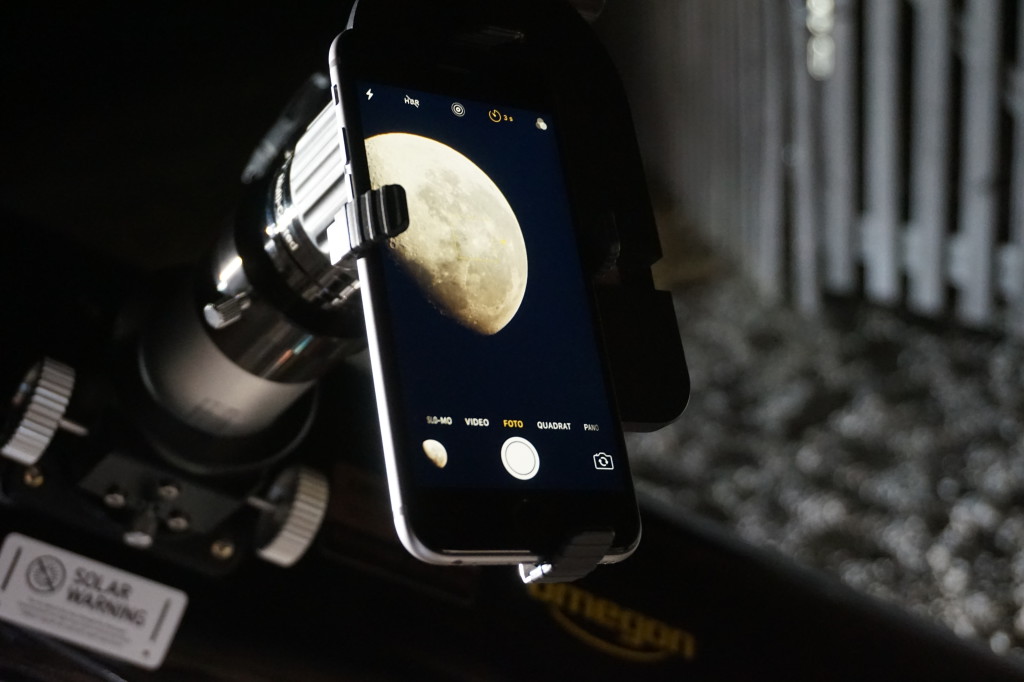
So sieht es aus: Das Smartphone am Teleskop und der Mond im Zentrum.

The photoshoot: The Moon in your smartphone

If your camera app has been switched on, you should now see the Moon in your display. Correct the focus once again and everything is ready for taking the photo.

These steps are necessary:
•    Switch off the flash
•    Activate the timer
•    Adapt the exposure time, if necessary and possible

Now press the trigger as usual and take a photo. This image of the Moon was taken with an Easypic universal smartphone adapter and an Omegon 8 inch Dobson telescope.

Using neutral density filters to reduce brightness

In most cases adjusting the correct exposure time is enough for successful Moon images. However, planets like Venus or Jupiter very often appear too bright in an image. They are over-exposed. The planet discs appear burned out. The solution: neutral density filters and variable polarising filters. This is our trick to be able to show the details of the planets.

Conclusion:

A smartphone in combination with an Easypic universal smartphone adapter allows you to take quick photos of the Moon and planets. You don’t have to be an expert: even connecting to the eyepiece is child’s play. All you need to do is position the adapter correctly. The smartphone takes photos of the Moon with outstanding sharpness. A fact that all of us could only dream about a few years ago.

EAGLE: The computer for astrophotography

September 12 2016, Stefan Taube

Why EAGLE?

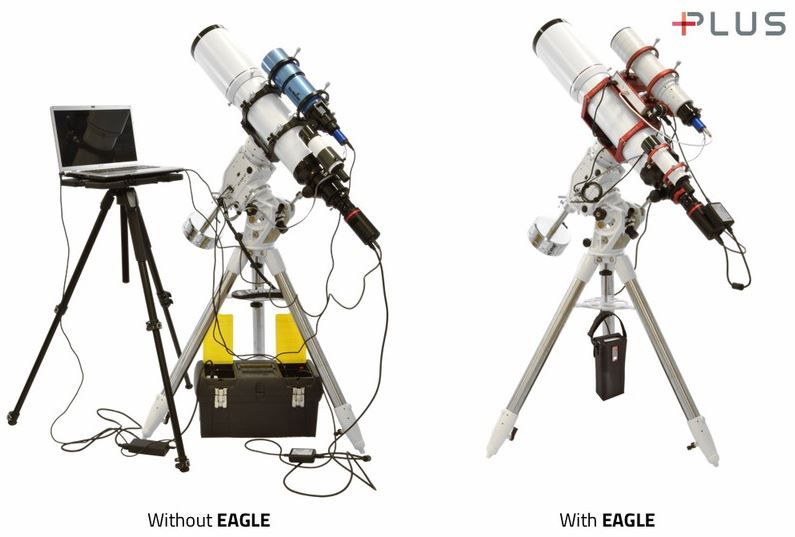
Hardly any other sector of our hobby, astronomy, has experienced such a dynamic development over the last few years than astro photography. But this all comes at a price! If in the past one had to set up a Dobsonian telescope, search the eyepiece bag for the correct focal length and probably also a colour filter, the mobile astronomer of today travels with an “observatory to go”: Equatorial mount with heavy counterweights, optics, camera, guiding telescope, guiding camera, laptop and large powerpack. Is there no easier way? The EAGLE control unit makes this possible. It is a computer that is tightly connected to the tube, and it controls mount, camera and guiding camera, centrally supplies electric current, and saves images. You can operate EAGLE wirelessly via WIFI with an input unit of your choice.

EAGLE

No messy or torn cables

All power and data lines to the mount and peripheral equipment run centrally from EAGLE. This allows the use of short cables and to leave these cables partially connected for a quicker setup. Since the EAGLE computer performs the same tracking movements as the mount, no cables can be wound up or torn off by the mount. You can quite confidently allow your astro photographical equipment to run for hours without supervision. The only cable you need to keep an eye on is the electric power supply cable for the EAGLE. Talking of power supply: Due to the power management of the EAGLE, you only need a smaller Powertank, or you can take photos over an even longer period of time.

EAGLE generates its own WIFI

With the associated app you can use all the programs you need, wirelessly and conveniently from your garden chair. Popular software like PHD2 Guiding are pre-installed. Since the EAGLE runs under Win 10 Enterprise, you can also install other programs. The advantage of EAGLE is the fact that you can control your system with any WIFI-compatible computer and any operating system: no matter whether you use a laptop, tablet or smartphone, and no matter whether you use Windows, Android or Apple. In the field, the WIFI range is approximately 25 metres.

EAGLE-Tablet

EAGLE saves your photos

You can have the camera images directly transferred to your tablet, laptop or smartphone via WIFI. Since you obviously take a lot of photos which need to be saved without losses, the EAGLE is equipped with an SSD memory card. Saving to a USB stick is also possible. However, there is no possibility to edit any of the photos in EAGLE. The computing power has been designed for low current consumption, which is why EAGLE also works without ventilation.

EAGLE is a fixed part of the system

The EAGLE computer is no additional accessory that you have to carry around. The small, but very stable box can stay mounted to your tube. The best way of installation probably is the installation between the tube and the guide scope rings. However, you can also mount the EAGLE box on the same prism rail that you use to fasten the telescope on the mount. This is recommended if you do not use a guiding tube. On our EAGLE product page you can see examples for this.

There is nothing you can’t do without the EAGLE control unit. However, anyone who is actively involved in astro photography on a regular basis and now and again likes to travel to good star gazing locations or telescope meetings, will quickly appreciate the EAGLE: no cable problems, no computer crash, a stable power supply, a compact system.

There is also a more powerful version available, which has been designed for large mounts and observatories: EAGLE Observatory.