Luminescent emission nebulae, supernova remnants and planetary nebulae are all particularly beautiful objects pertaining to the night sky. This applies both to the simple process of visual observation, as well as to astrophotography. Nature illuminates such nebulae in specific spectral colours: the red light of hydrogen, the blue-green light of oxygen ions and also in the colours of sulphur and nitrogen ions. Nebula filters enable these colours to pass through whilst blocking the diffused light of the natural luminance of the sky and of light pollution. The result is a marked increase in contrast.
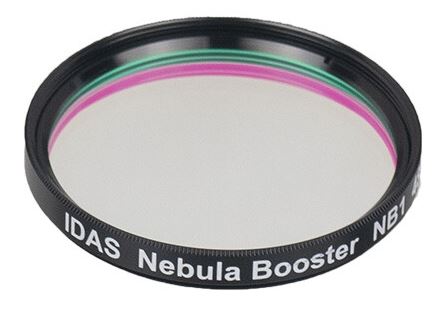
With the Nebula Booster NB1, the filter specialists IDASare introducing a new, very high-performing filter of this type onto the market, and one that is not overly expensive! As the transmission curve shows, the filter has high transmission and is permeable for all relevant spectral lines, with a surprisingly narrow passband: A real nebula intensifier!
Transmission curve IDAS NB1
The filter is ideal for photographing large nebula regions since it enables the typical colours of these objects to pass and blocks the disruptive skyglow. The filter quickly and completely cuts off near infrared up to 1100 nanometres. This is important since cameras are sensitive to this range, but telescopic lenses are optimised for the visible spectral range and are faulty in the infrared range.
IDAS Nebula Booster NB1
The Nebula Booster NB1 is available with two versions which cover both of the common filter thread sizes and can be screw-fitted to the housings of eyepieces or cameras.
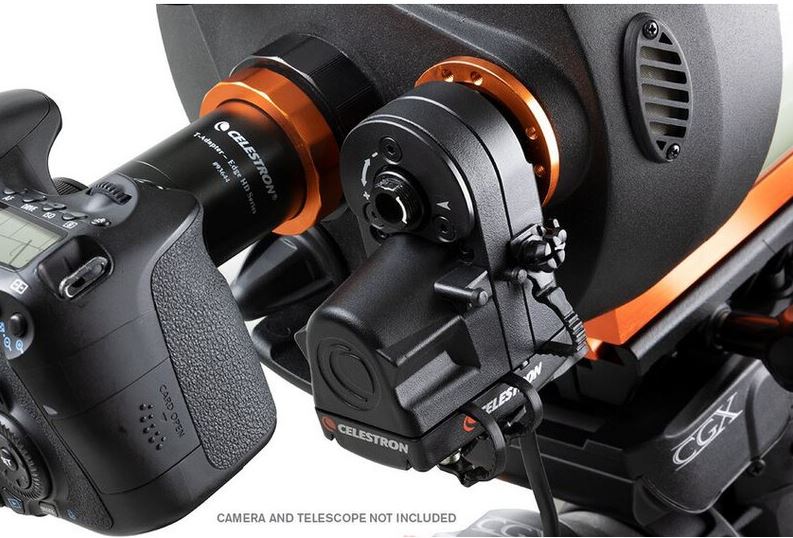
When it comes to astrophotography, the right focus is the most important thing. Even the best optics only deliver sharp images if the focus is spot on. A motorized focus has two advantages over manual focusing: it is vibration-free and very precise. If you remotely control your telescope via your PC, you definitely need motorization.
For the very popular SC telescopes of the Celestronbrand, numerous solutions from different suppliers have been available. Celestron now offers its own model, the focus motor for SC and EdgeHD optics.
Celestron focus motor for SC and EdgeHD optics.
The motor fits all SC, EdgeHD and RASA optics, as well as the two new Maksutovs with CGEM-IIand CGX mounts. Exceptions are optics built before 2006 and the 9.25″ EdgeHD. An additional adapter is required for the RASA 1100, as the RASA 1100 is already supplied with a FeatherTouch micro-focus. The adapter requires you to dismantle the focuser partially to fit the motor.
If you are using a Celestron mount, power is simply supplied via the mount’s AUX port. A cable for this is included in the scope of delivery. If all AUX ports on your mount are already occupied, simply use the Celestron Aux Port Splitter.
The motor can be controlled in three ways:
With the NexStar+ controller: Simply press the MENU button, select Focuser and you can use the two arrow keys to control the motor and adjust its speed. Version 5.30+ of the installed firmware is required. You can update your Nexstar control via the Internet at any time. The controller is not only suitable for visual observation, but also for astrophotography with a DSLR, i.e. without a laptop.
With a laptop or PC: If you operate your telescope remotely or have connected an astrophotography camera, it is best to use the free program Celestron Focuser Utility for Windows. For this purpose, you need to connect the NexStar hand controller to the computer via USB, not the focus motor itself. The new CGX and CGX-L mounts can be controlled with the Celestron PWI software. The focuser can also be addressed via this program. The CGXand CGX-L mounts can be connected directly to the laptop or PC via USB without manual control.
Without a Celestron mount: If you have a Celestron optic mounted on another brand’s mount, you can control the focus motor via the USB port. The USB port should supply 900mA. As an alternative to the USB power supply, you can also operate the focus motor via main power or a Powertank. However, a power supply unit or power cable is not included in the scope of delivery.
The brand ZWO is, especially thanks to its powerful and user-friendly CMOS astrocameras, a frequently heard name in amateur astronomy.
With the ASIAIR control unit, ZWO now promises to fundamentally change the astrophotography scene! It’s a compact computer (Raspberry Pi), that is secured to the telescope of the mount. The device can do everything you expect a computerised telescope system of the 21st century to do!
Mount, camera, filter wheel, and autoguider are connected with the ASIAIR. Via an app for Android or iOS, everything can be controlled centrally and wirelessly via WLAN from the smartphone or tablet. You’ll no longer need to take your laptop with you to autoguide and to use cooled astrocameras. There are also advanced functions such as plate solving at the press of a button.
Other manufacturers like PrimaLuceLab with the EAGLE 2 are following similar approaches to computerisation. This one may feature higher performance and a wider range of functions, but there’s also the user-friendly ASIAIR for just a fraction of the price.
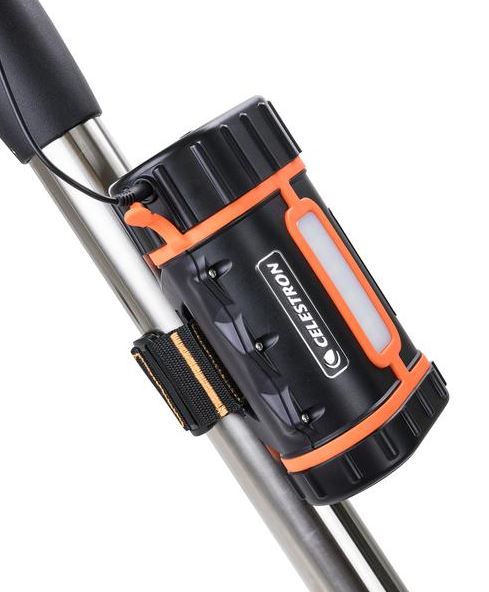
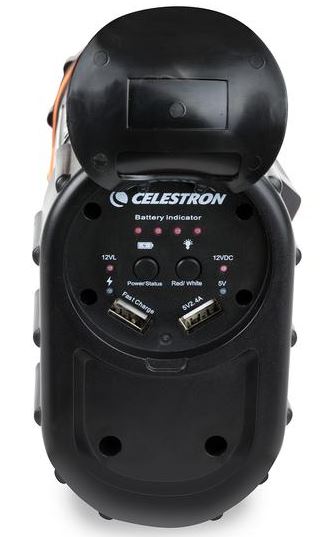
The Celestron Lithium Powertank has quickly proven itself and is already used as a power supply for countless astronomical telescopes. Celestron has now also packed two LiFePO4 elements into one battery to give twice the power with its Lithium Pro Powertank!
Some special features:
Up to 17 hours of power for your telescope!
Multiple devices can be powered simultaneously.
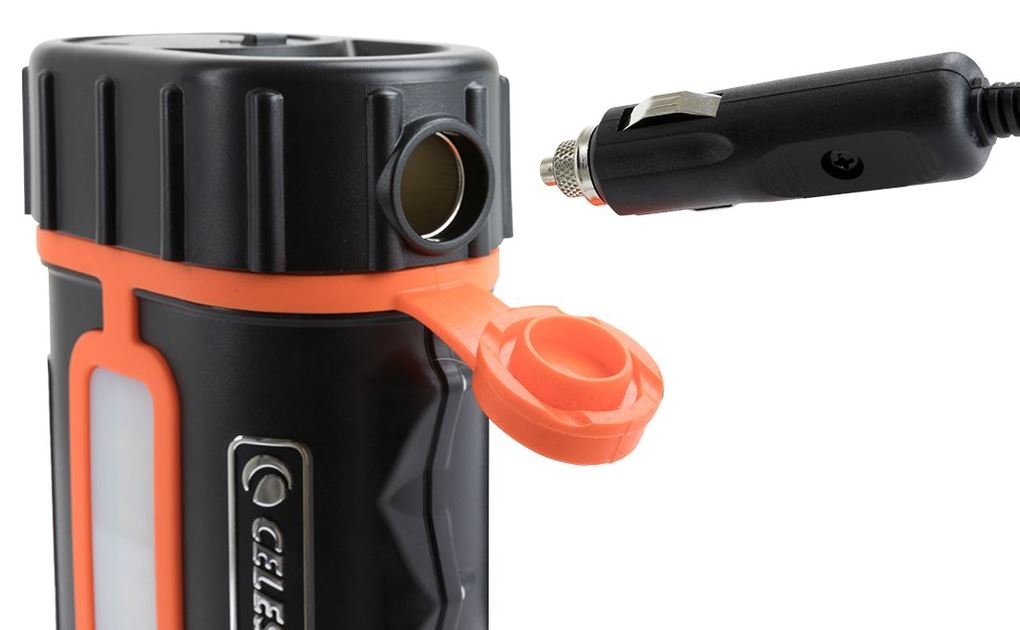
Socket for vehicle power plug (cigarette lighter cable). This cable is included with most telescopic mounts as an accessory.
High shelf life – unlike other power tanks, this battery does not need to be used regularly in order to maintain its performance.
Long operating life – up to 2,000 charging cycles, which only take about 3 hours.
Like its little brother, the larger Powertank also employs Celestron’s well thought-out design – it can be attached to the tripod with the loop and Velcro fastener provided. The torch has a red light function and the lid with the connections can be closed to protect against dust and moisture.
Thanks to its cigarette lighter connection, the Lithium Pro Powertank can be used with almost any mount. A powerful portable power supply such as this is highly recommended for slightly larger mounts, such as the Celestron CGX or the Skywatcher EQ6-R.
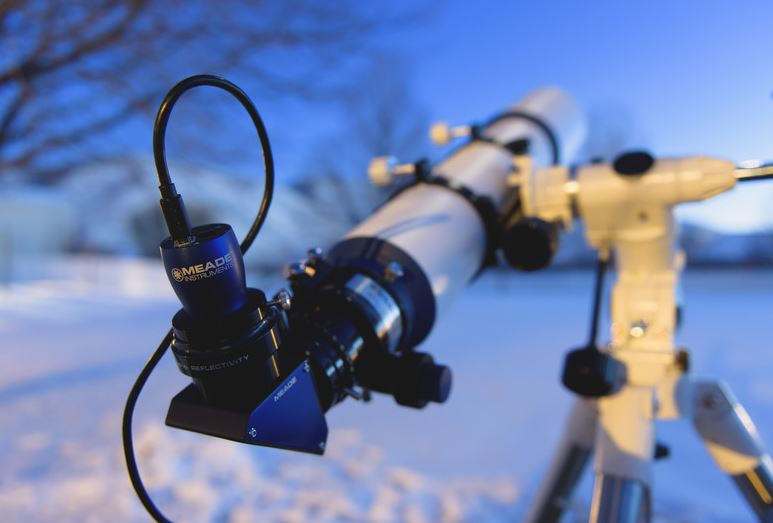
The abbreviation LPI-G stands for Lunar and Planetary Imager & Guider. These cameras from Meade are ideal for astrophotography involving the Sun, Moon and planets. Even small telescopes can safely carry these lightweight cameras. They plug into the telescope like an eyepiece and are connected to the laptop via USB.
Delivery includes Meade SkyCapture software – this allows intuitive operation and use of other programs via the ASCOM interface. The ST-4 socket means the cameras can also be used perfectly well as auto-guiders – that is, for the tracking control of your mount.
The standard version of the LPI-G series has a 1.2 megapixel sensor. The LPI-G Advanced camera offers a wider dynamic range, a 6.3 MP sensor and a high 59 fps frame rate. It has a USB 3.0 port to allow it to handle this data stream,.
The reasonably priced standard version is eminently suitable for beginners who would like to first get some experience. The Advanced model goes way beyond this and allows an intensive experience with planetary astrophotography to develop over many years.
Both versions are available as black-and-white or colour cameras. The black-and-white cameras have the advantage of higher sensitivity and resolution. The cost of colour imaging is higher as you will also need the appropriate colour filters and a filter wheel.
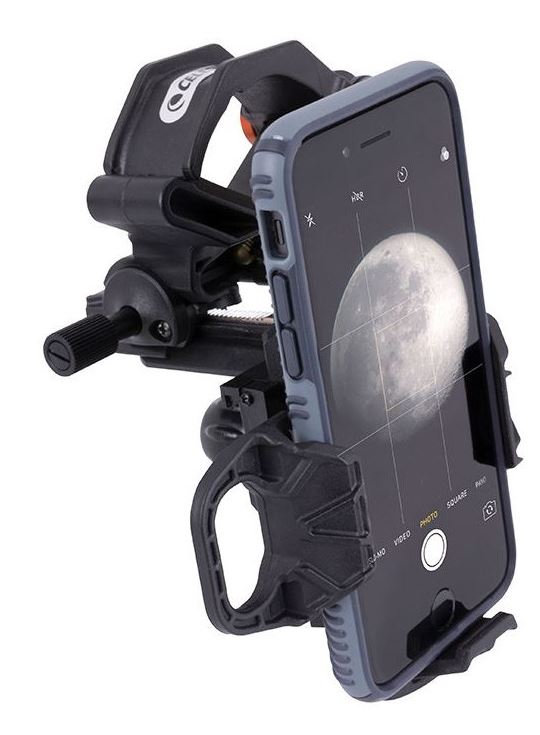
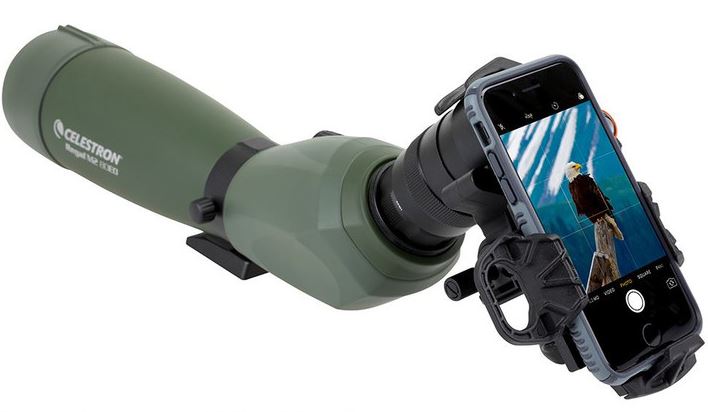
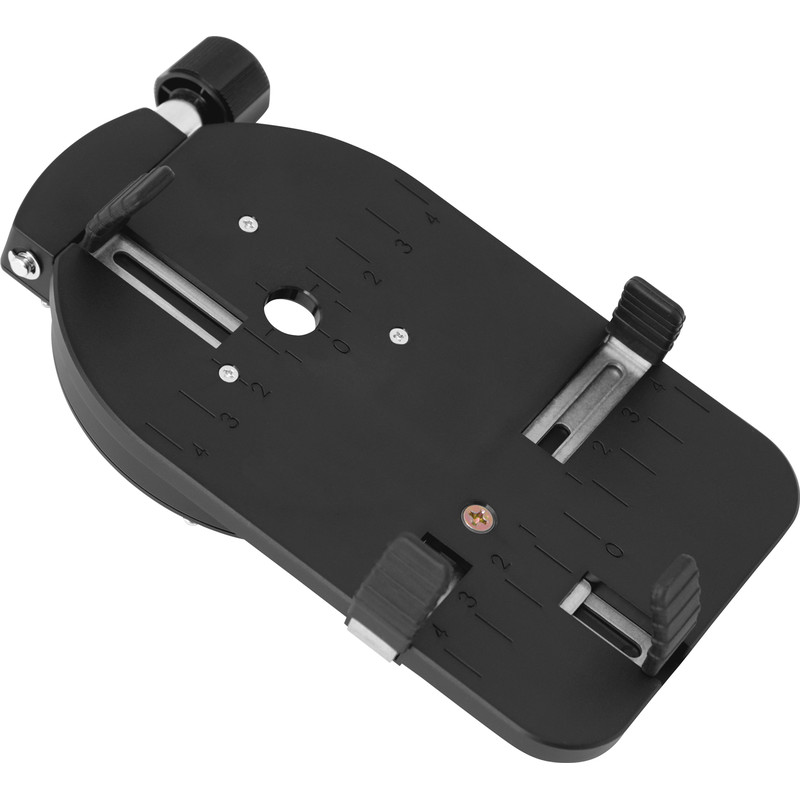
The trend of using smartphone cameras for photography with optical instruments has remained steady. This is, of course, an obvious choice because everyone has this camera with them, ready to send pictures; and these cameras are always improving. The large range ofsmartphone mounts has been extended by Celestron, adding a very interesting model.
The Celestron NexYZ is not only particularly robust; it can be adjusted in all three axes using a rotary knob. This means you’ll be able to set the perfect distance between the eyepiece and the adapter. This feature, in combination with the ease, with which the smartphone can be changed, is interesting for public shots at observatories, because all visitors want to take their personal moon photo home with them.
The clamp of the NexYZ adapter is also wonderfully suited for use on spotting scopes.
With the NexYZ adapter, we are offering you a smartphone holder with the usual clever design by Celestron.
Attention all lovers of nature, amateur astronomers and night owls: the night of the 27th of July, 2018 will be totally different. In this particular night, we will experience the Opposition of Mars and a rare Total Lunar Eclipse in Europe! It is sure to be a midnight Summer dream, in the middle of warm temperatures and mystical experiences.
In this article, you will learn about, that which you can use to observe and photograph the Total Lunar Eclipse and Mars.
Another interesting point: currently, there are a number of other planets to see. Now is the perfect opportunity to jump into Astronomy. You will be rewarded with a fireworks show of planets. Mars, Jupiter, Venus and Saturn are waiting for you to rediscover them!
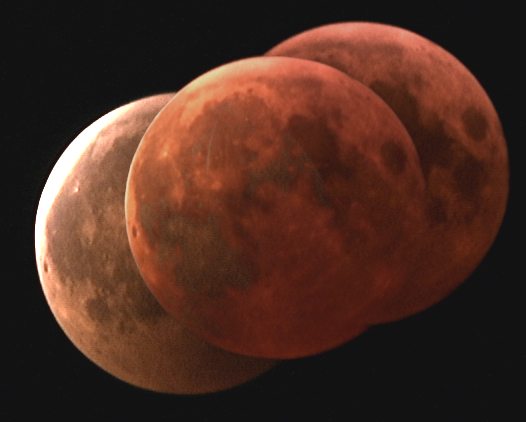
As the night slowly falls, the Moon will rise in the southeast. Our satellite will look unusual and simultaneously fascinating. Almost completely eclipsed, it will rise higher and higher. The “blood Moon”, which evoked fears and superstitions of death and destruction in earlier times, will be visible for us to witness with our knowledge and science in a relaxing manner and with a smile.
The highlight of this year: at a length of 1 hour and 44 minutes of totality, we will get to enjoy the longest Lunar Eclipse of the century! More information about this event is available below.
Now you can read on to learn about the 5 ways and effective products, to observe the Moon and the Planets. Let’s go!
1. Discover the Sky with Binoculars
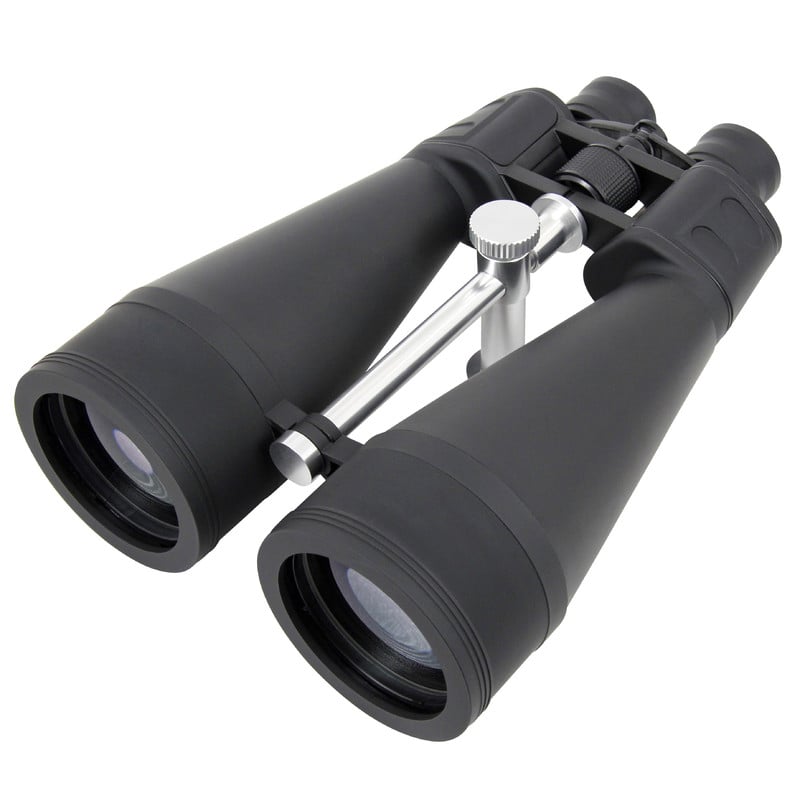
The lunar eclipse is visible with the naked eye, but with a pair of binoculars, the Moon in the Earth’s shadow becomes an especially intense experience. For an great observation, we recommend the Omegon Binoculars Nightstar 20×80. These binos are a great alternative to a telescope or as an entry into Astronomy. They are bright and something that you can always carry with you. Just point the binos to the sky or mount them on a tripod. Then you will see the Moon in all its glory and innumerable craters. It is amazing with both eyes, as if you were there. But there is more. You can can even view Jupiter and its moons as well as starclusters, such as the Pleiades or the Andromeda Galaxy.
The Omegon Binoculars 20×80
2. Getting closer with a telescope
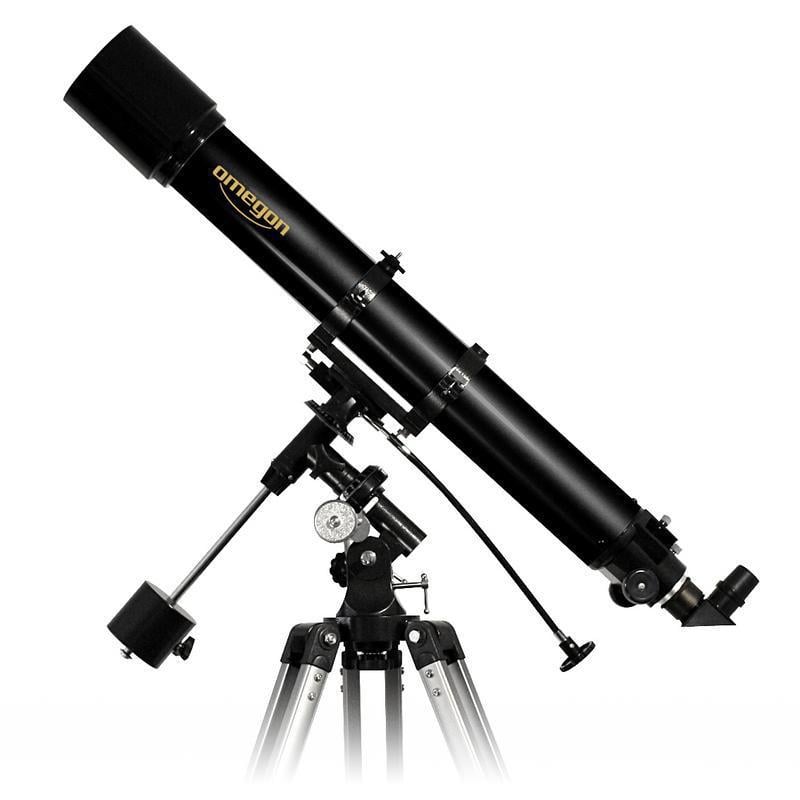
Much like a mega zoom into the cosmos: A telescope allows you to see real detail. Observe the entire Moon, singular lunar craters, Jupiter, or Saturn with its massive system of rings. However you want. The possibilities are endless! With a greater magnification, only available with telescopes, you will be able to see Mars for the planet that it is and not just the red “star” in the night sky. The Omegon AC 70/700 AZ-2 is the most budget-friendly entry point. With a 70mm aperture, it collects 100 times more light than the naked eye. The eyepieces enable a 35x and 70x magnification, or in combination with a barlow lense up to 140x. More details and more resolution is available in the Omegon AC 90/1000 EQ-2. The telescope is our tip for entry into lunar and planetary observing. With a 90mm aperture, you will be able to see many details, such as the cloud bands on Jupiter or the polar caps on Mars.
The Omegon AC 90/1000 EQ-2 – Recommendation for entry into Astronomy
3. The simplest way to your own astrophotos
A photo of the lunar eclipse? It’s possible with the simplest tools.
With a telescope, the path to your own photos is just a small step. The best camera for such a task is right in your pocket: your smartphone! Pick up a Smartphone adapter, which will keep your phone perfectly positioned above the eyepiece. We also offer the more budget-friendly Omegon Smartphone Adapter, which demands a bit of finesse or the Omegon Easypic Universal. This smartphone adapter is a self-centering and easy-to-use device. It only takes one minute and you will already have taken your own lunar photo.
Omegon Easypic Universal Smartphone adapter
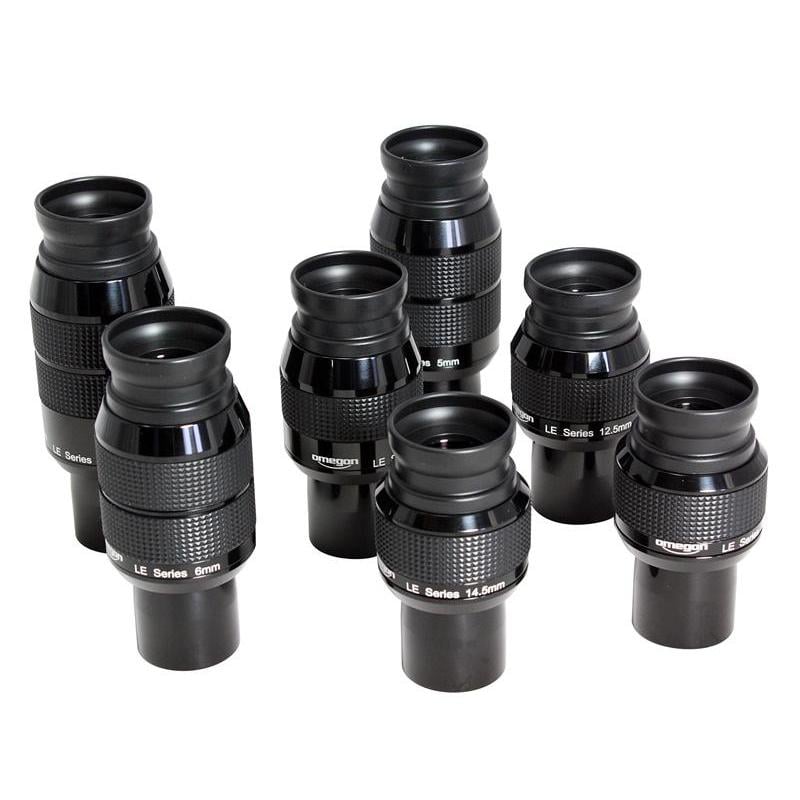
4. The right eyepiece is decisive, when it comes to details
With eyepieces, you often must separate the wheat from the chaff. An eyepiece is essentially an extended arm of the telescope’s optic and you should put a lot of stock into selection, just as you would with a telescope itself. A good tip would be to replace old or standard eyepieces with high quality ones, which can provide you with a significantly better image. Excellent crispness and great contrast can be found in the Omegon LE Planetry Eyepieces for all 1,25“. The customer reviews range from “just fantastic” to “you cannot believe it”.
The Family of Omegon LE Planetary Eyepieces
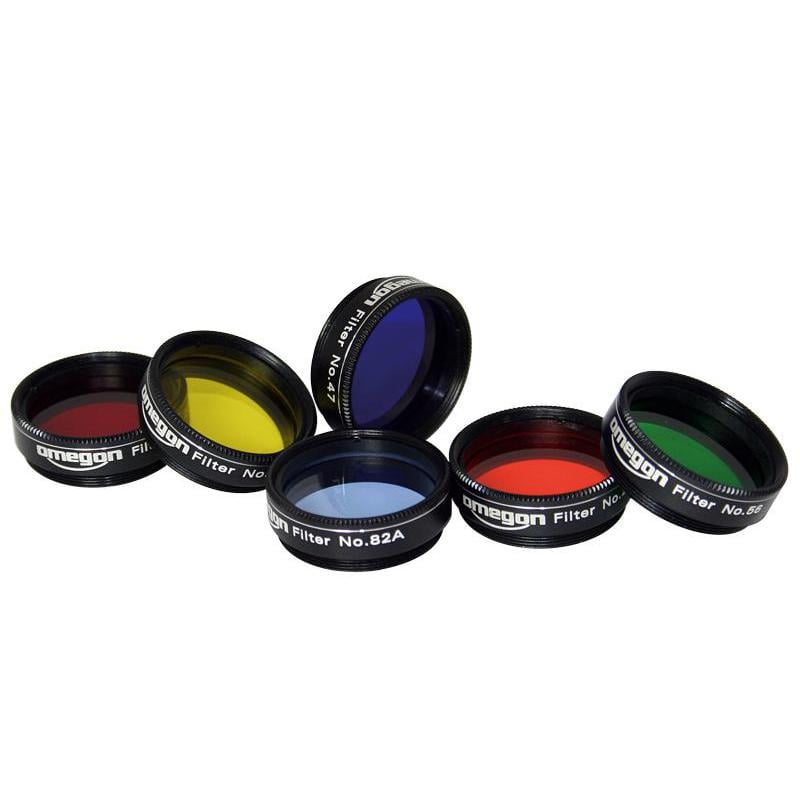
5. Color filters for better contrast
Much like a chain, the planets of Venus, Jupiter, Saturn and Mars will appear to us in a line, and all after darkness has fallen, during the most comfortable time of year. The constellation of planets is so rare, that now is the time to jump into astronomy. Amateurs can easily pinpoint the planets and see details of each. Polar caps and other structures on Mars, or the big red dot on Jupiter become more visible with the appropriate color filters. Placed into the eyepiece, filters can lead to an epiphany for any motivated observer. The Omegon Color filter set features the most important ones for all planets. Other contrast filters or our Lunar Filter are also a helpful inclusion to your collection.
Color filter set with 6 color filters
Other information about the Total Lunar Eclipse and the Mars Opposition is available here:
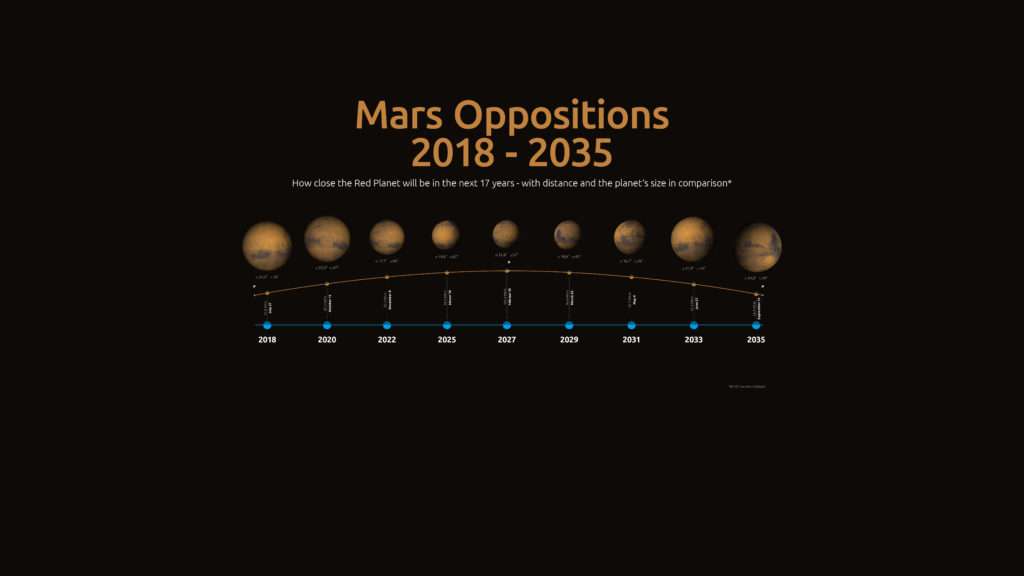
On the 27th of July, 2018, the time will finally be upon us: our neighbor, Mars, will stand in opposition to the Sun. Such an event happens every two years, but this time around is something much more special. The last time Mars was so close to Earth, during opposition, was back in 2003. This year, the red planet will come within 57 million kilometers, which is about the same distance as 15 years before. Mars will appear to be about half of the size of Jupiter, something only rarely observable, but with numerous details.
For more info about the Opposition, how to observe, which details to look for and which accessories improve your chances of a rewarding observation, read on below:
Photo: B.Gährken
Content:
Mars: The facts about a fascinating planet
The Mars Opposition: What is it?
Why only every two years?
Why will Mars be so large this year
Which Telescope?
You can see this on Mars
Helpful accessories, to improve your observation
1. Mars: The facts about a fascinating planet
With a diameter of 6,000 km, 687 day orbit and a mountain at 27,000 meters – Mars is only half as large as the Earth, but resembles our home very much. Much like Earth, Mars is home to a rocky surface with mountains, plateaus and canyons. Valles Marineris is a massive 4,000 km long canyon, with a width of 700 km, and is considered the Grand Canyon of Mars. Comparatively, our Grand Canyon is relatively small at only 450 km in length and with a 30 km width.
Mars features other similarities, with its polar ice caps and even seasons. Standing on Mars, you would also see sunrises and sunsets. You could even see Earth with a telescope. The planet even features a similar tilt in its orbital path and a day lasts 24 hours and 40 minutes.
What a nice twin, right? Many space pioneers think so. And to top it all off, recently NASA revealed clues that the planet was able to support life. There are, of course, a few disadvantages to lifing on Mars: the cold. A thick jacket won’t be enough, given that the temperatures drop to -85°C. Nevertheless, temperatures could reach about 20°C at the equator.
Even the oxygen levels and atmospheric pressure varies greatly: 95% carbon dioxide, 1.8% nitrogen und 0.1% oxygen. On Earth: 78% nitrogen and 20% oxygen. In other words, breathing on Mars would be suffocating. Take off your spacesuit and your blood would boil in short time, as if you were at 35 km in altitude above the Earth – 3 times higher than cruise altitude of a commercial jet.
2. The Mars Opposition: What is an opposition?
An opposition occurs, when Mars stands in a straight line with Earth and the Sun.
3. Why only every two years?
Mars orbits the Sun once every 687 days, so roughly 2 years. We on Earth travel a much higher speed and only require 365 days to orbit.
Imagine that both planets start at the same spot. The Earth would lap Mars at some point during its orbit. Given that Mars is also orbiting, one trip around the Sun would not suffice, however. Only after 780 days will the Earth and Mars be aligned once again. An opposition!
4. Why will Mars appear to be so large this year?
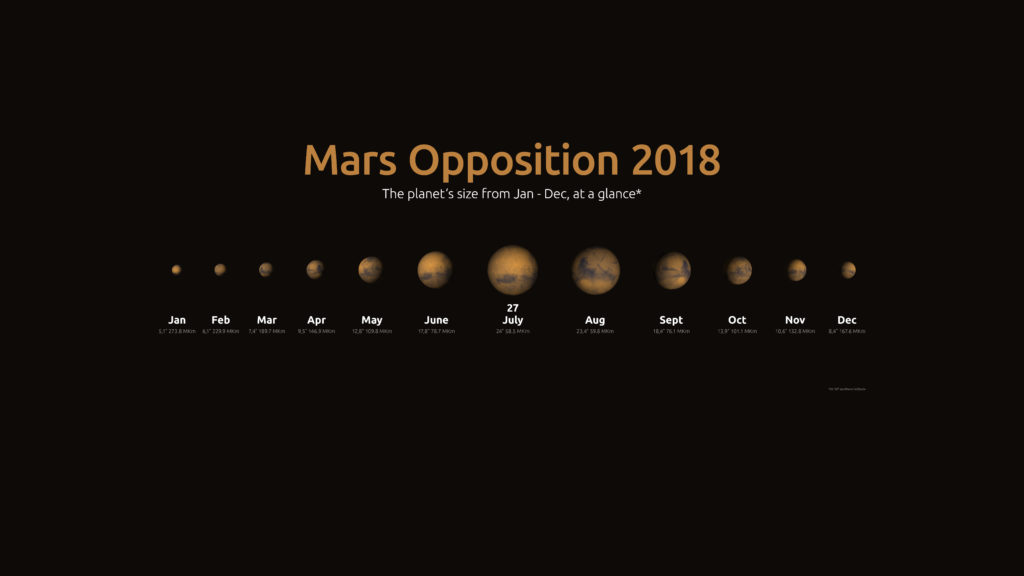
Mars is pretty conspicuous in the sky this year. The red planet rises as dusk falls, and will shine bright in the night sky until dawn. The disk will appear to be enormous! It will increase to up to 24 arc seconds. Through a telescope, Mars will appear especially large, meaning we will be able to identify many details on the surface. It is a unique chance for observers and astro-photographers. Mars only appeared slightly smaller during the Opposition of 2003.
Mars does not have a circular orbit, rather an off-center orbit around the Sun. That is why its distance to Earth can vary so greatly. Depending on the position, oppositions can vary between 101 m and 55 m km. This year: 57.7 m km. In 2020, 62.2 m km and two years later 82 m km. By year 2035, Mars will once again be about as close as this year.
For observers in the norther hemisphere, the close oppositions will take place below the celestial equator, since they occur in the Summer months. The planet will not be found high above the horizon, but rather just above it: this year, just 15°.
5. Which Telescope?
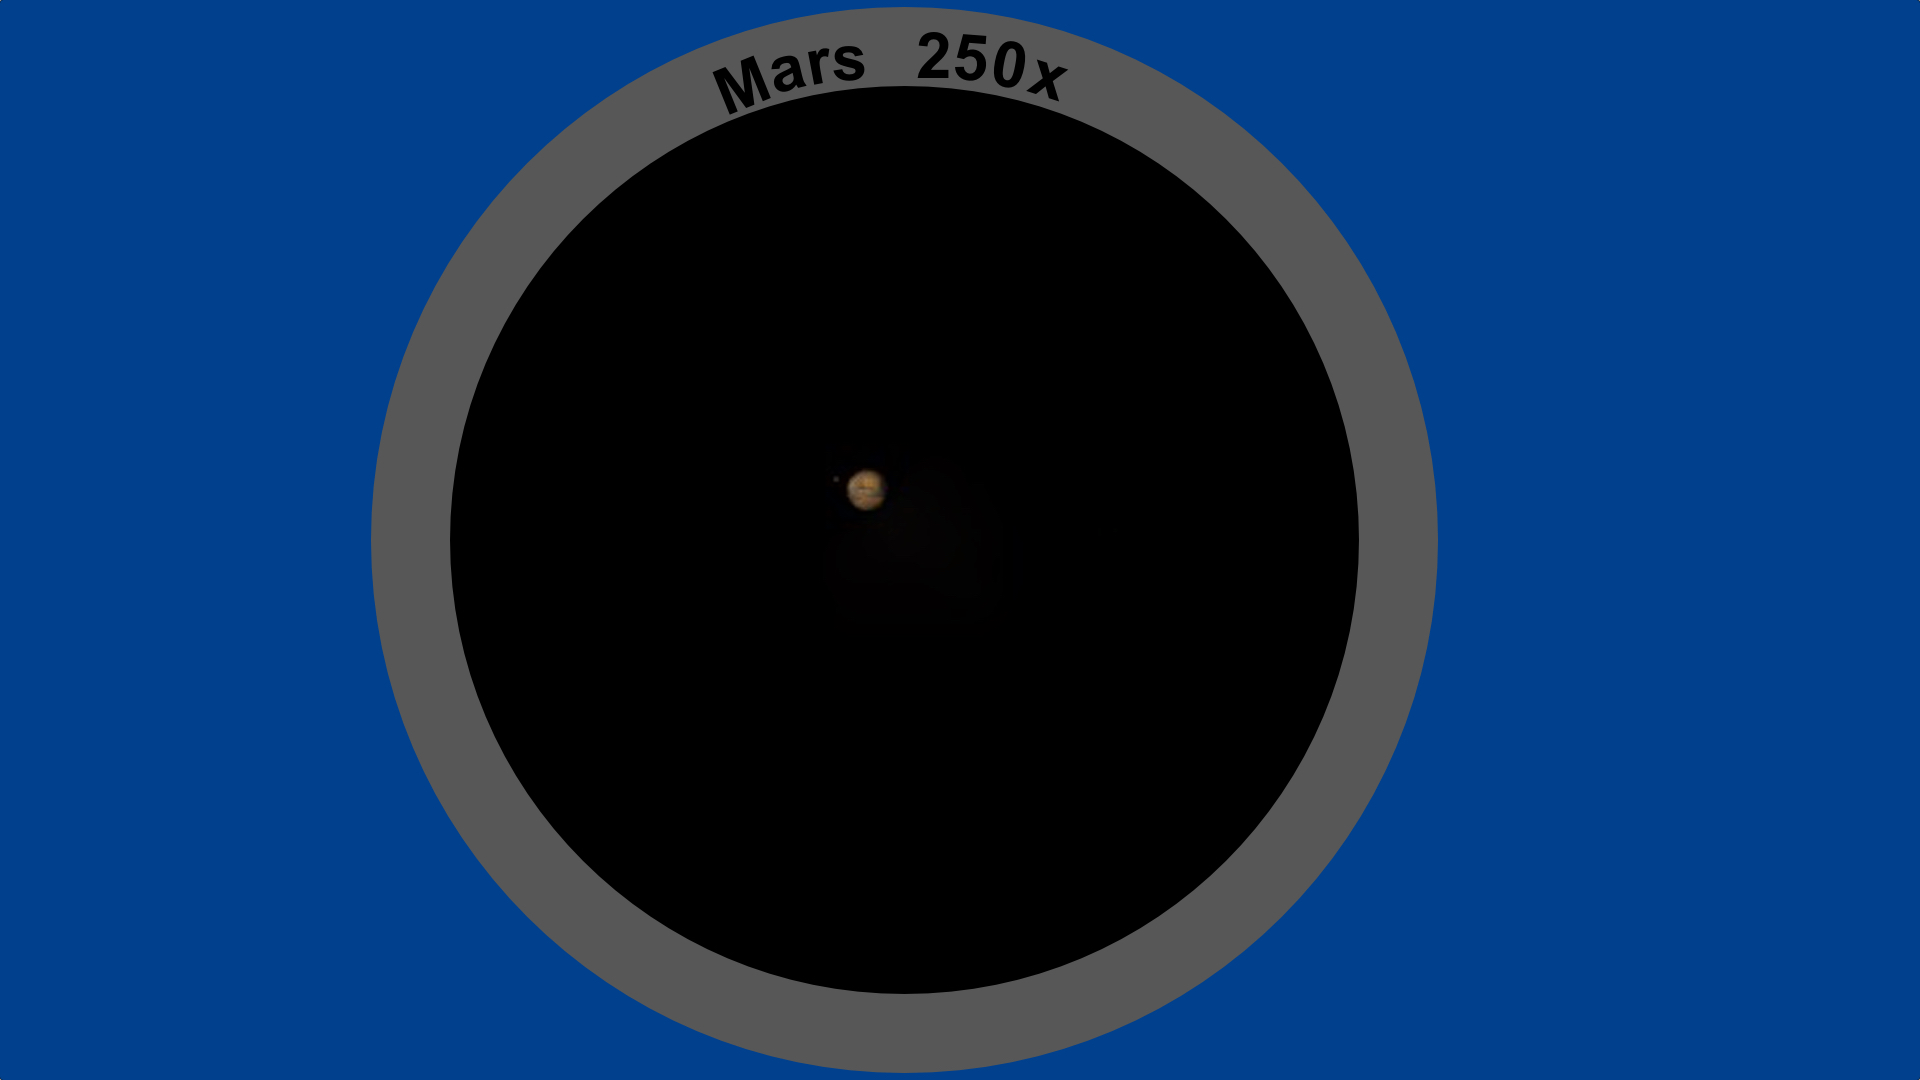
Mars is bright and an object, that you can see with the naked eye. It will rise late in the eveing in the south west, climbing ever higher and reaching its meridian on 27th of July, 2018. Shortly before sunrise, the red planet will once again disappear under the horizon. You cannot miss Mars, since it will be the only bright object with a very bright and red color.
During the opposition, Mars will be quite large. That is why you could use just about every telescope to have a look at the planet, even a telescope with a 70-80 mm aperture. A good beginner’s scope for planets would be the Omegon AC 90/1000 EQ-2. With an intermediate or large telescope from 150 – 200 mm, you will be able to enjoy a greater resolution, which is important if you want to be able to see the small details. Keep an eye out that the telescope is well calibrated and adjusted for the temperature outside – important factors for a good, contrast-rich image. Many observers cherish Dobson telescopes, since they are inexpensive, bright, and easy to work with.
Mars through a telescope
To view Mars, use a magnification of at least 100. Reason is, the small the planet, the more difficult it will be to see detail. Shorter focal lengths additionally afford you the greatest magnification. Magnifications of 200 – 300x are sensible to use. Hint: high-quality Televue Eyepieces on Sale are available here.
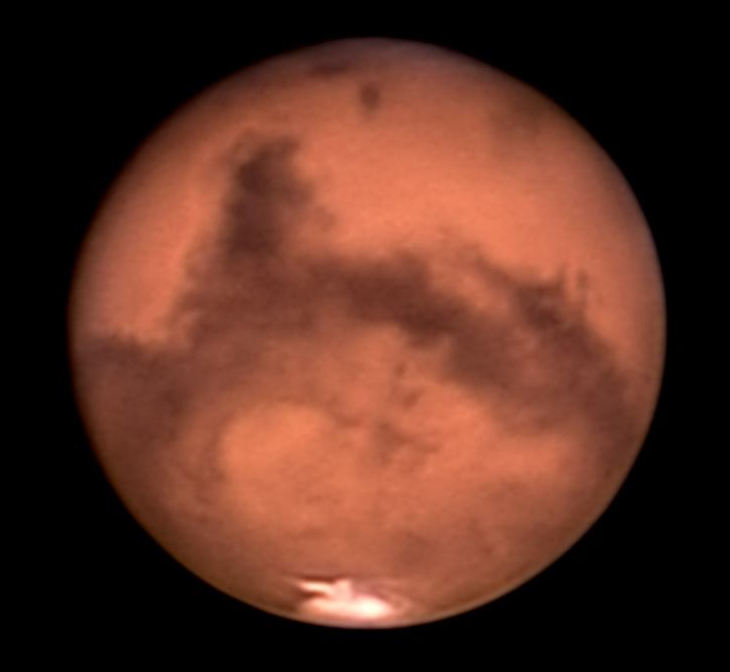
6. What to See on Mars
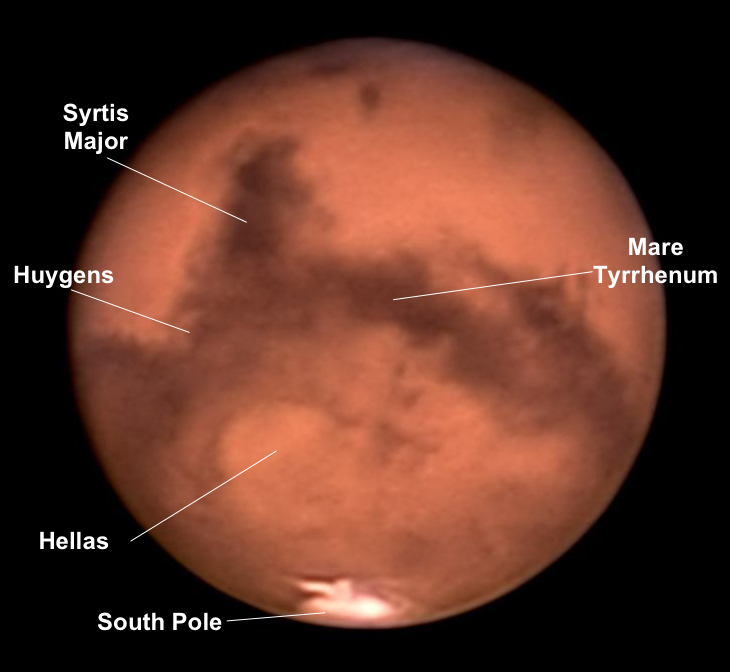
If you have a telescope of 100x, mars will appears only as red ball. With patience, you should be able to identify the bright, white polar caps.
Mars with notations, Image: B. Gährken
The most noticeable dark area on the red planet is the Syrte, which is a large, dust-free, and high plateau with a width of 1,300 km. The area lies close to the equator and should be noticeable with an intermediate telescope. The Hellas Basin is a large, bright region, found south of Syrte and often home to storms. Of course, we will only be able to see these two regions, if Mars happens to be sharing this side of itself. Additionally, white clouds of meteorological phenomena can be seen with larger telescopes and color filters.
A foldable “Mars Map” from Orion is helpful in preparing for observations and photography.
7. Helpful Accessories
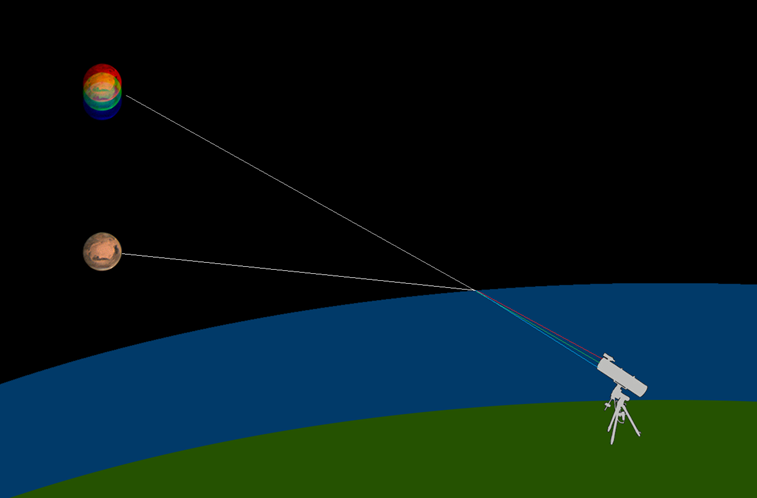
The ADC Corrector: for more contrast on the horizon
If we observe an object just above the horizon, the object could already set. The light of the cosmos is often distorted, while passing through the atmostphere or bowed. We see the same effect, for example, in a glass of water or a straw. The water is an optically dense medium – just as a straw would in a different way. Our atmosphere does the same.
A Schmidt-Cassegrain Telescope with ADC and a Toupek camera
Is that a problem? Indeed, when we talk about an astronomical object. Blue and red light is distorted in different ways. Objects then exhibit a colored edge and appear to be contrast-less. The images are just less sharp, than those higher in the sky.
The ADC from Omegon produces – if you will – a negative color defect, which works against the atmosphere. The planet Mars plays a role here. Mars appears, to float just a bit higher. When one of our colleagues tested the ADC the first time, he noted, “The effect was massive. It appeared as if the telescope was suddenly replaced with another.”
The atmosphere has an effect, like a simple lens and the colors of light are dispersed in various ways. An object appears higher, as a result, than it really is, in addition to color fringes. Image sources: NASA/JPL Solar System Simulator, Courtesy NASA/JPL-Caltech https://space.jpl.nasa.gov/.
In the next few years, many of the planets will be found quite close to the horizon. But, the ADC is your best hope. You can use it for visual observations, as well as for photography. Putting it to use is also quite simple: just place it into the recess, where the eyepieces normally is attached.
The advantages of the ADC in a nutshell:
ADC corrects atmospheric dispersion
Color fringes are reduced or disappear
Sharpness and contrast increase, as if the planet were higher in the sky
Just put it in the eyepiece recess and adjust the prisms.
Color filters: to unlock Mars’ detailed surface
Color filters are very useful for planetary observations, since they increase contrasts and make many details visible, which you may not see otherwise. The only requirement is that you should have some experience in observing, because seeing in astronomy is learned.
Color filters are available in sizes 1.25″ or 2″ and are simply screwed into the threads of the eyepiece.
But which details can you see on Mars?
Color filters are screwed directlz into the thread of your eyepiece.
Green filter: with it, you can directly enhance the surface, clouds and freezing fog.
Blue filter: only used for freezing fog and clouds.
Yellow filter: Great for seeing the occasional several week-long dust storm on the surface, by brightening such areas.
Orange and Red filters: Orange filters enhance the bright/dark structures of the surface and are the standard filter for observing Mars. The red filter does the same, but only utilized in large telescopes.
Tip: There are also special Mars filters, which increases greatly the contrasts of the red planet.
Filter wheel: For the quick switch
When you want to use several different filters, we recommend the filter wheel, for a quick switch between filter types.
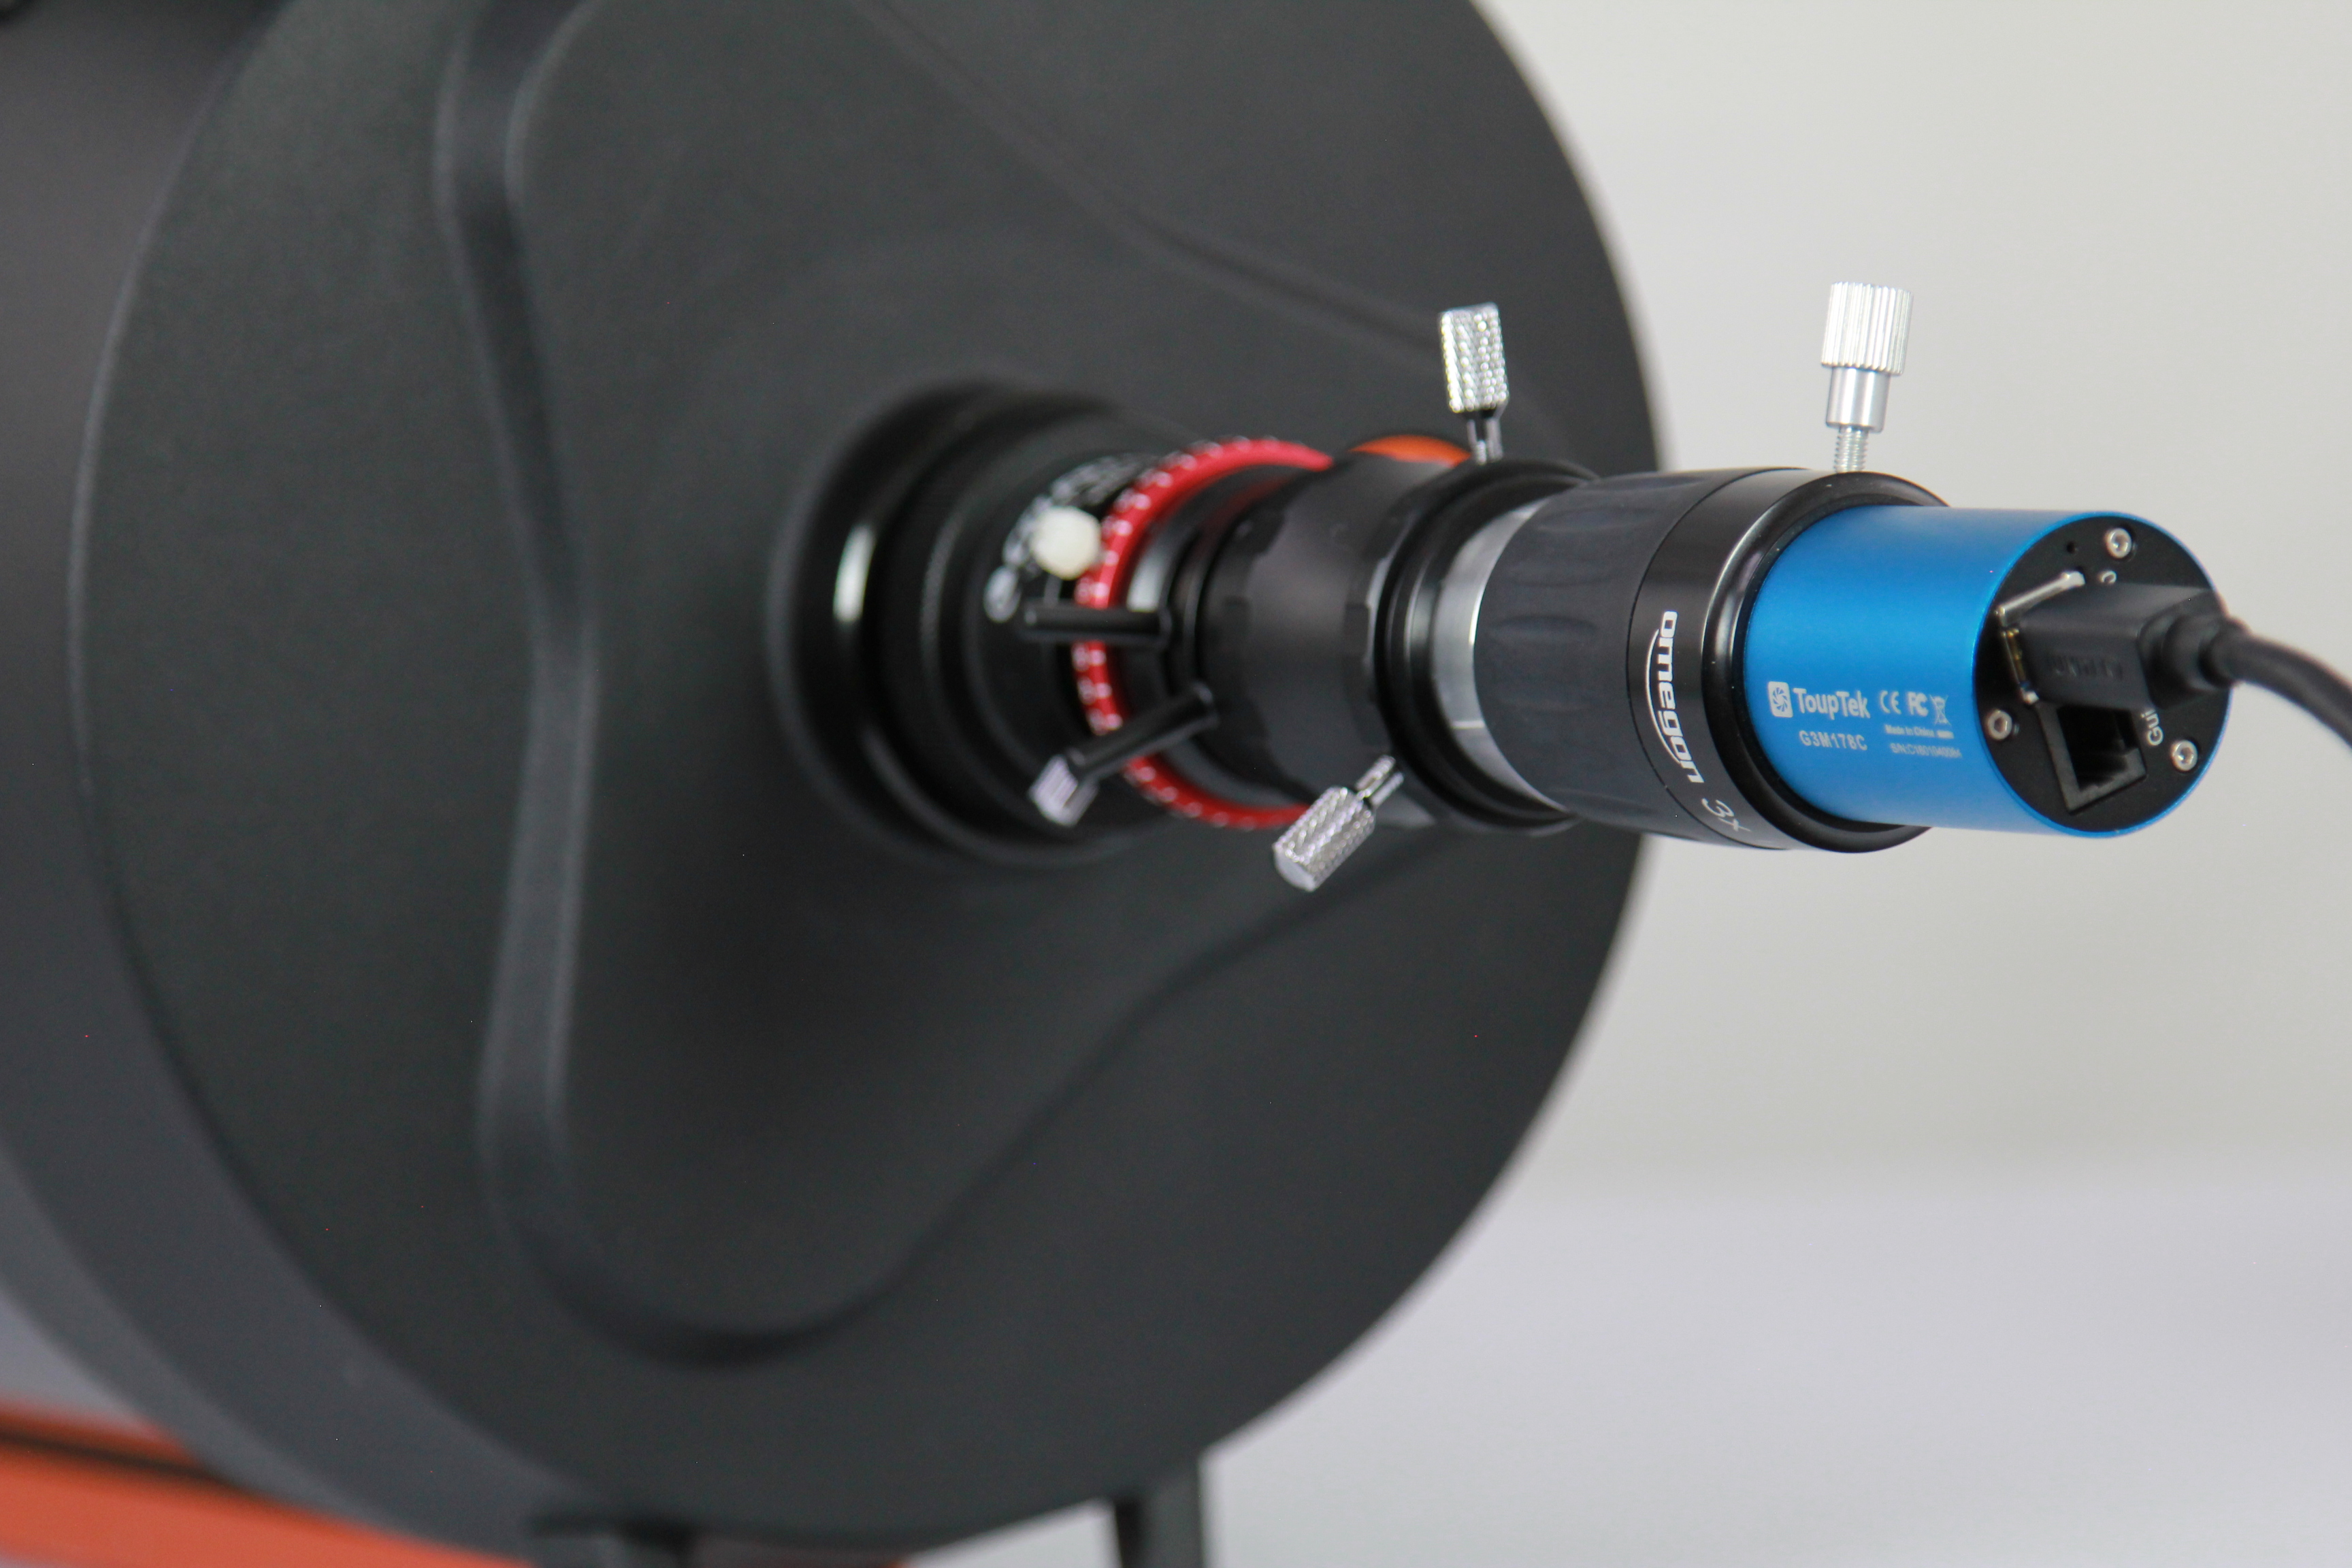
Camera: Capture Mars
Do you want to photograph Mars? Then get your hands on a Touptek Camera G3M178C, which offers a high sensitivity and a resolution of 6.4 megapixels. Plus, it is extremely fast. With 59 images per second, you can put the shortest moments to use, resulting in sharp images of the red planet.
The assembly of a successful Mars photography session: a Touptek camera, a barlow lens with a flip mirror and an eyepiece.
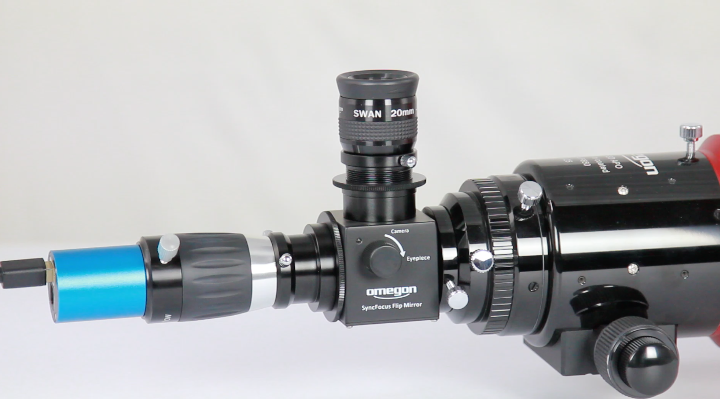
Flip Mirror
A great aid for planetary photography, making centering the planet in the dark hours no contest. With a flip mirror, you can switch between an eyepiece and camera in mere seconds.
Get out and observe!
Don’t wait until the year 2035! This Summer is a great opportunity to marvel at Mars in all its glory. In contrast to the opposition in 2003, camera technology has come quite a long way. Instruments like the ADC additionally enable you to view objects on the horizon. Get your telescope read and have a look at our nearest neighbor this Summer!
Product tip: Want to show your enthusiasm? Then get your hands on the Mars T-shirt! The backside features all the info of the opposition: distance, size, and brightness. Order now!
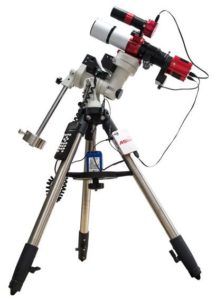
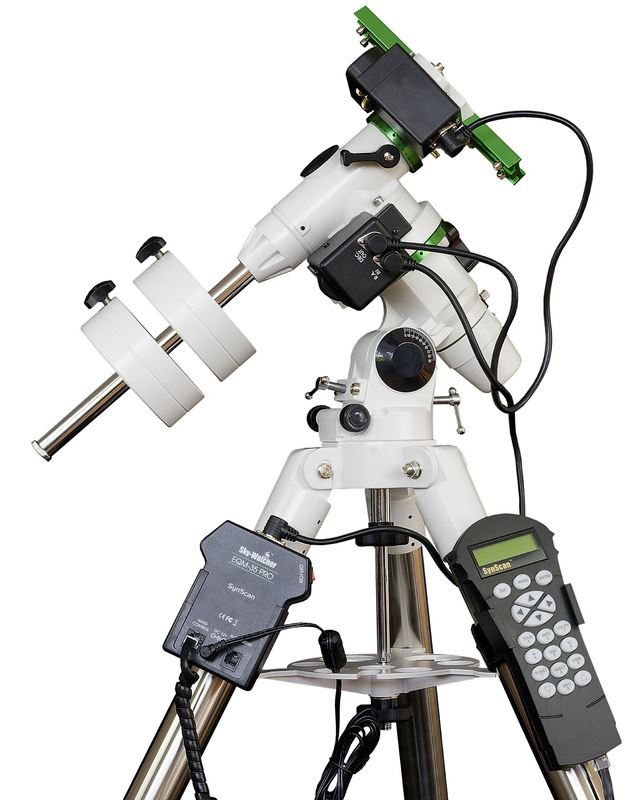
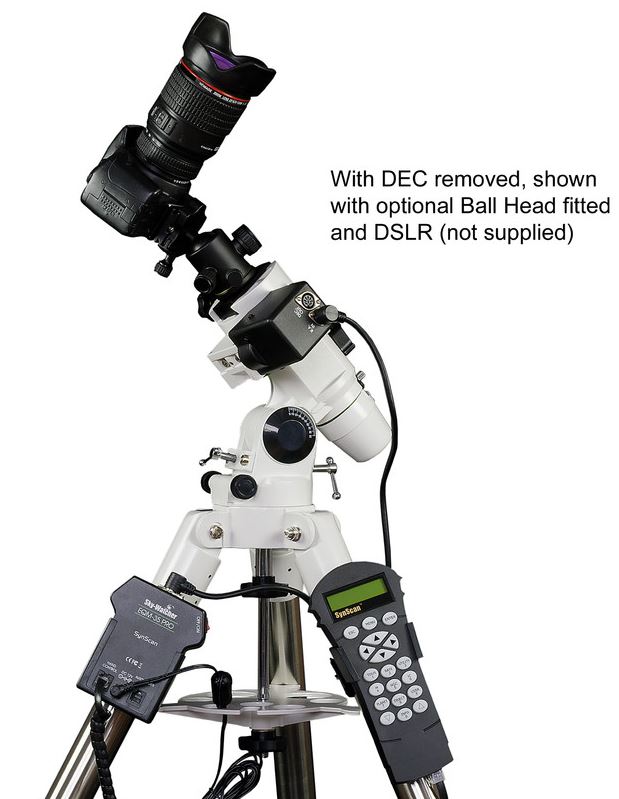
Many amateur astronomers started their hobby with the EQ-3 by Skywatcher. There’s one reason: The mount is excellent value for money and easy to transport. It can be used as an equatorial mount with motorised tracking for astrophotography and offers the functionality of larger mounts with its SynScan control.
Combine the EQM-35 Pro with a 6-inch telescope. The much-loved Newton optics N 150/750 is very suitable. You will receive this telescope with an improved eyepiece holder: N 150/750 PDS Explorer BD. It has a gear reduction that is useful for astrophotography. If you are interested mainly in photography, the new apochromatic refractor EvoStar 72 ED would be a great choice!
The special highlight of the EQM-35 Pro is the removal declination axis. This way you can use it as a photo mount , with a camera and lens taking the place of the telescope. The EQM-35 Pro then tracks the sky’s rotation, allowing long-exposure shots of larger constellations.
With the new EQM-35 Pro, you’ll be getting a versatile and very light mount on a sturdy steel tube tripod. A very good choice for taking up astronomy as a hobby without breaking the bank and a good travel mount for experienced astrophotographers.
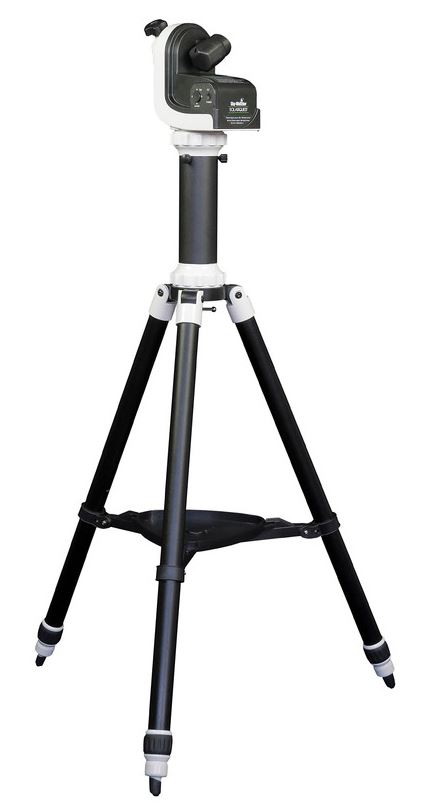
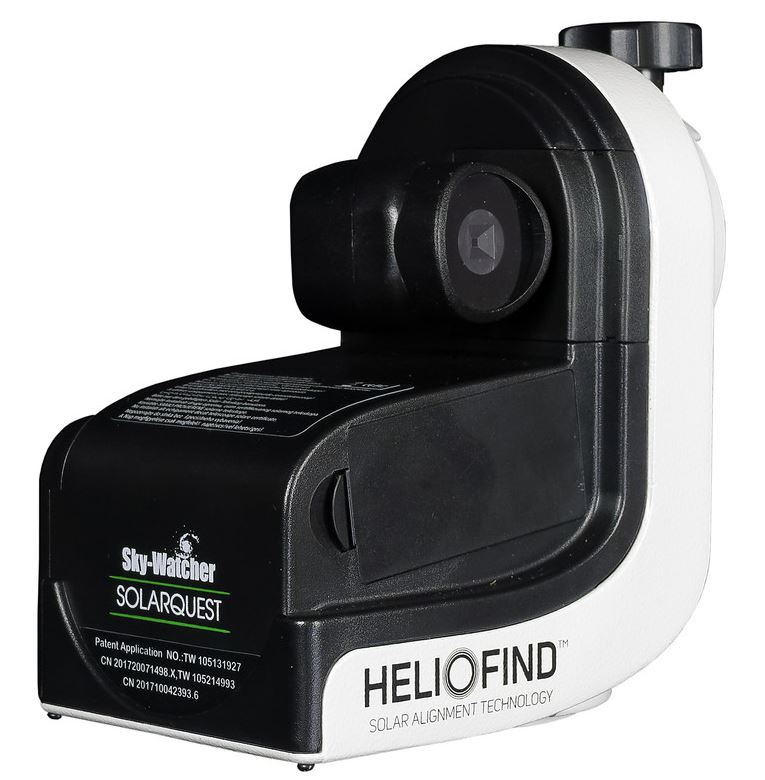
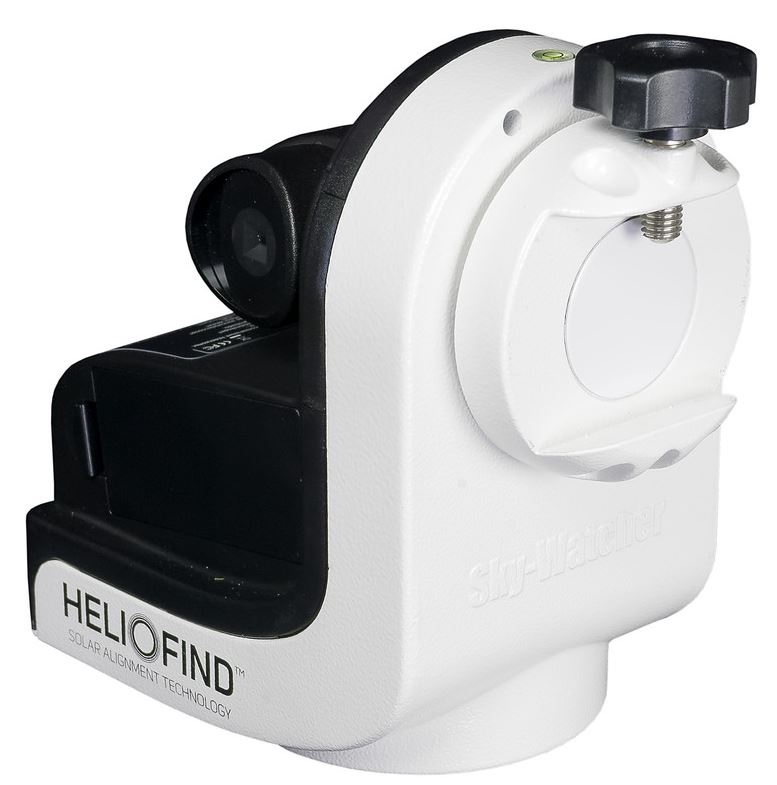
Adjusting your telescope while observing the sun is not as easy as you might at first think. The telescope should, of course, already be oriented towards the sun using a sun filter before setting up. When attempting to orient the telescope towards the sun, you can quickly become careless and peer without eye protection through the telescope at the blazing sun. Help is at hand here with the solar finder or the new Solarquest mount by Skywatcher.
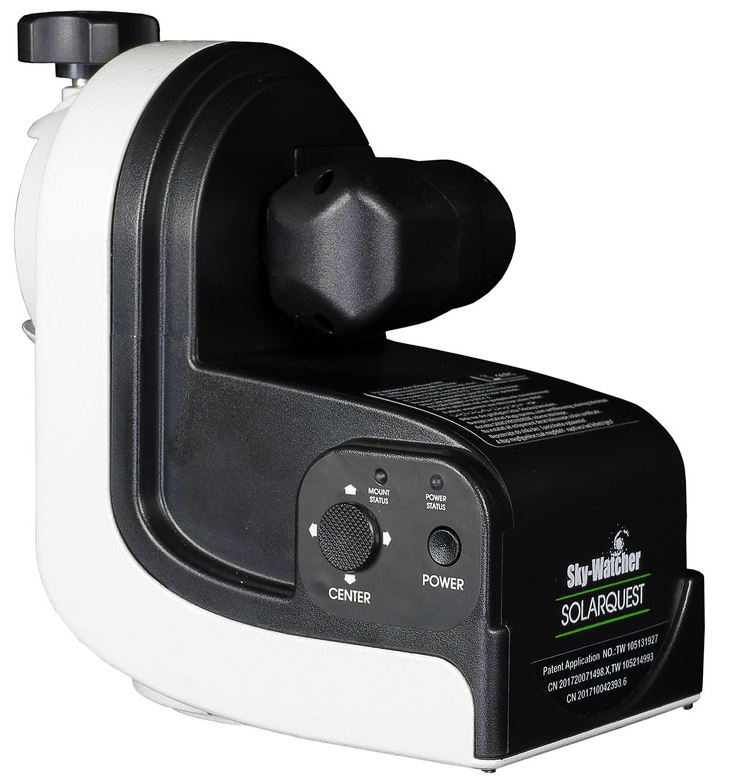
The Solarquest mount has GPS, an automatic level and an electronic solar finder, Heliofind®. You only have to fit the mount. After a short initialisation, the mount moves by itself to the sun. But, of course, the Solarquest can do more than that: The mount guides the telescope as the sun moves across the sky, so that it is always in line with the eyepiece or camera sensor. This precise tracking can also be done via the built-in Heliofind® finder.
Of course, you can also correct the orientation of the mount by hand, for example, if you are working with greater magnification, and would like to move to a specific place on the solar disc. To do this, there is a slider button on the mount so you can guide the movement yourself.
The azimuthal single arm mount, Solarquest, can hold small optics weighing up to four kilos, making it especially light and quiet. The Solarquest, in combination with a small sun telescope, forms an easy-to-transport system that is quick to set up – that is both particularly comfortable on your balcony at home and ideal for travel or for training purposes.
You can also place a small refractor on the Solarquest and fit a sun filter to it. In combination with a QUARK by DayStar, it is even possible to observe in H-alpha or Calcium-H light. You can even use it for night astronomy without a sun filter using the Solarquest mount. The Solarquest mount becomes a part of your versatile system for night observation.